Cirkit Designer Logo
Cirkit Designer
Your all-in-one circuit design IDE
Home / 
Component Documentation

How to Use Light Sensor: Examples, Pinouts, and Specs

Image of Light Sensor
Cirkit Designer LogoDesign with Light Sensor in Cirkit Designer

Introduction

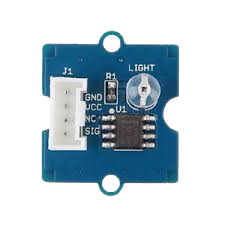
The Grove Light Sensor is an electronic component designed to measure ambient light intensity. It is widely used in applications such as automatic lighting control, daylight harvesting, and in systems that adjust brightness levels for displays and keyboards based on the surrounding light conditions. Manufactured by Seeed Studio, this sensor is part of the Grove modular system, which simplifies the process of connecting to a microcontroller such as an Arduino UNO.

Explore Projects Built with Light Sensor

Use Cirkit Designer to design, explore, and prototype these projects online. Some projects support real-time simulation. Click "Open Project" to start designing instantly!
Arduino UNO-Based Smart Street Light Control with PIR and LDR Sensors
Image of street light: A project utilizing Light Sensor in a practical application
This circuit is a street light control system using an Arduino UNO, LDR sensor, and two PIR sensors. The LDR sensor determines day or night, turning on three LEDs at night via a transistor switch, while the PIR sensors detect motion to activate an additional LED.
Cirkit Designer LogoOpen Project in Cirkit Designer
Arduino UNO-Based Smart Street Light Control with LDR and PIR Sensors
Image of Copy of street light: A project utilizing Light Sensor in a practical application
This circuit is a street light control system using an Arduino UNO, LDR sensor, and two PIR sensors. The LDR sensor detects day or night to control three LEDs via a transistor switch, while the PIR sensors detect motion to turn on an additional LED for enhanced illumination.
Cirkit Designer LogoOpen Project in Cirkit Designer
Arduino UNO-Based Smart Street Light Control with LDR and PIR Sensors
Image of street light: A project utilizing Light Sensor in a practical application
This circuit is a street light control system using an Arduino UNO, LDR sensor, and two PIR sensors. The LDR sensor determines day or night to control three LEDs via a transistor switch, while the PIR sensors detect motion to turn on an additional LED for enhanced illumination.
Cirkit Designer LogoOpen Project in Cirkit Designer
Arduino UNO-Based Smart Street Light Control with LDR and PIR Sensors
Image of street light: A project utilizing Light Sensor in a practical application
This circuit is a street light control system using an Arduino UNO, LDR sensor, PIR sensors, and LEDs. The LDR sensor detects day or night to control three LEDs via a transistor switch, while the PIR sensors detect motion to turn on an additional LED for enhanced illumination.
Cirkit Designer LogoOpen Project in Cirkit Designer

Explore Projects Built with Light Sensor

Use Cirkit Designer to design, explore, and prototype these projects online. Some projects support real-time simulation. Click "Open Project" to start designing instantly!
Image of street light: A project utilizing Light Sensor in a practical application
Arduino UNO-Based Smart Street Light Control with PIR and LDR Sensors
This circuit is a street light control system using an Arduino UNO, LDR sensor, and two PIR sensors. The LDR sensor determines day or night, turning on three LEDs at night via a transistor switch, while the PIR sensors detect motion to activate an additional LED.
Cirkit Designer LogoOpen Project in Cirkit Designer
Image of Copy of street light: A project utilizing Light Sensor in a practical application
Arduino UNO-Based Smart Street Light Control with LDR and PIR Sensors
This circuit is a street light control system using an Arduino UNO, LDR sensor, and two PIR sensors. The LDR sensor detects day or night to control three LEDs via a transistor switch, while the PIR sensors detect motion to turn on an additional LED for enhanced illumination.
Cirkit Designer LogoOpen Project in Cirkit Designer
Image of street light: A project utilizing Light Sensor in a practical application
Arduino UNO-Based Smart Street Light Control with LDR and PIR Sensors
This circuit is a street light control system using an Arduino UNO, LDR sensor, and two PIR sensors. The LDR sensor determines day or night to control three LEDs via a transistor switch, while the PIR sensors detect motion to turn on an additional LED for enhanced illumination.
Cirkit Designer LogoOpen Project in Cirkit Designer
Image of street light: A project utilizing Light Sensor in a practical application
Arduino UNO-Based Smart Street Light Control with LDR and PIR Sensors
This circuit is a street light control system using an Arduino UNO, LDR sensor, PIR sensors, and LEDs. The LDR sensor detects day or night to control three LEDs via a transistor switch, while the PIR sensors detect motion to turn on an additional LED for enhanced illumination.
Cirkit Designer LogoOpen Project in Cirkit Designer

Technical Specifications

Key Technical Details

  • Operating Voltage: 3.3V to 5V
  • Sensitivity: Adjustable via onboard potentiometer
  • Response Spectrum: 300-1000nm (peak sensitivity at 550nm)
  • Operating Temperature: -40°C to 85°C
  • Interface: Analog

Pin Configuration and Descriptions

Pin Number Description
1 GND (Ground)
2 VCC (Power Supply)
3 NC (Not Connected)
4 SIG (Analog Signal)

Usage Instructions

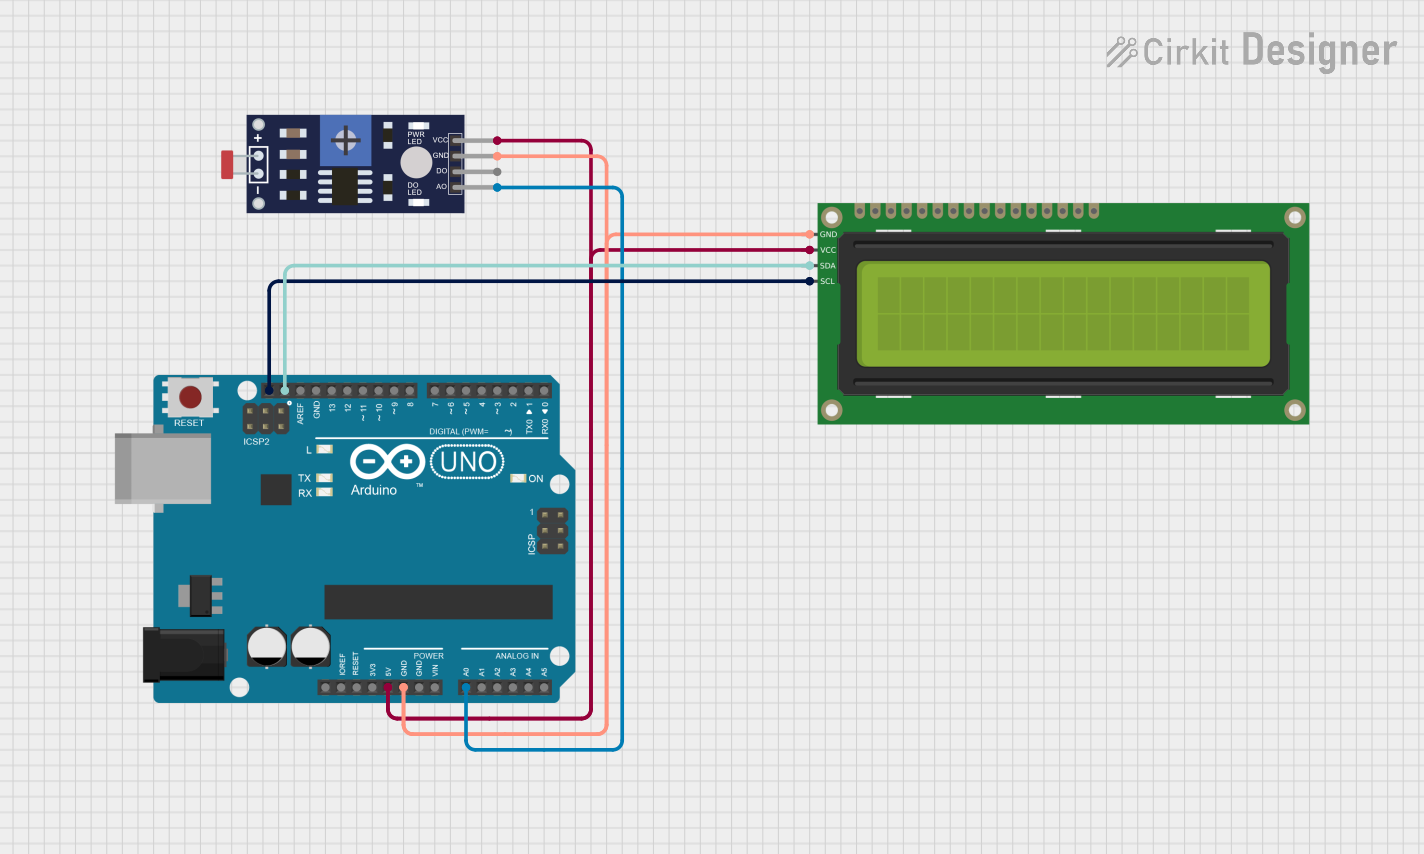
Connecting to a Circuit

To use the Grove Light Sensor with an Arduino UNO, follow these steps:

  1. Connect the sensor to the Arduino using a Grove cable.
  2. Plug one end of the cable into the Grove Light Sensor's four-pin connector.
  3. Connect the other end to the A0 (analog input) connector on the Grove Base Shield attached to the Arduino UNO.
  4. Ensure that the Base Shield is powered with a voltage compatible with the sensor (3.3V or 5V).

Programming the Arduino

Here is a sample code snippet to read the light intensity from the Grove Light Sensor:

// Define the sensor pin
const int lightSensorPin = A0;

void setup() {
  // Initialize serial communication at 9600 bits per second:
  Serial.begin(9600);
}

void loop() {
  // Read the input on analog pin 0:
  int sensorValue = analogRead(lightSensorPin);
  // Convert the analog reading to voltage
  float voltage = sensorValue * (5.0 / 1023.0);
  // Print out the value in the Serial Monitor
  Serial.println(voltage);
  // Delay for a bit to avoid spamming the serial output
  delay(1000);
}

Important Considerations and Best Practices

  • Avoid exposing the sensor to direct sunlight or strong artificial light sources that could damage the sensor.
  • Use the onboard potentiometer to adjust the sensitivity based on the application's requirements.
  • When integrating into a system, ensure that the sensor is placed where it can accurately measure the ambient light without obstruction.

Troubleshooting and FAQs

Common Issues

  • Inaccurate Readings: Ensure that the sensor is not being affected by nearby light sources and that it has been calibrated correctly using the onboard potentiometer.
  • No Readings: Check the connections to the Arduino and ensure that the correct pin is being used in the code. Also, verify that the Grove Base Shield is properly seated on the Arduino UNO.

Solutions and Tips for Troubleshooting

  • If the sensor is not responding, try using another analog pin and update the code accordingly.
  • Ensure that the sensor is not subjected to extreme temperatures that exceed its operating range.
  • If the readings are erratic, consider adding a delay in the loop to stabilize the readings.

FAQs

Q: Can the Grove Light Sensor be used outdoors? A: Yes, but it should be protected from direct sunlight and harsh weather conditions to ensure longevity and accurate readings.

Q: How do I calibrate the sensor? A: Turn the onboard potentiometer clockwise or counterclockwise while monitoring the output until you achieve the desired sensitivity.

Q: What is the resolution of the sensor? A: The resolution depends on the analog-to-digital converter (ADC) of the microcontroller. For an Arduino UNO, it is 10 bits (0-1023).

For further assistance, please refer to the Seeed Studio community forums or contact technical support.