How to Use GRAVITY I2C WATTMETER: Examples, Pinouts, and Specs
Introduction
The GRAVITY I2C WATTMETER (Part ID: WATTMETER) is a digital power meter designed to measure voltage, current, and power consumption in real-time. It utilizes the I2C communication protocol, making it easy to integrate into microcontroller-based systems. This component is ideal for applications such as energy monitoring, battery management, and power optimization in electronic devices.
Explore Projects Built with GRAVITY I2C WATTMETER


Explore Projects Built with GRAVITY I2C WATTMETER
Common Applications and Use Cases
- Monitoring energy usage in IoT devices
- Battery-powered system diagnostics
- Power consumption analysis in embedded systems
- Renewable energy projects (e.g., solar or wind power systems)
- Educational projects for learning about power measurement
Technical Specifications
The GRAVITY I2C WATTMETER is designed for precision and ease of use. Below are its key technical details:
Key Specifications
| Parameter | Value |
|---|---|
| Operating Voltage | 3.3V to 5V |
| Measurement Voltage Range | 0V to 26V |
| Measurement Current Range | 0A to 3.2A |
| Communication Protocol | I2C |
| I2C Address (Default) | 0x40 |
| Power Consumption | < 10mA |
| Measurement Accuracy | ±1% |
| Operating Temperature | -40°C to 85°C |
| Dimensions | 42mm x 32mm |
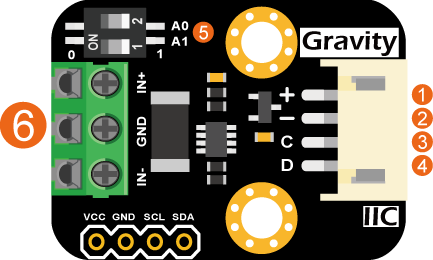
Pin Configuration
The GRAVITY I2C WATTMETER has a 4-pin interface for easy connection. Below is the pinout:
| Pin Name | Description |
|---|---|
| VCC | Power supply input (3.3V to 5V) |
| GND | Ground |
| SDA | I2C data line |
| SCL | I2C clock line |
Usage Instructions
The GRAVITY I2C WATTMETER is straightforward to use in a circuit. Follow the steps below to integrate it into your project:
Connecting the Wattmeter
- Power Supply: Connect the
VCCpin to a 3.3V or 5V power source and theGNDpin to ground. - I2C Communication: Connect the
SDApin to the I2C data line and theSCLpin to the I2C clock line of your microcontroller. - Load Connection: Connect the load (device to be monitored) to the wattmeter's input and output terminals as per the wiring diagram provided in the datasheet.
Important Considerations
- Ensure the voltage and current of the load do not exceed the wattmeter's maximum ratings (26V and 3.2A).
- Use pull-up resistors (typically 4.7kΩ) on the
SDAandSCLlines if your microcontroller does not have internal pull-ups. - Avoid noisy environments or use proper shielding to maintain measurement accuracy.
Example: Using with Arduino UNO
Below is an example of how to use the GRAVITY I2C WATTMETER with an Arduino UNO to measure voltage, current, and power:
Wiring Diagram
VCC→ 5V on ArduinoGND→ GND on ArduinoSDA→ A4 on ArduinoSCL→ A5 on Arduino
Arduino Code
#include <Wire.h>

// I2C address of the GRAVITY I2C WATTMETER
#define WATTMETER_ADDRESS 0x40

void setup() {
  Wire.begin(); // Initialize I2C communication
  Serial.begin(9600); // Start serial communication for debugging
  Serial.println("GRAVITY I2C WATTMETER Example");
}

void loop() {
  Wire.beginTransmission(WATTMETER_ADDRESS);
  Wire.write(0x00); // Command to request data (check datasheet for details)
  Wire.endTransmission();

  Wire.requestFrom(WATTMETER_ADDRESS, 6); // Request 6 bytes of data
  if (Wire.available() == 6) {
    uint16_t voltage = Wire.read() << 8 | Wire.read(); // Read voltage (2 bytes)
    uint16_t current = Wire.read() << 8 | Wire.read(); // Read current (2 bytes)
    uint16_t power = Wire.read() << 8 | Wire.read();   // Read power (2 bytes)

    // Convert raw data to meaningful values
    float voltageValue = voltage * 0.001; // Convert to volts
    float currentValue = current * 0.001; // Convert to amps
    float powerValue = power * 0.001;     // Convert to watts

    // Print the results
    Serial.print("Voltage: ");
    Serial.print(voltageValue);
    Serial.println(" V");

    Serial.print("Current: ");
    Serial.print(currentValue);
    Serial.println(" A");

    Serial.print("Power: ");
    Serial.print(powerValue);
    Serial.println(" W");
  }

  delay(1000); // Wait 1 second before the next reading
}
Best Practices
- Calibrate the wattmeter if precise measurements are required.
- Use proper decoupling capacitors near the power supply pins to reduce noise.
- Regularly check the connections to ensure reliable operation.
Troubleshooting and FAQs
Common Issues and Solutions
No Data on Serial Monitor
- Cause: Incorrect I2C address or wiring.
- Solution: Verify the I2C address (default is 0x40) and check the connections.
Inaccurate Measurements
- Cause: Exceeding voltage or current limits, or noisy environment.
- Solution: Ensure the load is within the wattmeter's specifications and use proper shielding.
Device Not Detected
- Cause: Missing pull-up resistors on
SDAandSCLlines. - Solution: Add 4.7kΩ pull-up resistors to the I2C lines.
- Cause: Missing pull-up resistors on
FAQs
Q: Can the wattmeter measure negative current?
A: No, the GRAVITY I2C WATTMETER is designed for unidirectional current measurement only.
Q: Can I change the I2C address?
A: The default I2C address is 0x40. Refer to the datasheet for instructions on changing the address if supported.
Q: Is it compatible with 3.3V microcontrollers?
A: Yes, the wattmeter supports both 3.3V and 5V logic levels.
Q: How do I improve measurement accuracy?
A: Use a stable power supply, avoid noisy environments, and ensure proper calibration.
This concludes the documentation for the GRAVITY I2C WATTMETER. For further details, refer to the manufacturer's datasheet or support resources.