Cirkit Designer Logo
Cirkit Designer
Your all-in-one circuit design IDE
Home / 
Component Documentation

How to Use 12 v battery: Examples, Pinouts, and Specs

Image of 12 v battery
Cirkit Designer LogoDesign with 12 v battery in Cirkit Designer

Introduction

A 12V battery is an essential component in many electronic systems, serving as a reliable power source. It provides a stable 12 volts of electrical potential difference, which is commonly used in automotive applications, backup power supplies, portable electronics, and DIY projects, including those involving Arduino boards.

Explore Projects Built with 12 v battery

Use Cirkit Designer to design, explore, and prototype these projects online. Some projects support real-time simulation. Click "Open Project" to start designing instantly!
12V Battery-Powered Fan System
Image of sdfsdfdfSDf: A project utilizing 12 v battery in a practical application
This circuit connects a 120mm 12V DC fan to a 12V 7Ah battery. The fan's positive and negative terminals are directly connected to the corresponding positive and negative terminals of the battery, allowing the fan to operate at its rated voltage.
Cirkit Designer LogoOpen Project in Cirkit Designer
Battery-Powered 12V High-Power LED Light
Image of testing: A project utilizing 12 v battery in a practical application
This circuit consists of a 12V battery connected to a 12V, 10W power LED. The battery provides the necessary voltage and current to power the LED, enabling it to emit light.
Cirkit Designer LogoOpen Project in Cirkit Designer
12V Battery-Powered Motor Control Circuit
Image of moter: A project utilizing 12 v battery in a practical application
This circuit consists of a 12V 200Ah battery connected to a 12V geared motor, with a 200 Ohm resistor in series with one of the motor's terminals. The battery provides power to the motor, and the resistor limits the current flowing into the motor, potentially to control speed or to protect the motor from excessive current.
Cirkit Designer LogoOpen Project in Cirkit Designer
Solar-Powered DC Motor Control System with Battery Backup and Power Inverter
Image of sistem pembersih jalan menggunakan motor dc dan bateri dijana oleh solar: A project utilizing 12 v battery in a practical application
This circuit is designed to power a DC motor using a 12V 200Ah battery, with the capability to be charged by a solar panel. A solar charge controller is used to manage the charging of the battery from the solar panel and to control the power supply to the motor. A power inverter is connected to the battery for potential AC power applications, and a rocker switch is included to control the on/off state of the motor.
Cirkit Designer LogoOpen Project in Cirkit Designer

Explore Projects Built with 12 v battery

Use Cirkit Designer to design, explore, and prototype these projects online. Some projects support real-time simulation. Click "Open Project" to start designing instantly!
Image of sdfsdfdfSDf: A project utilizing 12 v battery in a practical application
12V Battery-Powered Fan System
This circuit connects a 120mm 12V DC fan to a 12V 7Ah battery. The fan's positive and negative terminals are directly connected to the corresponding positive and negative terminals of the battery, allowing the fan to operate at its rated voltage.
Cirkit Designer LogoOpen Project in Cirkit Designer
Image of testing: A project utilizing 12 v battery in a practical application
Battery-Powered 12V High-Power LED Light
This circuit consists of a 12V battery connected to a 12V, 10W power LED. The battery provides the necessary voltage and current to power the LED, enabling it to emit light.
Cirkit Designer LogoOpen Project in Cirkit Designer
Image of moter: A project utilizing 12 v battery in a practical application
12V Battery-Powered Motor Control Circuit
This circuit consists of a 12V 200Ah battery connected to a 12V geared motor, with a 200 Ohm resistor in series with one of the motor's terminals. The battery provides power to the motor, and the resistor limits the current flowing into the motor, potentially to control speed or to protect the motor from excessive current.
Cirkit Designer LogoOpen Project in Cirkit Designer
Image of sistem pembersih jalan menggunakan motor dc dan bateri dijana oleh solar: A project utilizing 12 v battery in a practical application
Solar-Powered DC Motor Control System with Battery Backup and Power Inverter
This circuit is designed to power a DC motor using a 12V 200Ah battery, with the capability to be charged by a solar panel. A solar charge controller is used to manage the charging of the battery from the solar panel and to control the power supply to the motor. A power inverter is connected to the battery for potential AC power applications, and a rocker switch is included to control the on/off state of the motor.
Cirkit Designer LogoOpen Project in Cirkit Designer

Common Applications and Use Cases:

  • Automotive and motorcycle batteries
  • Uninterruptible Power Supplies (UPS)
  • Portable power for camping and outdoor activities
  • Robotics and hobbyist projects
  • Power source for Arduino and other microcontroller-based projects

Technical Specifications

Key Technical Details:

  • Nominal Voltage: 12V
  • Chemistry Types: Lead-Acid, Li-Ion, NiMH, etc. (varies by specific model)
  • Capacity: Specified in ampere-hours (Ah), varies by model
  • Maximum Charging Voltage: Typically around 13.8 to 14.5V for lead-acid (varies by chemistry)
  • Maximum Charging Current: Depends on the battery's capacity and chemistry
  • Operating Temperature Range: Varies by manufacturer and model

Pin Configuration and Descriptions:

Pin Description
+ Positive terminal of the battery
- Negative terminal of the battery

Usage Instructions

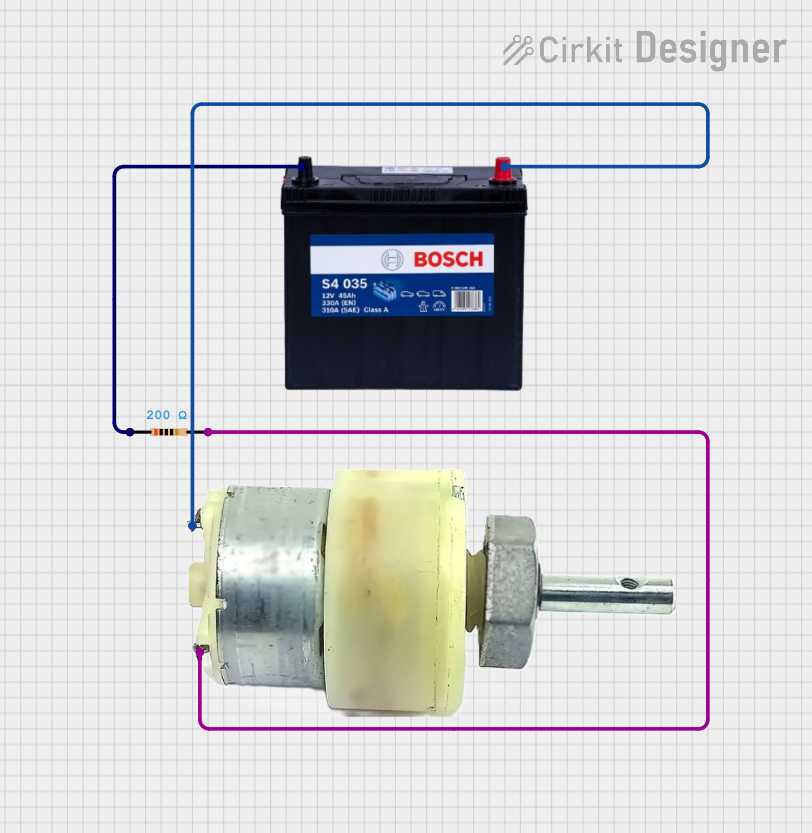
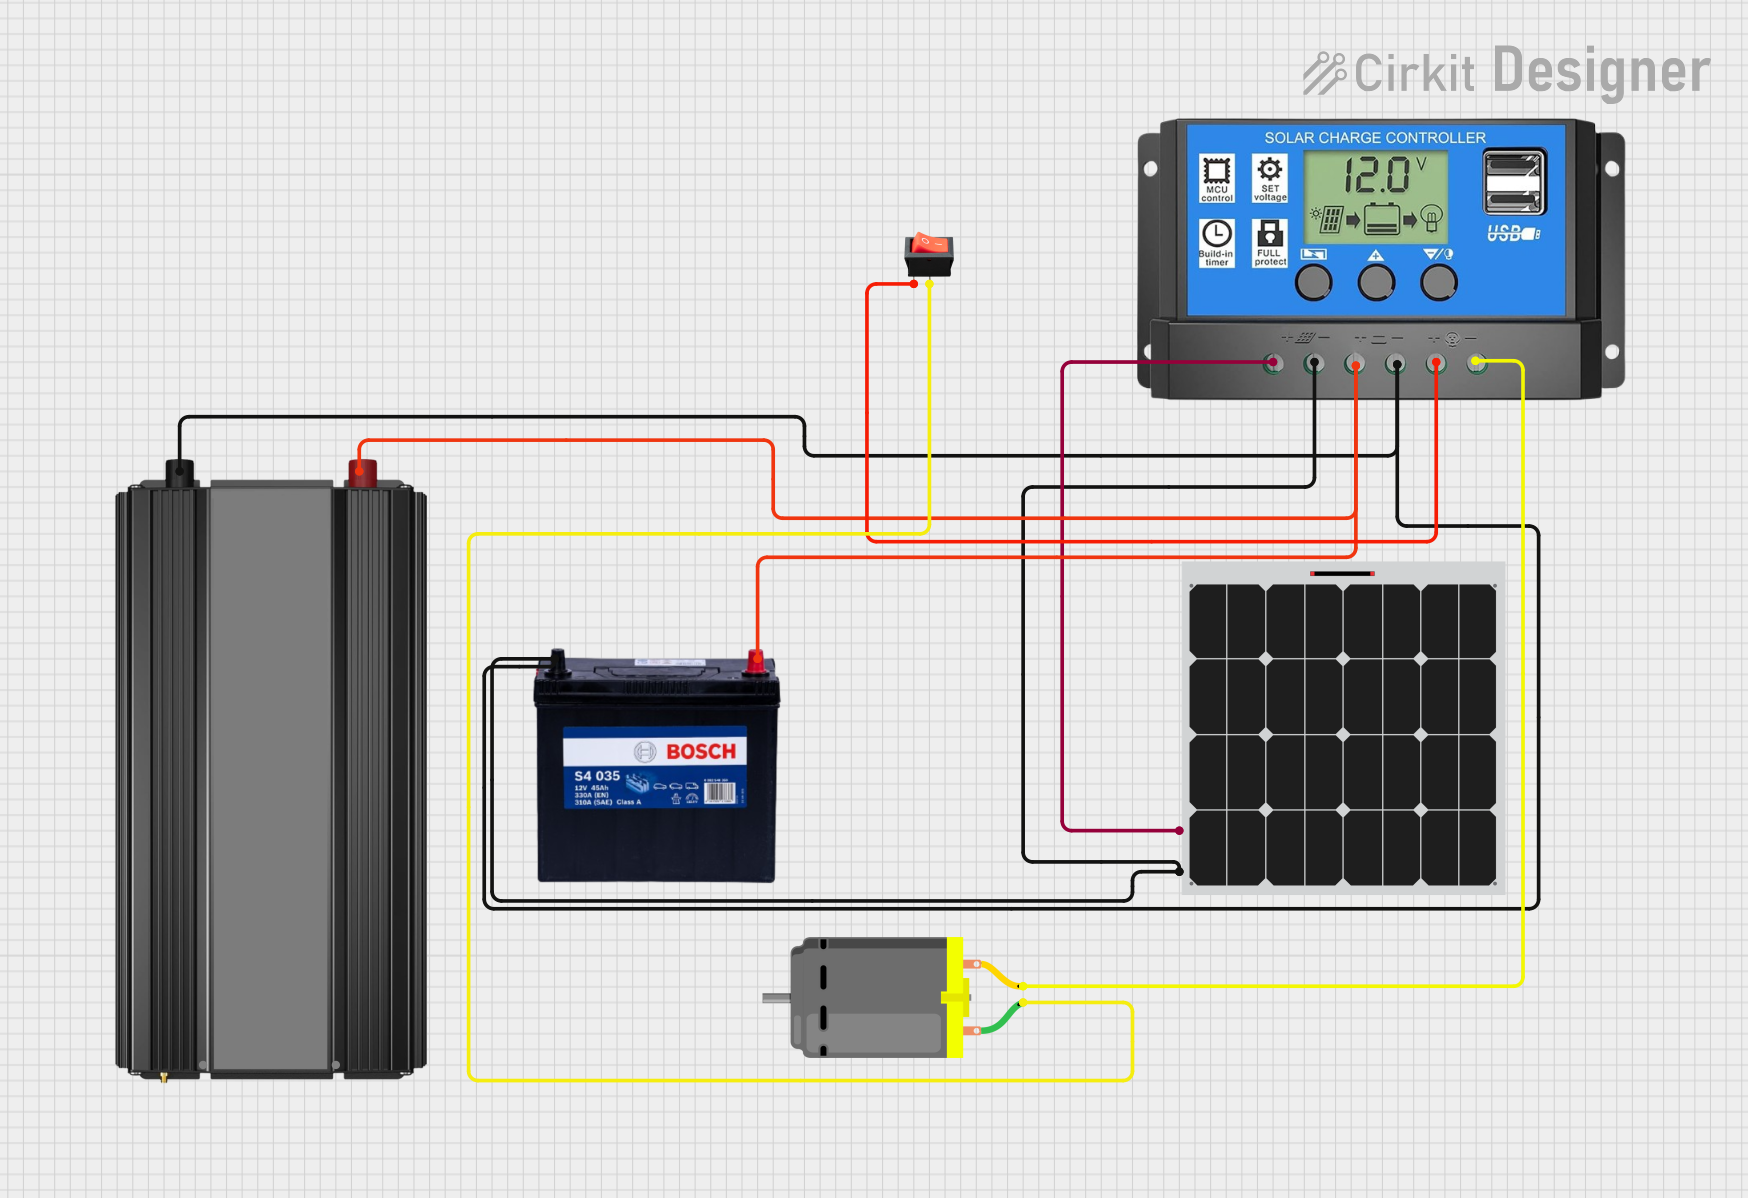
How to Use the Component in a Circuit:

  1. Identify the polarity: Locate the positive (+) and negative (-) terminals on the battery.
  2. Connect to the circuit: Use appropriate connectors to attach the battery to the circuit, ensuring correct polarity.
  3. Power management: Incorporate a power management system if necessary, to prevent overcharging or deep discharging.

Important Considerations and Best Practices:

  • Voltage Regulation: Ensure that the voltage is appropriate for the devices being powered.
  • Current Limiting: Use fuses or current-limiting circuits to protect against short circuits or overcurrent conditions.
  • Battery Chemistry: Be aware of the specific charging and discharging requirements based on the battery's chemistry.
  • Temperature: Avoid exposing the battery to extreme temperatures, which can affect performance and lifespan.
  • Storage: Store the battery in a cool, dry place and maintain charge levels as recommended by the manufacturer.

Troubleshooting and FAQs

Common Issues Users Might Face:

  • Battery won't charge: Check charger compatibility and connections.
  • Reduced capacity: Batteries degrade over time; consider replacing if performance drops significantly.
  • Voltage drop under load: This may indicate the battery is nearing the end of its useful life.

Solutions and Tips for Troubleshooting:

  • Charging Issues: Verify that the charger is functioning and the contacts are clean.
  • Capacity Issues: Perform a capacity test to determine if the battery needs replacement.
  • Voltage Issues: Check for loose connections and ensure the battery is properly charged.

FAQs:

  • Q: How long does a 12V battery last?

  • A: Battery life depends on usage, load, and battery type. Check the manufacturer's specifications for estimated lifespan.

  • Q: Can I use a 12V battery with my Arduino project?

  • A: Yes, but you'll need a voltage regulator to bring the voltage down to the 5V or 3.3V level that Arduino boards typically require.

  • Q: How do I properly dispose of a 12V battery?

  • A: Take it to a recycling center or a location that accepts hazardous materials. Do not dispose of batteries in household waste.

Example Arduino Connection Code

// Example code to monitor 12V battery voltage using Arduino UNO
// Note: This requires a voltage divider to step down the voltage to a safe level for the Arduino analog input.

const int batteryPin = A0; // Analog pin connected to voltage divider output

void setup() {
  Serial.begin(9600);
}

void loop() {
  int sensorValue = analogRead(batteryPin); // Read the analog value (0 to 1023)
  float batteryVoltage = sensorValue * (12.0 / 1023.0); // Convert to battery voltage
  Serial.print("Battery Voltage: ");
  Serial.println(batteryVoltage);
  delay(1000); // Wait for 1 second before the next reading
}

Note: The above code assumes a voltage divider that scales the 12V down to a maximum of 5V. Adjust the (12.0 / 1023.0) ratio based on your specific voltage divider.

Remember: Always ensure that the input voltage to the Arduino's analog pin does not exceed 5V to avoid damaging the microcontroller.