How to Use Led Luxeon 3W - 3VDC: Examples, Pinouts, and Specs
Introduction
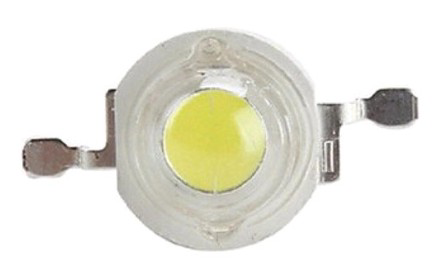
The LED Luxeon 3W - 3VDC is a high-power light-emitting diode (LED) designed for applications requiring bright and efficient illumination. Manufactured by Led with the part ID LUXEON, this LED operates at 3 watts and 3 volts DC, making it ideal for use in high-intensity lighting systems. Its compact size and high luminous output make it suitable for a wide range of applications, including flashlights, automotive lighting, architectural lighting, and DIY electronics projects.
Explore Projects Built with Led Luxeon 3W - 3VDC

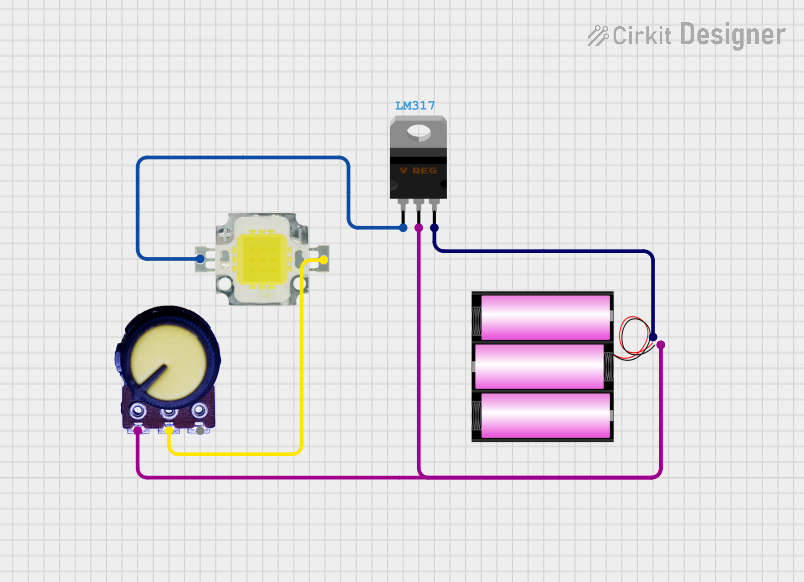
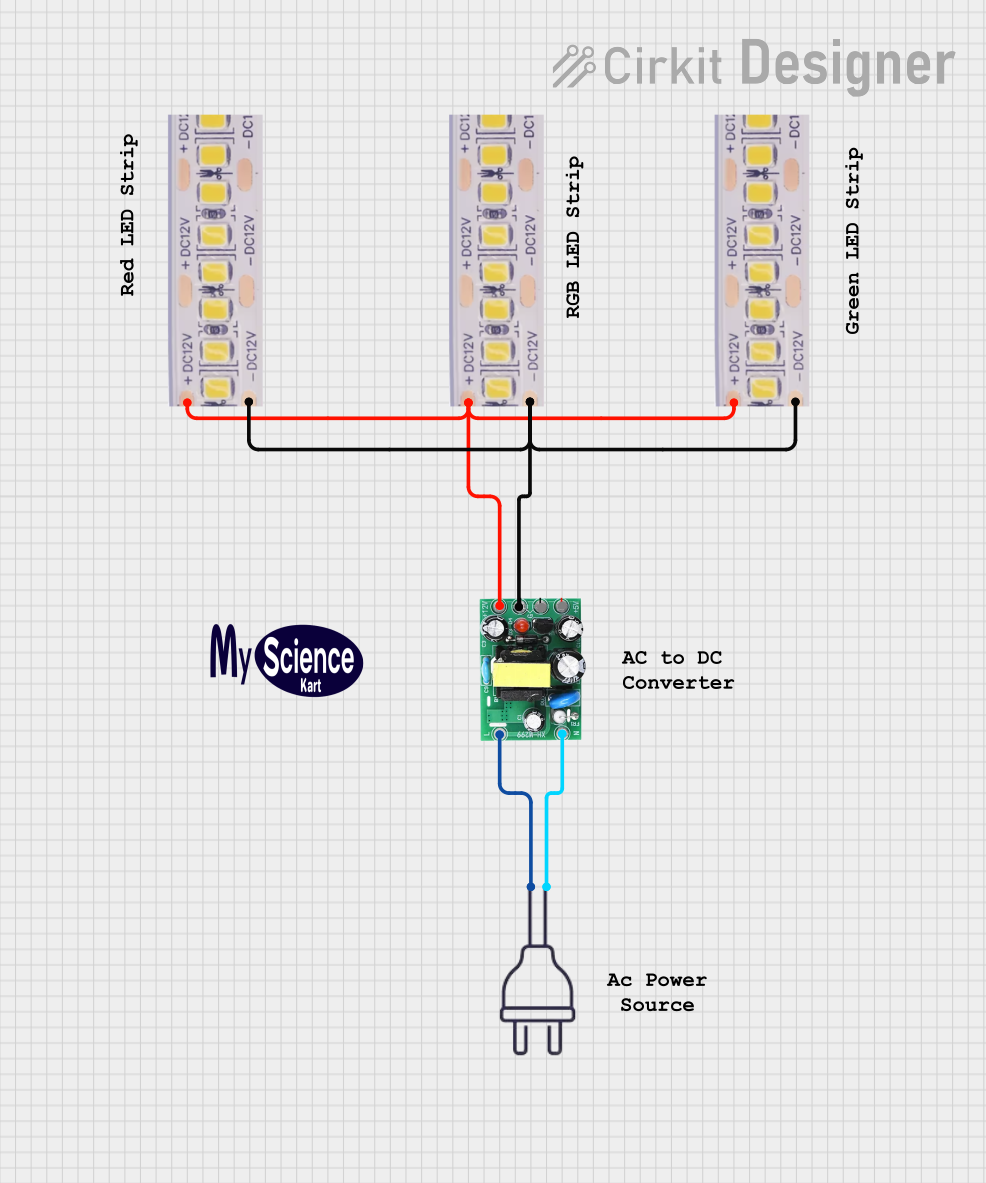
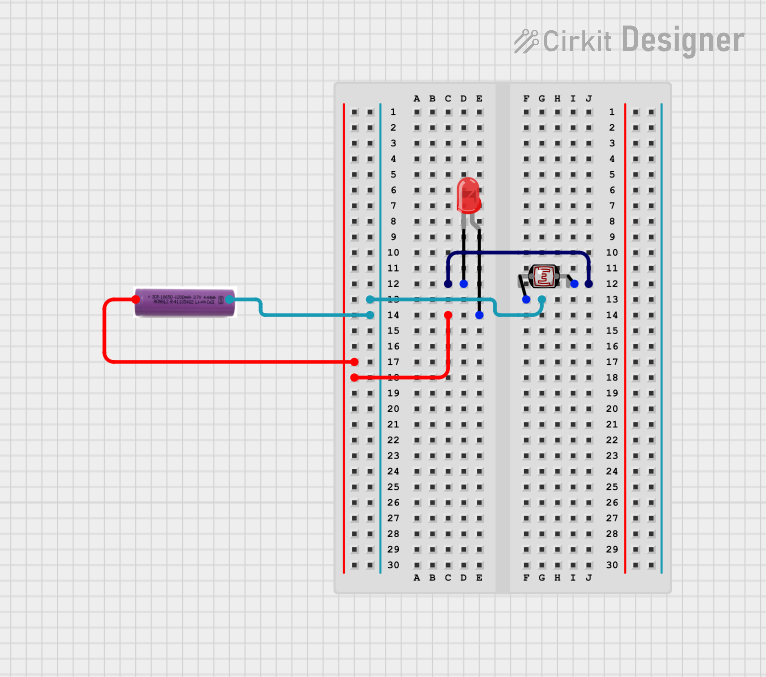
Explore Projects Built with Led Luxeon 3W - 3VDC
Common Applications
- Flashlights and portable lighting devices
- Automotive headlights and taillights
- Architectural and decorative lighting
- DIY electronics and hobbyist projects
- Emergency and outdoor lighting systems
Technical Specifications
The following table outlines the key technical details of the LED Luxeon 3W - 3VDC:
| Parameter | Value |
|---|---|
| Manufacturer | Led |
| Part ID | LUXEON |
| Power Rating | 3 Watts |
| Operating Voltage | 3 Volts DC |
| Forward Current (typ.) | 700 mA |
| Luminous Flux (typ.) | 240-260 lumens |
| Color Temperature | 3000K (Warm White) |
| Viewing Angle | 120° |
| Thermal Resistance | 10°C/W |
| Operating Temperature | -40°C to +85°C |
| Dimensions | 5 mm x 5 mm x 3 mm |
Pin Configuration and Descriptions
The LED Luxeon 3W - 3VDC has two terminals:
| Pin | Name | Description |
|---|---|---|
| 1 | Anode (+) | Positive terminal; connect to the positive voltage source. |
| 2 | Cathode (-) | Negative terminal; connect to ground or the negative voltage source. |
Usage Instructions
How to Use the LED Luxeon 3W - 3VDC in a Circuit
- Power Supply: Ensure the LED is powered by a constant current source to prevent damage. A typical forward current of 700 mA is recommended.
- Current Limiting: Use a resistor or a constant current driver to limit the current through the LED. Calculate the resistor value using Ohm's Law:
[ R = \frac{V_{supply} - V_{forward}}{I_{forward}} ] For example, if the supply voltage is 5V and the forward voltage is 3V, and the desired current is 700 mA:
[ R = \frac{5V - 3V}{0.7A} = 2.86 , \Omega ] - Heat Management: The LED Luxeon 3W generates significant heat during operation. Use a heatsink or thermal pad to dissipate heat and maintain optimal performance.
- Polarity: Ensure correct polarity when connecting the LED. Reversing the polarity can damage the component.
Example Circuit with Arduino UNO
The LED Luxeon 3W can be controlled using an Arduino UNO and a MOSFET for current regulation. Below is an example circuit and code:
Circuit Components:
- LED Luxeon 3W - 3VDC
- N-channel MOSFET (e.g., IRF540N)
- 10 kΩ resistor (pull-down for MOSFET gate)
- 2.2 Ω resistor (current limiting)
- Arduino UNO
Circuit Diagram:
- Connect the MOSFET's Drain to the LED's Cathode (-).
- Connect the LED's Anode (+) to the positive voltage source (e.g., 3.3V or 5V).
- Connect the MOSFET's Source to ground.
- Connect a 10 kΩ resistor between the MOSFET's Gate and ground.
- Connect the MOSFET's Gate to an Arduino digital pin (e.g., pin 9).
Arduino Code:
// Define the pin connected to the MOSFET gate
const int ledPin = 9;

void setup() {
  pinMode(ledPin, OUTPUT); // Set the pin as an output
}

void loop() {
  analogWrite(ledPin, 128); // Set brightness (0-255, 128 = 50% duty cycle)
  delay(1000);              // Keep LED on for 1 second
  analogWrite(ledPin, 0);   // Turn off the LED
  delay(1000);              // Keep LED off for 1 second
}
Important Considerations
- Thermal Management: Always use a heatsink to prevent overheating.
- Current Regulation: Avoid connecting the LED directly to a power source without a current-limiting resistor or driver.
- Polarity Check: Double-check the polarity before powering the LED.
Troubleshooting and FAQs
Common Issues and Solutions
LED Does Not Light Up:
- Cause: Incorrect polarity or insufficient voltage.
- Solution: Verify the polarity and ensure the power supply provides at least 3V.
LED Flickers:
- Cause: Unstable power supply or loose connections.
- Solution: Use a stable power source and check all connections.
LED Overheats:
- Cause: Insufficient heat dissipation or excessive current.
- Solution: Attach a heatsink and ensure the current does not exceed 700 mA.
LED Burns Out Quickly:
- Cause: Overvoltage or lack of current regulation.
- Solution: Use a constant current driver and ensure the voltage does not exceed 3V.
FAQs
Q1: Can I power the LED Luxeon 3W directly from a 5V source?
A1: No, you must use a current-limiting resistor or a constant current driver to prevent damage.
Q2: What is the recommended heatsink size?
A2: The heatsink size depends on the operating environment, but it should dissipate at least 3W of heat efficiently.
Q3: Can I dim the LED Luxeon 3W?
A3: Yes, you can dim the LED using PWM (Pulse Width Modulation) with a microcontroller like Arduino.
Q4: Is the LED Luxeon 3W waterproof?
A4: No, the LED itself is not waterproof. Use a waterproof housing for outdoor applications.
By following this documentation, you can effectively integrate the LED Luxeon 3W - 3VDC into your projects and ensure optimal performance.