How to Use Labjack T7: Examples, Pinouts, and Specs
Introduction
The LabJack T7 is a versatile and high-performance data acquisition (DAQ) device designed for interfacing with sensors, actuators, and control systems. Manufactured by LabJack, the T7 offers a wide range of analog and digital input/output capabilities, making it an ideal choice for applications in automation, measurement, and control. With USB and Ethernet connectivity, the T7 provides flexibility for both local and remote operation.
Explore Projects Built with Labjack T7


Explore Projects Built with Labjack T7
Common Applications and Use Cases
- Data logging and monitoring
- Industrial automation and process control
- Sensor interfacing and signal acquisition
- Prototyping and research in engineering and science
- Remote data acquisition via Ethernet
Technical Specifications
Key Technical Details
| Parameter | Specification |
|---|---|
| Manufacturer | LabJack |
| Part ID | T7 |
| Analog Inputs (AIN) | 14 single-ended or 7 differential |
| Analog Input Resolution | 16-bit (default) or 24-bit (high-res) |
| Analog Input Range | ±10V, ±1V, ±0.1V (software-selectable) |
| Analog Outputs (DAC) | 2 channels, 12-bit resolution |
| Digital I/O (FIO/EIO) | 23 channels (configurable) |
| Communication Interfaces | USB 2.0, Ethernet |
| Max Sampling Rate | 100 kSamples/s (aggregate) |
| Power Supply | 5V via USB or external power supply |
| Operating Temperature | -40°C to +85°C |
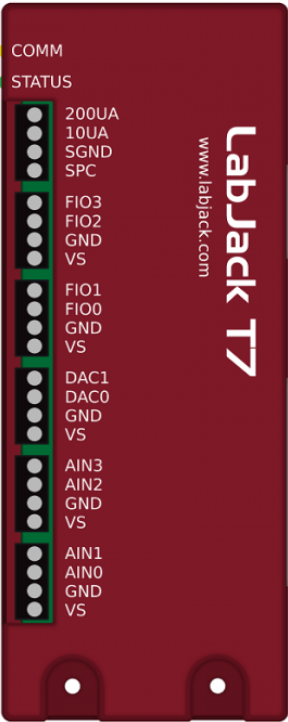
Pin Configuration and Descriptions
The LabJack T7 features multiple connectors for analog, digital, and power connections. Below is a summary of the pin configuration:
Analog Input/Output Pins
| Pin Name | Description | Notes |
|---|---|---|
| AIN0-AIN13 | Analog input channels | Can be single-ended or differential |
| DAC0, DAC1 | Analog output channels | 0-5V range, 12-bit resolution |
Digital I/O Pins
| Pin Name | Description | Notes |
|---|---|---|
| FIO0-FIO7 | Flexible digital I/O channels | Configurable as input or output |
| EIO0-EIO7 | Extended digital I/O channels | Configurable as input or output |
| CIO0-CIO3 | Counter/Timer I/O channels | Supports pulse counting, PWM, etc. |
Power and Communication Pins
| Pin Name | Description | Notes |
|---|---|---|
| VS | 5V power supply output | For powering external devices |
| GND | Ground | Common ground for all signals |
| USB | USB communication port | For PC connection |
| Ethernet | Ethernet communication port | For network connection |
Usage Instructions
How to Use the LabJack T7 in a Circuit
Powering the Device:
- Connect the T7 to a PC using a USB cable, or use an external 5V power supply.
- Ensure the power source is stable and within the specified voltage range.
Connecting Sensors and Actuators:
- For analog inputs, connect the sensor output to the appropriate AIN pin. Configure the input range and resolution in software.
- For digital I/O, connect the device to the FIO/EIO pins and configure the pins as input or output as needed.
- For analog outputs, connect the load to the DAC pins and set the desired output voltage in software.
Communication Setup:
- For USB communication, install the LabJack software and drivers on your PC.
- For Ethernet communication, configure the T7's IP address using the LabJack software.
Software Configuration:
- Use the LabJack software (LJControlPanel or Kipling) to configure the device and test its functionality.
- For custom applications, use the LabJack API or libraries (available for Python, C/C++, LabVIEW, etc.).
Important Considerations and Best Practices
- Always ensure proper grounding to avoid noise and interference in analog signals.
- Use shielded cables for sensitive analog inputs to minimize external noise.
- Avoid exceeding the voltage and current ratings of the pins to prevent damage.
- For high-speed data acquisition, use Ethernet for better performance and stability.
Example: Using the LabJack T7 with Arduino UNO
The LabJack T7 can be interfaced with an Arduino UNO via its digital I/O pins. Below is an example of controlling a digital output on the T7 using the Arduino:
#include <Wire.h> // Include Wire library for I2C communication

// Define the I2C address of the LabJack T7
#define LABJACK_T7_ADDRESS 0x40

void setup() {
  Wire.begin(); // Initialize I2C communication
  Serial.begin(9600); // Initialize serial communication for debugging

  // Set up the LabJack T7 digital output (e.g., FIO0)
  Wire.beginTransmission(LABJACK_T7_ADDRESS);
  Wire.write(0xF0); // Command to configure FIO0 as output
  Wire.write(0x01); // Set FIO0 to HIGH
  Wire.endTransmission();

  Serial.println("LabJack T7 configured.");
}

void loop() {
  // Toggle the digital output on the LabJack T7
  Wire.beginTransmission(LABJACK_T7_ADDRESS);
  Wire.write(0xF0); // Command to toggle FIO0
  Wire.write(0x00); // Set FIO0 to LOW
  Wire.endTransmission();

  delay(1000); // Wait for 1 second

  Wire.beginTransmission(LABJACK_T7_ADDRESS);
  Wire.write(0xF0); // Command to toggle FIO0
  Wire.write(0x01); // Set FIO0 to HIGH
  Wire.endTransmission();

  delay(1000); // Wait for 1 second
}
Troubleshooting and FAQs
Common Issues and Solutions
Device Not Recognized by PC:
- Ensure the USB cable is properly connected and functional.
- Install the latest LabJack drivers from the official website.
- Try a different USB port or cable.
Analog Input Readings Are Noisy:
- Check the grounding of the circuit and ensure proper shielding of cables.
- Use the high-resolution mode for more accurate readings.
Ethernet Connection Fails:
- Verify the T7's IP address and network configuration.
- Ensure the Ethernet cable is securely connected and functional.
- Check for firewall or network restrictions.
Digital I/O Not Responding:
- Confirm the pin configuration in the software.
- Check the voltage levels and ensure they are within the specified range.
FAQs
Can the T7 be powered via Ethernet (PoE)?
No, the T7 does not support Power over Ethernet (PoE). Use USB or an external power supply.What is the maximum cable length for USB and Ethernet?
For USB, the maximum recommended length is 5 meters. For Ethernet, it is 100 meters.Is the T7 compatible with Raspberry Pi?
Yes, the T7 can be used with Raspberry Pi via USB or Ethernet, using the LabJack API for Python.Can multiple T7 devices be used simultaneously?
Yes, multiple T7 devices can be connected to a single PC or network, and each device can be addressed individually.