How to Use 78L05: Examples, Pinouts, and Specs
78L05 Voltage Regulator Documentation
1. Introduction
The 78L05 is a low-dropout, fixed-voltage regulator that provides a stable 5V output. It is widely used in electronic circuits to power microcontrollers, sensors, and other low-power devices. The 78L05 ensures a consistent voltage supply, even when the input voltage fluctuates, making it an essential component for reliable circuit operation.
Common Applications:
- Powering microcontrollers (e.g., Arduino, ESP32, etc.)
- Voltage regulation for sensors and modules
- Battery-powered devices
- DIY electronics projects
- Low-power embedded systems
The 78L05 is compact, cost-effective, and easy to use, making it a popular choice for hobbyists and professionals alike.
2. Technical Specifications
The following table outlines the key technical details of the 78L05 voltage regulator:
| Parameter | Value |
|---|---|
| Output Voltage | 5V ± 0.1V |
| Input Voltage Range | 7V to 30V |
| Maximum Output Current | 100mA |
| Dropout Voltage | 1.7V (typical) |
| Quiescent Current | 3mA (typical) |
| Operating Temperature | -40°C to +125°C |
| Package Types | TO-92, SOT-89 |
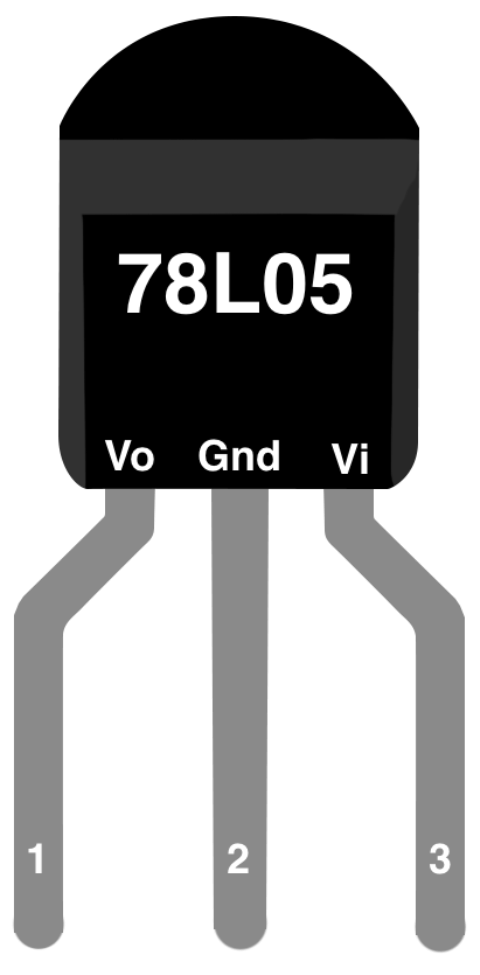
Pin Configuration
The 78L05 is typically available in a TO-92 package. The pinout is as follows:
| Pin Number | Pin Name | Description |
|---|---|---|
| 1 | Input (IN) | Connect to the unregulated input voltage source. |
| 2 | Ground (GND) | Common ground for input and output. |
| 3 | Output (OUT) | Provides the regulated 5V output. |
3. Usage Instructions
Basic Circuit Configuration
To use the 78L05 in a circuit, follow these steps:
Connect the Input Voltage:
- Attach the unregulated DC voltage source (7V to 30V) to the Input (IN) pin.
- Ensure the input voltage is at least 2V higher than the desired 5V output for proper regulation.
Connect the Ground:
- Connect the Ground (GND) pin to the circuit's ground.
Connect the Output:
- The Output (OUT) pin provides a stable 5V. Connect this pin to the load or circuit requiring 5V.
Add Capacitors:
- Place a 0.33µF capacitor between the Input (IN) pin and ground.
- Place a 0.1µF capacitor between the Output (OUT) pin and ground.
- These capacitors help stabilize the voltage and reduce noise.
Example Circuit Diagram
   +7V to +30V
       │
       │
      [C1]  0.33µF
       │
       │
      IN (Pin 1) ────────────────┐
       │                        │
       │                        │
      GND (Pin 2) ──────────────┘
       │
       │
      OUT (Pin 3) ────────────────> +5V Output
       │
      [C2]  0.1µF
       │
       │
      GND
Important Considerations:
- Input Voltage: Ensure the input voltage is within the specified range (7V to 30V).
- Heat Dissipation: The 78L05 can heat up under high input voltages or loads. Use a heatsink if necessary.
- Current Limitation: The maximum output current is 100mA. For higher currents, consider using the 7805 regulator instead.
- Capacitors: Always use the recommended capacitors to ensure stable operation.
4. Example with Arduino UNO
The 78L05 can be used to power an Arduino UNO or other 5V devices. Below is an example of how to connect the 78L05 to an Arduino UNO:
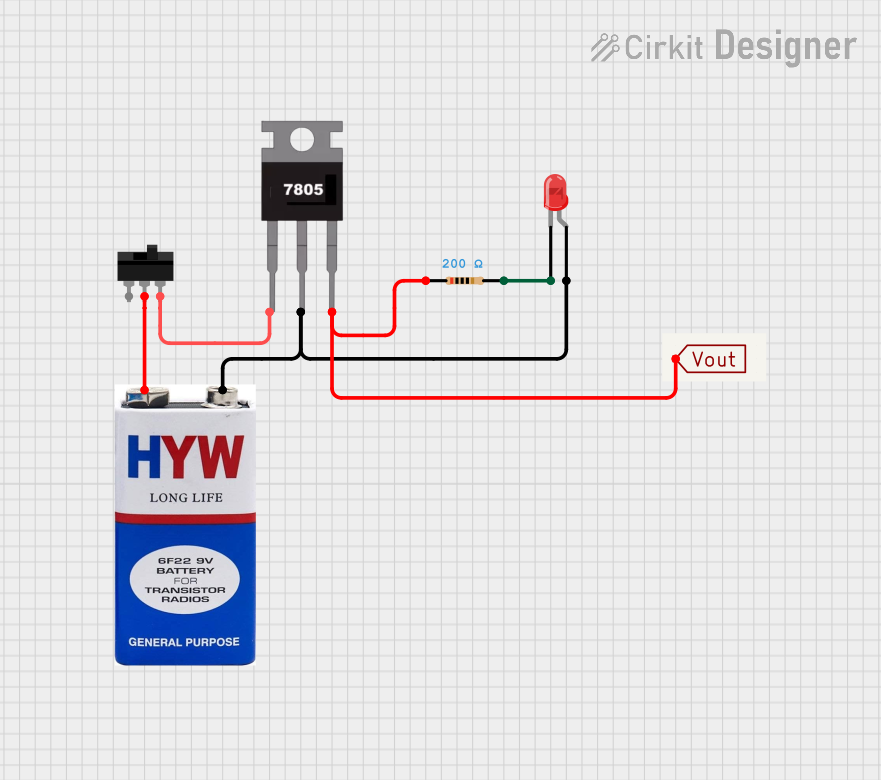
Circuit Description:
- The 78L05 regulates a 9V battery to provide a stable 5V output.
- The 5V output is connected to the Arduino UNO's 5V pin.
Circuit Diagram:
   9V Battery
       │
       │
      [C1]  0.33µF
       │
       │
      IN (Pin 1) ────────────────┐
       │                        │
       │                        │
      GND (Pin 2) ──────────────┘
       │
       │
      OUT (Pin 3) ────────────────> Arduino UNO 5V Pin
       │
      [C2]  0.1µF
       │
       │
      GND ───────────────────────> Arduino UNO GND Pin
Arduino Code Example:
// Example: Blink an LED using Arduino UNO powered by 78L05 regulator

// Define the LED pin
const int ledPin = 13;

void setup() {
  pinMode(ledPin, OUTPUT); // Set the LED pin as an output
}

void loop() {
  digitalWrite(ledPin, HIGH); // Turn the LED on
  delay(1000);                // Wait for 1 second
  digitalWrite(ledPin, LOW);  // Turn the LED off
  delay(1000);                // Wait for 1 second
}
5. Troubleshooting and FAQs
Common Issues and Solutions
| Issue | Possible Cause | Solution |
|---|---|---|
| Output voltage is not 5V | Input voltage is too low (<7V) | Increase the input voltage to at least 7V. |
| Regulator overheating | Excessive input voltage or current draw | Use a heatsink or reduce the input voltage. |
| Circuit is noisy or unstable | Missing input/output capacitors | Add the recommended capacitors (0.33µF, 0.1µF). |
| No output voltage | Incorrect pin connections | Verify the pin connections and polarity. |
FAQs
Can I use the 78L05 with a 6V input?
- No, the input voltage must be at least 7V for proper regulation.
What happens if I exceed the maximum current rating?
- The 78L05 may overheat or shut down. Use a regulator with a higher current rating if needed.
Can I use the 78L05 without capacitors?
- It is not recommended. Capacitors are essential for stable operation and noise reduction.
Is the 78L05 suitable for powering high-current devices?
- No, the 78L05 is designed for low-power applications (up to 100mA). For higher currents, consider the 7805 or a switching regulator.
6. Conclusion
The 78L05 voltage regulator is a reliable and easy-to-use component for providing a stable 5V output in low-power electronic circuits. By following the recommended usage guidelines and best practices, you can ensure optimal performance and longevity of your projects. Whether you're powering an Arduino UNO or a custom embedded system, the 78L05 is a versatile and indispensable tool for voltage regulation.
Explore Projects Built with 78L05


Explore Projects Built with 78L05