How to Use PDM Ultrasonic Microphone Sensor Knowles SPH0655LM4H-1 RAK18032: Examples, Pinouts, and Specs
Introduction
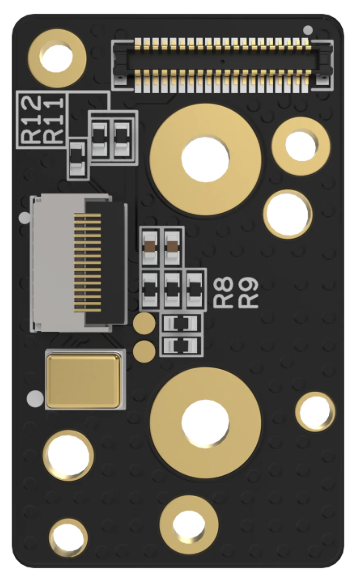
The RAK18032 is a high-performance digital microphone that leverages Pulse Density Modulation (PDM) technology to deliver high-fidelity sound capture. Manufactured by RAK, this microphone is based on the Knowles SPH0655LM4H-1 sensor, which is known for its compact size, low power consumption, and excellent audio quality. It is ideal for applications requiring precise audio input, such as voice recognition, ultrasonic sensing, and environmental sound monitoring.
Explore Projects Built with PDM Ultrasonic Microphone Sensor Knowles SPH0655LM4H-1 RAK18032
Explore Projects Built with PDM Ultrasonic Microphone Sensor Knowles SPH0655LM4H-1 RAK18032
Common Applications and Use Cases
- Voice recognition systems (e.g., smart assistants)
- Ultrasonic sensing for distance measurement
- Environmental sound monitoring
- Audio recording in IoT devices
- Wearable devices and hearing aids
- Smart home automation systems
Technical Specifications
The RAK18032 microphone sensor is designed to meet the needs of modern audio and ultrasonic applications. Below are its key technical specifications:
| Parameter | Value |
|---|---|
| Technology | Pulse Density Modulation (PDM) |
| Operating Voltage | 1.62V to 3.6V |
| Current Consumption | 650 µA (typical) |
| Acoustic Overload Point | 120 dB SPL |
| Signal-to-Noise Ratio | 65 dB |
| Frequency Response | 100 Hz to 10 kHz |
| Sensitivity | -26 dBFS ±3 dB |
| Package Dimensions | 3.50 mm x 2.65 mm x 0.98 mm |
| Operating Temperature | -40°C to +85°C |
Pin Configuration and Descriptions
The RAK18032 has a simple pinout configuration, as shown in the table below:
| Pin Name | Pin Number | Description |
|---|---|---|
| VDD | 1 | Power supply input (1.62V to 3.6V) |
| GND | 2 | Ground |
| CLK | 3 | PDM clock input (1 MHz to 3.25 MHz) |
| DATA | 4 | PDM data output |
| LRSEL | 5 | Left/Right channel select (connect to GND or VDD) |
Usage Instructions
The RAK18032 PDM Ultrasonic Microphone Sensor is straightforward to integrate into a circuit. Below are the steps and considerations for using this component effectively:
Circuit Integration
- Power Supply: Connect the VDD pin to a stable power source within the range of 1.62V to 3.6V. Connect the GND pin to the ground of the circuit.
- Clock Signal: Provide a clock signal (1 MHz to 3.25 MHz) to the CLK pin. This clock drives the PDM output.
- Data Output: The DATA pin outputs the PDM signal, which can be processed by a microcontroller or DSP.
- Channel Selection: Use the LRSEL pin to configure the microphone as either a left or right channel. Connect LRSEL to GND for the left channel or to VDD for the right channel.
Important Considerations
- Decoupling Capacitor: Place a 0.1 µF decoupling capacitor close to the VDD pin to ensure stable operation.
- Clock Signal Quality: Ensure the clock signal is clean and within the specified frequency range to avoid data corruption.
- PDM Signal Processing: Use a microcontroller or DSP with PDM decoding capability to convert the PDM signal into a usable audio signal.
- Ultrasonic Applications: For ultrasonic sensing, ensure the microphone is positioned to capture the desired frequency range effectively.
Example: Connecting to an Arduino UNO
The RAK18032 can be connected to an Arduino UNO for basic audio capture. Below is an example of how to set up the microphone and read PDM data:
Wiring Diagram
| RAK18032 Pin | Arduino UNO Pin |
|---|---|
| VDD | 3.3V |
| GND | GND |
| CLK | D3 (PWM capable) |
| DATA | D2 |
| LRSEL | GND (Left channel) |
Arduino Code Example
#include <PDM.h> // Include the PDM library for decoding PDM signals

// Buffer to store PDM data
#define BUFFER_SIZE 256
int16_t pdmBuffer[BUFFER_SIZE];

// Callback function to handle PDM data
void onPDMData() {
  // Read PDM data into the buffer
  int bytesAvailable = PDM.available();
  PDM.read(pdmBuffer, bytesAvailable);

  // Process the PDM data (e.g., convert to PCM or analyze)
  // Add your custom processing code here
}

void setup() {
  // Initialize serial communication for debugging
  Serial.begin(9600);
  while (!Serial);

  // Configure the PDM microphone
  if (!PDM.begin(1, 16000)) { // Mono channel, 16 kHz sample rate
    Serial.println("Failed to initialize PDM microphone!");
    while (1);
  }

  // Set the PDM data callback
  PDM.onReceive(onPDMData);

  Serial.println("PDM microphone initialized successfully.");
}

void loop() {
  // Main loop does nothing; PDM data is handled in the callback
}
Notes:
- The
PDMlibrary is required for this example. Install it via the Arduino Library Manager. - Ensure the Arduino UNO is powered by a stable 5V source, and use a level shifter if necessary to interface with the 3.3V logic of the RAK18032.
Troubleshooting and FAQs
Common Issues
No Output from the Microphone
- Cause: Missing or incorrect clock signal.
- Solution: Verify the clock signal is within the 1 MHz to 3.25 MHz range and properly connected to the CLK pin.
Distorted or Noisy Audio
- Cause: Poor power supply decoupling or noisy clock signal.
- Solution: Add a 0.1 µF decoupling capacitor near the VDD pin and ensure the clock signal is clean.
Microphone Not Detected by Microcontroller
- Cause: Incorrect wiring or channel selection.
- Solution: Double-check all connections and ensure the LRSEL pin is configured correctly.
FAQs
Can the RAK18032 be used for ultrasonic sensing?
- Yes, the microphone supports frequencies up to 10 kHz, making it suitable for certain ultrasonic applications.
What is the maximum distance for sound capture?
- The effective range depends on the sound source's intensity and environmental conditions. For typical voice applications, it can capture sound from several meters away.
Can I use the RAK18032 with a 5V microcontroller?
- Yes, but you must use a level shifter to interface the 3.3V logic of the microphone with the 5V logic of the microcontroller.
Is the RAK18032 suitable for outdoor use?
- The microphone operates in a wide temperature range (-40°C to +85°C), but additional protection may be required for harsh environmental conditions.
By following this documentation, users can effectively integrate and utilize the RAK18032 PDM Ultrasonic Microphone Sensor in their projects.