Cirkit Designer Logo
Cirkit Designer
Your all-in-one circuit design IDE
Home / 
Component Documentation

How to Use Steaker: Examples, Pinouts, and Specs

Image of Steaker
Cirkit Designer LogoDesign with Steaker in Cirkit Designer

Introduction

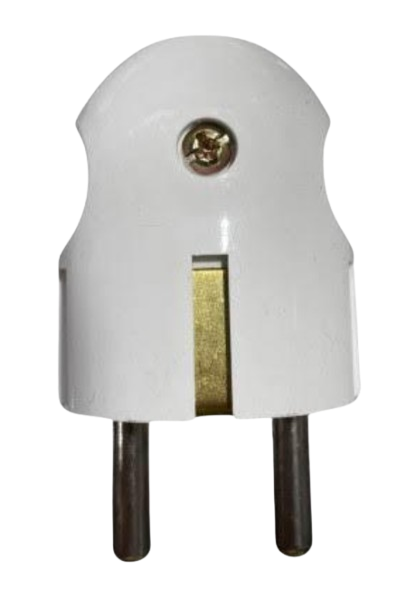
The Steaker (Manufacturer: SMKN1KRAS, Part ID: A) is a versatile device designed for use in electronic circuits to connect or disconnect components. It is commonly employed in testing, maintenance, and prototyping applications, where temporary or controlled connections are required. The Steaker simplifies circuit debugging and allows for quick modifications without the need for soldering or permanent connections.

Explore Projects Built with Steaker

Use Cirkit Designer to design, explore, and prototype these projects online. Some projects support real-time simulation. Click "Open Project" to start designing instantly!
Arduino Mega 2560 Stepper Motor Controller with LCD Display and Keypad
Image of Stepper-encoder-LCD-keyboard: A project utilizing Steaker in a practical application
This circuit controls a stepper motor using an Arduino Mega 2560, a DM542T driver, an LCD display, a membrane keypad, and a rotary encoder. The user can set and fine-tune the rotation angle and speed of the stepper motor via the keypad and rotary encoder, with the current settings displayed on the LCD.
Cirkit Designer LogoOpen Project in Cirkit Designer
Arduino UNO-Based Automatic Styrofoam Cutter with Dual Stepper Motor Control
Image of Automatic Styrofoam Cutter: A project utilizing Steaker in a practical application
This circuit is an automatic styrofoam cutter controlled by an Arduino UNO, which drives two stepper motors using an A4988 driver for a bipolar stepper motor and a ULN2003 driver for a unipolar stepper motor. The Arduino sends control signals to the drivers to rotate the motors, powered by a 12V power supply.
Cirkit Designer LogoOpen Project in Cirkit Designer
Teensy 4.1 Controlled Precision Stepper Motor System with OLED Display and Logic Level Conversion
Image of Teensy ELS V2.2: A project utilizing Steaker in a practical application
This circuit features a Teensy 4.1 microcontroller interfaced with a keypad for user input, an OLED display for visual feedback, and an optical rotary encoder for position sensing. It controls a closed-loop stepper motor via a Stepperonline CL57T driver, with a bi-directional logic level converter to ensure compatible voltage levels between the microcontroller and the stepper driver. The circuit is likely designed for precise motion control applications, such as CNC machines or robotic systems, where user input is used to adjust parameters like pitch or position.
Cirkit Designer LogoOpen Project in Cirkit Designer
Arduino UNO and VC-02 Module-Based Voice-Controlled Stepper Motor System
Image of automatic bike stand slider and voice communication: A project utilizing Steaker in a practical application
This circuit integrates an Arduino UNO to control a stepper motor via an A4988 driver and interfaces with a VC-02 module for audio processing. The condenser microphone captures audio signals, which are processed by the VC-02 module and output through a loudspeaker, while the Arduino also communicates with the VC-02 module and controls the stepper motor's movements.
Cirkit Designer LogoOpen Project in Cirkit Designer

Explore Projects Built with Steaker

Use Cirkit Designer to design, explore, and prototype these projects online. Some projects support real-time simulation. Click "Open Project" to start designing instantly!
Image of Stepper-encoder-LCD-keyboard: A project utilizing Steaker in a practical application
Arduino Mega 2560 Stepper Motor Controller with LCD Display and Keypad
This circuit controls a stepper motor using an Arduino Mega 2560, a DM542T driver, an LCD display, a membrane keypad, and a rotary encoder. The user can set and fine-tune the rotation angle and speed of the stepper motor via the keypad and rotary encoder, with the current settings displayed on the LCD.
Cirkit Designer LogoOpen Project in Cirkit Designer
Image of Automatic Styrofoam Cutter: A project utilizing Steaker in a practical application
Arduino UNO-Based Automatic Styrofoam Cutter with Dual Stepper Motor Control
This circuit is an automatic styrofoam cutter controlled by an Arduino UNO, which drives two stepper motors using an A4988 driver for a bipolar stepper motor and a ULN2003 driver for a unipolar stepper motor. The Arduino sends control signals to the drivers to rotate the motors, powered by a 12V power supply.
Cirkit Designer LogoOpen Project in Cirkit Designer
Image of Teensy ELS V2.2: A project utilizing Steaker in a practical application
Teensy 4.1 Controlled Precision Stepper Motor System with OLED Display and Logic Level Conversion
This circuit features a Teensy 4.1 microcontroller interfaced with a keypad for user input, an OLED display for visual feedback, and an optical rotary encoder for position sensing. It controls a closed-loop stepper motor via a Stepperonline CL57T driver, with a bi-directional logic level converter to ensure compatible voltage levels between the microcontroller and the stepper driver. The circuit is likely designed for precise motion control applications, such as CNC machines or robotic systems, where user input is used to adjust parameters like pitch or position.
Cirkit Designer LogoOpen Project in Cirkit Designer
Image of automatic bike stand slider and voice communication: A project utilizing Steaker in a practical application
Arduino UNO and VC-02 Module-Based Voice-Controlled Stepper Motor System
This circuit integrates an Arduino UNO to control a stepper motor via an A4988 driver and interfaces with a VC-02 module for audio processing. The condenser microphone captures audio signals, which are processed by the VC-02 module and output through a loudspeaker, while the Arduino also communicates with the VC-02 module and controls the stepper motor's movements.
Cirkit Designer LogoOpen Project in Cirkit Designer

Common Applications and Use Cases

  • Circuit testing and debugging
  • Prototyping and temporary circuit modifications
  • Maintenance and repair of electronic systems
  • Isolation of specific components for troubleshooting
  • Educational purposes in electronics labs

Technical Specifications

The Steaker is designed to handle a wide range of electronic applications. Below are its key technical specifications:

Parameter Value
Operating Voltage 0–50V DC
Maximum Current Rating 5A
Contact Resistance ≤ 50 mΩ
Insulation Resistance ≥ 100 MΩ
Operating Temperature -20°C to +70°C
Dimensions 25mm x 10mm x 5mm
Material High-grade conductive alloy
Lifespan 10,000 connection cycles

Pin Configuration and Descriptions

The Steaker typically features two pins or terminals for connection. Below is the pin configuration:

Pin Name Description
1 Input Terminal Connects to the input side of the circuit or component to be tested or isolated.
2 Output Terminal Connects to the output side of the circuit or component.

Usage Instructions

How to Use the Steaker in a Circuit

  1. Identify the Connection Points: Determine the points in the circuit where the Steaker will be inserted.
  2. Connect the Terminals:
    • Attach the Input Terminal to the circuit's input side.
    • Attach the Output Terminal to the circuit's output side.
  3. Engage or Disengage: Use the Steaker's mechanism (e.g., a switch or lever) to connect or disconnect the circuit as needed.
  4. Test the Circuit: Perform your testing or maintenance tasks while the Steaker is in place.

Important Considerations and Best Practices

  • Voltage and Current Ratings: Ensure the Steaker is used within its specified voltage and current limits to avoid damage.
  • Secure Connections: Make sure the terminals are securely connected to prevent accidental disconnections.
  • Avoid Overheating: Prolonged use at high currents may cause the Steaker to heat up. Allow it to cool if necessary.
  • Clean Contacts: Periodically clean the terminals to maintain low contact resistance and reliable performance.
  • Use in Low-Noise Environments: For sensitive circuits, ensure the Steaker does not introduce electrical noise.

Example: Using the Steaker with an Arduino UNO

The Steaker can be used to isolate or connect components in an Arduino-based project. Below is an example of using the Steaker to control an LED circuit:

Circuit Setup

  • Connect the Steaker's Input Terminal to pin 13 of the Arduino UNO.
  • Connect the Steaker's Output Terminal to the positive leg of the LED.
  • Complete the circuit by connecting the LED's negative leg to a resistor, and then to the Arduino's GND.

Arduino Code

// Example code to control an LED using a Steaker
// Ensure the Steaker is properly connected to the circuit

const int ledPin = 13; // Pin connected to the Steaker's input terminal

void setup() {
  pinMode(ledPin, OUTPUT); // Set pin 13 as an output
}

void loop() {
  digitalWrite(ledPin, HIGH); // Turn the LED on
  delay(1000);                // Wait for 1 second
  digitalWrite(ledPin, LOW);  // Turn the LED off
  delay(1000);                // Wait for 1 second
}

Troubleshooting and FAQs

Common Issues and Solutions

  1. Issue: The Steaker does not establish a connection.

    • Solution: Check that the terminals are securely connected and free of dirt or corrosion. Ensure the Steaker's mechanism is functioning properly.
  2. Issue: High resistance in the circuit.

    • Solution: Clean the Steaker's terminals to reduce contact resistance. Verify that the connections are tight.
  3. Issue: Overheating during use.

    • Solution: Ensure the current passing through the Steaker does not exceed its 5A rating. Allow the device to cool if it becomes too hot.
  4. Issue: Intermittent connections.

    • Solution: Inspect the Steaker for wear or damage. Replace the device if it has exceeded its lifespan of 10,000 cycles.

FAQs

  • Q: Can the Steaker be used with AC circuits?
    A: The Steaker is primarily designed for DC circuits. For AC applications, ensure the voltage and current ratings are not exceeded.

  • Q: How do I clean the Steaker's terminals?
    A: Use a soft cloth or a small amount of isopropyl alcohol to clean the terminals. Avoid abrasive materials that could damage the surface.

  • Q: Is the Steaker suitable for high-frequency circuits?
    A: The Steaker is best suited for low-frequency or DC applications. For high-frequency circuits, consider components specifically designed for such use.

  • Q: Can I use multiple Steakers in a single circuit?
    A: Yes, multiple Steakers can be used as long as each is within its specified ratings and properly connected.

This documentation provides all the necessary details to effectively use and troubleshoot the Steaker in various electronic applications.