How to Use bluno beetle: Examples, Pinouts, and Specs
Introduction
The Bluno Beetle is a microcontroller board based on the ATmega328 and equipped with a TI CC2540 Bluetooth 4.0 chip. Manufactured by DFRobot, this component is designed for makers and hobbyists who require wireless communication for their projects. It is particularly well-suited for wearable devices due to its small size and low power consumption. The Bluno Beetle can be used for a variety of applications, including robotics, smart home devices, and interactive artwork.
Explore Projects Built with bluno beetle
Explore Projects Built with bluno beetle
Technical Specifications
Key Technical Details
- Microcontroller: ATmega328
- Bluetooth Chip: TI CC2540
- Operating Voltage: 5V (via USB) or 3.3-4.2V (via BAT)
- Input Voltage (VIN): 3.7-5V
- Digital I/O Pins: 6
- Analog Input Pins: 4
- PWM Channels: 2
- UART Interfaces: 1
- Micro USB Connector: 1
- Integrated Li-Polymer Battery Charger
- Flash Memory: 32 KB (ATmega328) of which 4 KB used by bootloader
- SRAM: 2 KB (ATmega328)
- EEPROM: 1 KB (ATmega328)
- Clock Speed: 16 MHz
- Bluetooth Version: 4.0 (also known as Bluetooth Low Energy or BLE)
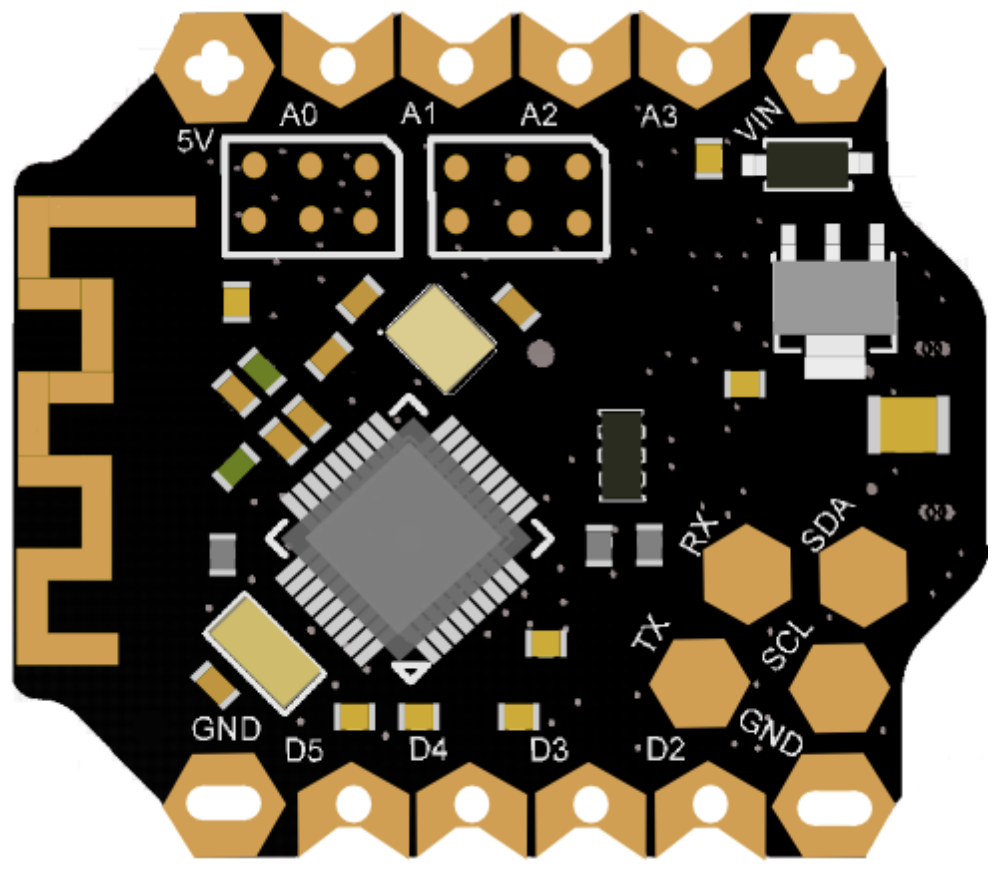
Pin Configuration and Descriptions
| Pin Number | Function | Description |
|---|---|---|
| D2 | Digital I/O | General-purpose digital input/output pin |
| D3 | Digital I/O, PWM | General-purpose digital input/output pin, PWM capable |
| D4 | Digital I/O | General-purpose digital input/output pin |
| D5 | Digital I/O, PWM | General-purpose digital input/output pin, PWM capable |
| D6 | Digital I/O | General-purpose digital input/output pin |
| D7 | Digital I/O | General-purpose digital input/output pin |
| A0 | Analog Input | Analog input pin |
| A1 | Analog Input | Analog input pin |
| A2 | Analog Input | Analog input pin |
| A3 | Analog Input | Analog input pin |
| VIN | Voltage Input | Used to power the board with an external power source |
| GND | Ground | Common ground for power and logic |
| RST | Reset | Resets the microcontroller |
| RXD | UART Receive | Serial data receive pin |
| TXD | UART Transmit | Serial data transmit pin |
| BLK | BLE Mode | Bluetooth module status and mode selection |
| 5V | 5V Output | Regulated 5V output pin |
| 3V3 | 3.3V Output | Regulated 3.3V output pin |
Usage Instructions
Integrating Bluno Beetle into a Circuit
Powering the Board: The Bluno Beetle can be powered via the USB connection or with a 3.7V Li-Polymer battery connected to the BAT connector. Ensure that the power source does not exceed the recommended voltage levels.
Programming the Board: The board can be programmed using the Arduino IDE. Select "Arduino Uno" as the board type, and choose the appropriate COM port for the USB connection.
Connecting Bluetooth: To pair the Bluno Beetle with another Bluetooth device, power the board and search for available Bluetooth devices on your smartphone or computer. The default name is "Bluno".
Using I/O Pins: Connect sensors, actuators, or other components to the digital and analog pins as required for your project. Be mindful of the voltage and current limitations of each pin.
Best Practices
- Always disconnect the power source before making or altering connections.
- Use a current limiting resistor when connecting LEDs to the output pins.
- Avoid placing the board in environments with extreme temperatures or humidity.
- Ensure proper antenna placement for optimal Bluetooth range and performance.
Troubleshooting and FAQs
Common Issues
- Device Not Pairing: Ensure the Bluno Beetle is in pairing mode and that no other device is currently connected to it.
- Cannot Upload Sketch: Check the USB cable and ensure the correct board and port are selected in the Arduino IDE.
- Unexpected Behavior: Reset the board using the RST pin or re-upload the sketch to ensure the program is running correctly.
FAQs
Q: Can the Bluno Beetle be used with a 5V sensor? A: Yes, but ensure that the sensor is connected to the 5V output pin and not directly to the board's power input.
Q: How do I update the BLE firmware? A: Firmware updates can be done through the DFRobot website, following their specific instructions for the Bluno series.
Q: What is the range of the Bluetooth connection? A: The typical range is up to 30 meters without obstacles, but this can vary based on environmental factors.
Example Code for Arduino UNO
// This example code is designed to quickly deploy an example sketch to a Bluno Beetle
// It will blink the onboard LED connected to pin D13.

void setup() {
  pinMode(13, OUTPUT); // Initialize the LED pin as an output
}

void loop() {
  digitalWrite(13, HIGH);   // Turn the LED on
  delay(1000);              // Wait for a second
  digitalWrite(13, LOW);    // Turn the LED off
  delay(1000);              // Wait for a second
}
Remember to add comments to your code to explain each function and to maintain readability. This example is a simple starting point to ensure your Bluno Beetle is functioning correctly. For more advanced BLE functionalities, refer to the DFRobot Bluno series library and examples.