How to Use PT100 Temperature Transmitter: Examples, Pinouts, and Specs
Introduction
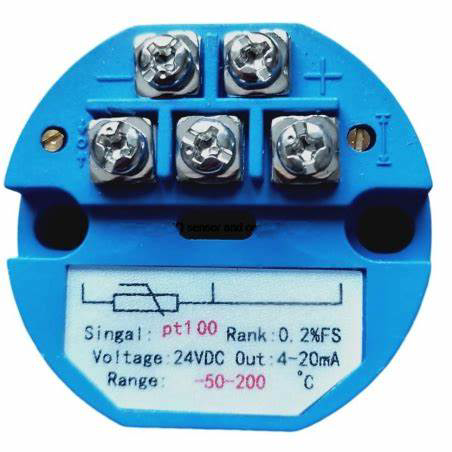
The PT100 Temperature Transmitter (Manufacturer Part ID: PT100-4-20mA-TX) is a device designed to convert the resistance of a PT100 temperature sensor into a standardized output signal, typically 4-20 mA. This enables precise temperature measurement and monitoring in industrial and automation systems. The transmitter ensures reliable signal transmission over long distances, making it ideal for harsh environments and critical applications.
Explore Projects Built with PT100 Temperature Transmitter

Explore Projects Built with PT100 Temperature Transmitter
Common Applications
- Industrial process control and monitoring
- HVAC systems
- Food and beverage processing
- Chemical and pharmaceutical industries
- Power plants and energy systems
Technical Specifications
Below are the key technical details and pin configuration for the PT100 Temperature Transmitter:
Key Technical Details
| Parameter | Specification |
|---|---|
| Input Sensor Type | PT100 (Platinum Resistance Sensor) |
| Input Range | -50°C to 200°C |
| Output Signal | 4-20 mA (current loop) |
| Supply Voltage | 12-36 V DC |
| Accuracy | ±0.2% of full scale |
| Operating Temperature Range | -40°C to 85°C |
| Mounting Type | DIN rail or field-mounted |
| Electrical Isolation | 1500 V AC |
| Response Time | < 100 ms |
Pin Configuration and Descriptions
| Pin Number | Label | Description |
|---|---|---|
| 1 | +V | Positive supply voltage (12-36 V DC) |
| 2 | -V | Negative supply voltage (ground) |
| 3 | PT100+ | Positive terminal for PT100 sensor connection |
| 4 | PT100- | Negative terminal for PT100 sensor connection |
| 5 | OUT+ | Positive terminal for 4-20 mA output signal |
| 6 | OUT- | Negative terminal for 4-20 mA output signal |
Usage Instructions
How to Use the PT100 Temperature Transmitter in a Circuit
- Power Supply: Connect a DC power supply (12-36 V) to the
+Vand-Vpins of the transmitter. - Sensor Connection: Attach the PT100 sensor to the
PT100+andPT100-terminals. Ensure proper polarity and secure connections. - Output Signal: Connect the
OUT+andOUT-terminals to the input of a current-measuring device (e.g., PLC, data logger, or multimeter). - Calibration: If required, calibrate the transmitter using the manufacturer's instructions to ensure accurate temperature readings.
- Mounting: Install the transmitter on a DIN rail or in a suitable enclosure for field use.
Important Considerations and Best Practices
- Wiring: Use shielded cables to minimize electrical noise, especially in industrial environments.
- Sensor Placement: Ensure the PT100 sensor is properly installed in the measurement area for accurate readings.
- Power Supply: Verify that the power supply voltage is within the specified range (12-36 V DC).
- Load Resistance: Ensure the total load resistance in the current loop does not exceed the transmitter's maximum capacity.
- Environmental Protection: If used in harsh environments, protect the transmitter with an appropriate enclosure.
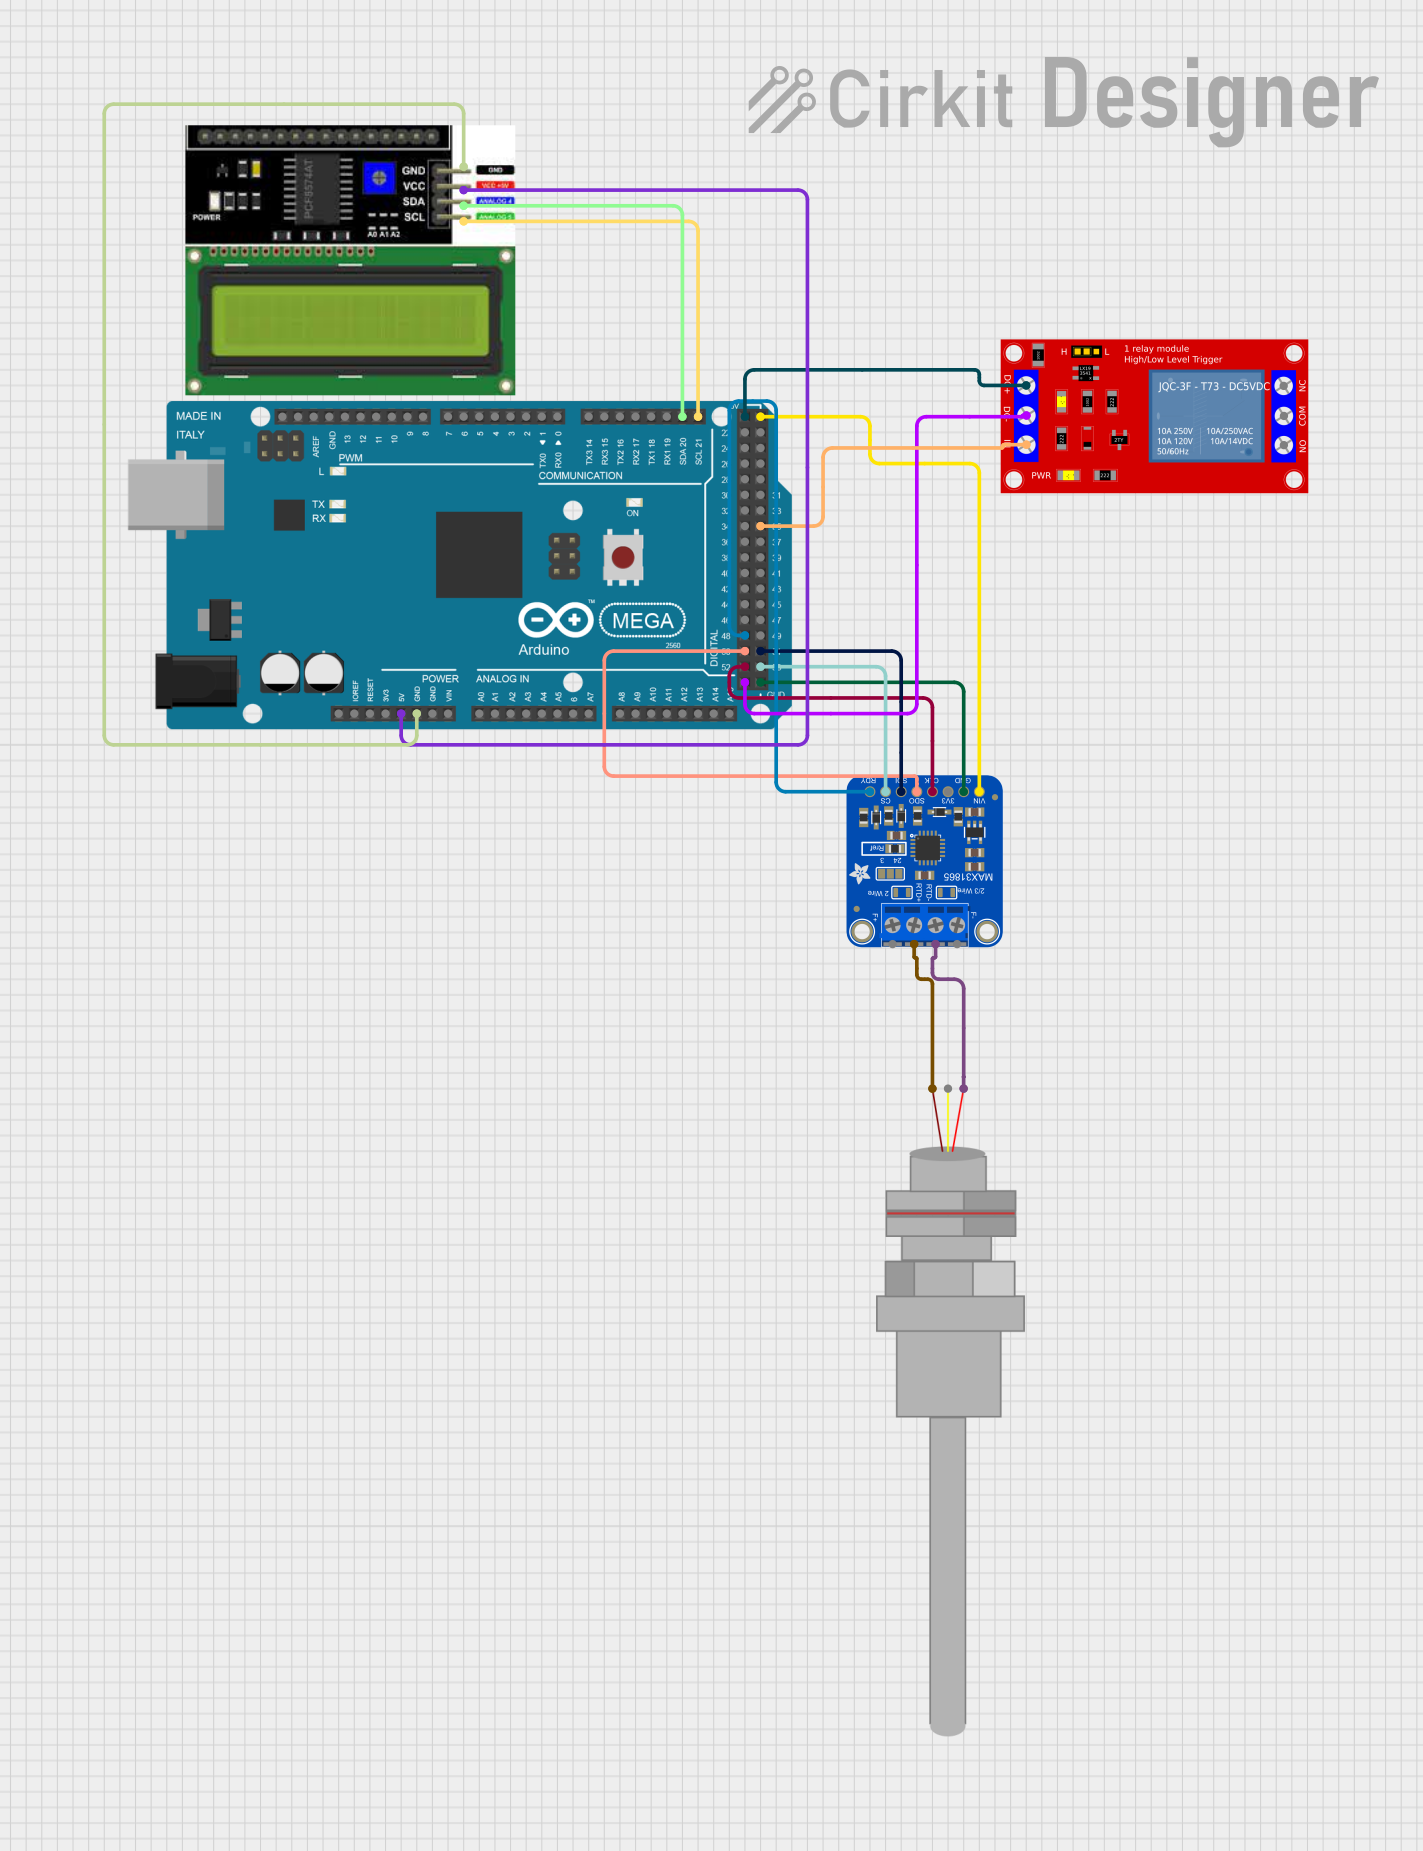
Example: Connecting to an Arduino UNO
The PT100 Temperature Transmitter can be interfaced with an Arduino UNO using a 4-20 mA current loop receiver module. Below is an example code snippet for reading the temperature:
// Example code for interfacing PT100 Temperature Transmitter with Arduino UNO
// This code assumes the use of a 4-20 mA receiver module connected to Arduino's A0 pin.

const int analogPin = A0;  // Analog pin connected to the 4-20 mA receiver module
const float minCurrent = 4.0;  // Minimum current in mA
const float maxCurrent = 20.0; // Maximum current in mA
const float minTemp = -50.0;   // Minimum temperature in °C
const float maxTemp = 200.0;   // Maximum temperature in °C

void setup() {
  Serial.begin(9600);  // Initialize serial communication
}

void loop() {
  int analogValue = analogRead(analogPin);  // Read analog value (0-1023)
  float current = (analogValue / 1023.0) * 5.0;  // Convert to voltage (0-5V)
  current = (current / 250.0) * 1000.0;  // Convert to current in mA (250 ohm resistor)

  // Map current (4-20 mA) to temperature (-50°C to 200°C)
  float temperature = map(current * 100, minCurrent * 100, maxCurrent * 100,
                          minTemp * 100, maxTemp * 100) / 100.0;

  Serial.print("Temperature: ");
  Serial.print(temperature);
  Serial.println(" °C");

  delay(1000);  // Wait for 1 second
}
Troubleshooting and FAQs
Common Issues and Solutions
| Issue | Possible Cause | Solution |
|---|---|---|
| No output signal | Incorrect wiring or loose connections | Verify all connections and wiring polarity |
| Output signal out of range | Sensor or transmitter malfunction | Check the PT100 sensor and transmitter |
| Fluctuating readings | Electrical noise or interference | Use shielded cables and proper grounding |
| Incorrect temperature readings | Calibration error | Recalibrate the transmitter |
| Overheating of the transmitter | Excessive supply voltage | Ensure supply voltage is within 12-36 V DC |
FAQs
Can I use a PT100 sensor with a different temperature range?
Yes, but ensure the transmitter is compatible with the sensor's range and specifications.What is the maximum cable length for the PT100 sensor?
The maximum length depends on the cable type and environment. Use low-resistance, shielded cables for longer distances.Can I use the transmitter in outdoor environments?
Yes, but ensure it is housed in a weatherproof enclosure to protect it from moisture and dust.How do I verify the accuracy of the transmitter?
Use a calibrated reference thermometer to compare readings and adjust the transmitter if necessary.