Cirkit Designer Logo
Cirkit Designer
Your all-in-one circuit design IDE
Home / 
Component Documentation

How to Use grayscale 3ch sensor: Examples, Pinouts, and Specs

Image of grayscale 3ch sensor
Cirkit Designer LogoDesign with grayscale 3ch sensor in Cirkit Designer

Introduction

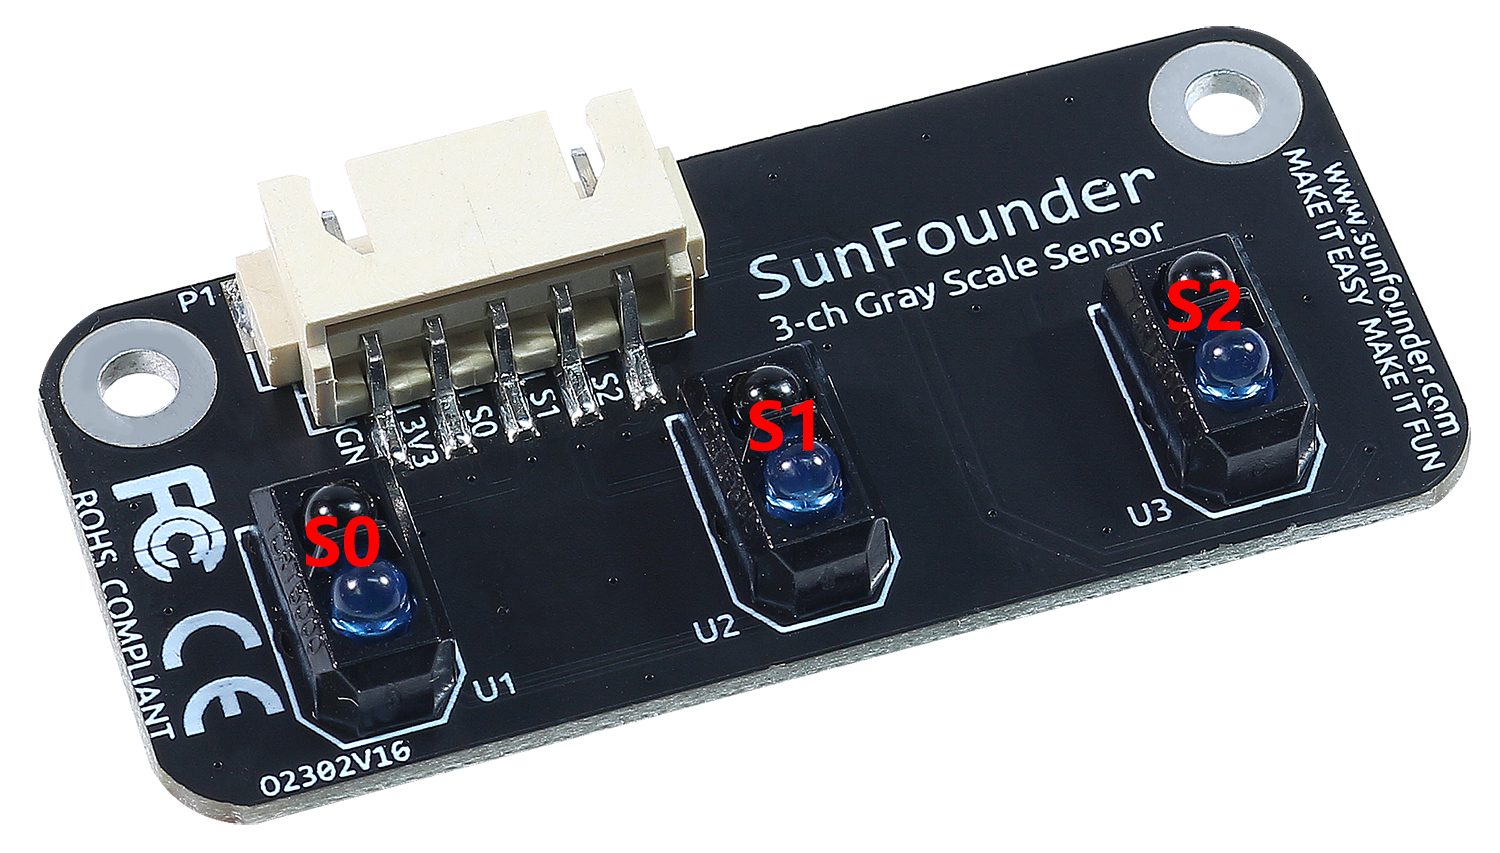
The Grayscale 3CH Sensor by SunFounder (Part ID: Grayscale 3CH Sensor) is a versatile light intensity sensor designed to detect variations in grayscale levels across three independent channels. This component is ideal for applications requiring precise light intensity measurements, such as robotics, line-following vehicles, and machine vision systems. By capturing grayscale data, the sensor enables detailed image processing and analysis, making it a valuable tool for projects involving object detection, path tracking, and environmental monitoring.

Explore Projects Built with grayscale 3ch sensor

Use Cirkit Designer to design, explore, and prototype these projects online. Some projects support real-time simulation. Click "Open Project" to start designing instantly!
Arduino Micro and TCS3200 Color Sensor System
Image of Light sensor v0.1: A project utilizing grayscale 3ch sensor in a practical application
This circuit consists of an Arduino Micro (Rev3) connected to a TCS3200 color sensor. The Arduino controls the sensor's configuration pins (S0, S1, S2, S3) and reads the sensor's output to detect color information, which can be used for various applications such as color recognition or sorting.
Cirkit Designer LogoOpen Project in Cirkit Designer
Arduino Nano-Controlled Lighting System with Gesture and Sound Interaction
Image of 4 load controll using hand gesture and sound controll: A project utilizing grayscale 3ch sensor in a practical application
This circuit features an Arduino Nano microcontroller interfaced with an APDS-9960 RGB and Gesture Sensor for color and gesture detection, and a KY-038 microphone module for sound detection. The Arduino controls a 4-channel relay module, which in turn switches four AC bulbs on and off. The 12V power supply is used to power the relay module, and the bulbs are connected to the normally open (N.O.) contacts of the relays, allowing the Arduino to control the lighting based on sensor inputs.
Cirkit Designer LogoOpen Project in Cirkit Designer
Arduino UNO with TCS34725 Color Sensor and LDR Light Detection
Image of SSC: A project utilizing grayscale 3ch sensor in a practical application
This circuit features an Arduino UNO microcontroller connected to an Adafruit TCS34725 RGB Color Sensor and a photocell (LDR) with a 10k Ohm resistor forming a voltage divider connected to the Arduino's analog input A0. The RGB sensor is interfaced with the Arduino via I2C communication, using SDA and SCL lines. The purpose of this circuit is likely to measure ambient light intensity with the photocell and detect colors with the RGB sensor, both interfaced with the Arduino for processing and potential output of the sensor data.
Cirkit Designer LogoOpen Project in Cirkit Designer
NodeMCU ESP8266 Smart Door Security System with Color Sensor and Relay Control
Image of NodeMCU 8266 V3 rgb color sensor buzzer: A project utilizing grayscale 3ch sensor in a practical application
This circuit is a smart canister monitoring system that uses a TCS3472 color sensor to detect the color of the canister contents. The NodeMCU ESP8266 microcontroller processes the sensor data and controls a relay and buzzer to provide alerts based on the detected color, indicating whether the canister is empty or not.
Cirkit Designer LogoOpen Project in Cirkit Designer

Explore Projects Built with grayscale 3ch sensor

Use Cirkit Designer to design, explore, and prototype these projects online. Some projects support real-time simulation. Click "Open Project" to start designing instantly!
Image of Light sensor v0.1: A project utilizing grayscale 3ch sensor in a practical application
Arduino Micro and TCS3200 Color Sensor System
This circuit consists of an Arduino Micro (Rev3) connected to a TCS3200 color sensor. The Arduino controls the sensor's configuration pins (S0, S1, S2, S3) and reads the sensor's output to detect color information, which can be used for various applications such as color recognition or sorting.
Cirkit Designer LogoOpen Project in Cirkit Designer
Image of 4 load controll using hand gesture and sound controll: A project utilizing grayscale 3ch sensor in a practical application
Arduino Nano-Controlled Lighting System with Gesture and Sound Interaction
This circuit features an Arduino Nano microcontroller interfaced with an APDS-9960 RGB and Gesture Sensor for color and gesture detection, and a KY-038 microphone module for sound detection. The Arduino controls a 4-channel relay module, which in turn switches four AC bulbs on and off. The 12V power supply is used to power the relay module, and the bulbs are connected to the normally open (N.O.) contacts of the relays, allowing the Arduino to control the lighting based on sensor inputs.
Cirkit Designer LogoOpen Project in Cirkit Designer
Image of SSC: A project utilizing grayscale 3ch sensor in a practical application
Arduino UNO with TCS34725 Color Sensor and LDR Light Detection
This circuit features an Arduino UNO microcontroller connected to an Adafruit TCS34725 RGB Color Sensor and a photocell (LDR) with a 10k Ohm resistor forming a voltage divider connected to the Arduino's analog input A0. The RGB sensor is interfaced with the Arduino via I2C communication, using SDA and SCL lines. The purpose of this circuit is likely to measure ambient light intensity with the photocell and detect colors with the RGB sensor, both interfaced with the Arduino for processing and potential output of the sensor data.
Cirkit Designer LogoOpen Project in Cirkit Designer
Image of NodeMCU 8266 V3 rgb color sensor buzzer: A project utilizing grayscale 3ch sensor in a practical application
NodeMCU ESP8266 Smart Door Security System with Color Sensor and Relay Control
This circuit is a smart canister monitoring system that uses a TCS3472 color sensor to detect the color of the canister contents. The NodeMCU ESP8266 microcontroller processes the sensor data and controls a relay and buzzer to provide alerts based on the detected color, indicating whether the canister is empty or not.
Cirkit Designer LogoOpen Project in Cirkit Designer

Common Applications

  • Line-following robots
  • Obstacle detection and avoidance
  • Image processing and analysis
  • Industrial automation systems
  • Educational robotics projects

Technical Specifications

The following table outlines the key technical details of the Grayscale 3CH Sensor:

Parameter Specification
Operating Voltage 3.3V - 5V
Operating Current ≤ 20mA
Output Type Analog (3 channels)
Detection Range 1mm - 6mm
Response Time ≤ 2ms
Dimensions 30mm x 20mm x 10mm
Operating Temperature -10°C to 50°C

Pin Configuration and Descriptions

The Grayscale 3CH Sensor has a 4-pin interface. The pin configuration is as follows:

Pin Name Description
1 VCC Power supply input (3.3V - 5V)
2 GND Ground connection
3 OUT1 Analog output for Channel 1 (grayscale intensity)
4 OUT2 Analog output for Channel 2 (grayscale intensity)
5 OUT3 Analog output for Channel 3 (grayscale intensity)

Usage Instructions

How to Use the Component in a Circuit

  1. Power the Sensor: Connect the VCC pin to a 3.3V or 5V power source and the GND pin to the ground of your circuit.
  2. Connect Outputs: Use the OUT1, OUT2, and OUT3 pins to read the analog grayscale intensity values for each channel. These outputs can be connected to an ADC (Analog-to-Digital Converter) or directly to an Arduino's analog input pins.
  3. Positioning: Place the sensor at a distance of 1mm to 6mm from the surface to ensure accurate grayscale detection. Ensure the surface is well-lit for optimal performance.

Important Considerations and Best Practices

  • Surface Contrast: For line-following applications, ensure the surface has a clear contrast (e.g., black line on a white background).
  • Ambient Light: Minimize ambient light interference by shielding the sensor or using it in controlled lighting conditions.
  • Calibration: Calibrate the sensor outputs for your specific application to account for variations in surface reflectivity and lighting.
  • Avoid Overvoltage: Do not exceed the recommended operating voltage (5V) to prevent damage to the sensor.

Example: Connecting to an Arduino UNO

Below is an example of how to connect and use the Grayscale 3CH Sensor with an Arduino UNO:

Circuit Connections

  • Connect the VCC pin of the sensor to the 5V pin on the Arduino.
  • Connect the GND pin of the sensor to the GND pin on the Arduino.
  • Connect OUT1, OUT2, and OUT3 to Arduino analog pins A0, A1, and A2, respectively.

Arduino Code

// Grayscale 3CH Sensor Example Code
// Reads analog values from the sensor and prints them to the Serial Monitor.

const int sensorPin1 = A0; // Channel 1 connected to A0
const int sensorPin2 = A1; // Channel 2 connected to A1
const int sensorPin3 = A2; // Channel 3 connected to A2

void setup() {
  Serial.begin(9600); // Initialize serial communication at 9600 baud
}

void loop() {
  // Read analog values from each channel
  int value1 = analogRead(sensorPin1); // Read Channel 1
  int value2 = analogRead(sensorPin2); // Read Channel 2
  int value3 = analogRead(sensorPin3); // Read Channel 3

  // Print the values to the Serial Monitor
  Serial.print("Channel 1: ");
  Serial.print(value1);
  Serial.print(" | Channel 2: ");
  Serial.print(value2);
  Serial.print(" | Channel 3: ");
  Serial.println(value3);

  delay(100); // Delay for 100ms before the next reading
}

Troubleshooting and FAQs

Common Issues and Solutions

  1. No Output or Incorrect Readings

    • Cause: Incorrect wiring or loose connections.
    • Solution: Double-check all connections, ensuring the VCC and GND pins are properly connected.
  2. Inconsistent Readings

    • Cause: Ambient light interference or improper sensor positioning.
    • Solution: Shield the sensor from ambient light and ensure it is positioned within the recommended detection range (1mm - 6mm).
  3. Low Sensitivity

    • Cause: Surface reflectivity is too low.
    • Solution: Use a surface with higher contrast or adjust the lighting conditions.
  4. Sensor Overheating

    • Cause: Operating voltage exceeds 5V.
    • Solution: Ensure the power supply voltage is within the 3.3V - 5V range.

FAQs

Q1: Can the Grayscale 3CH Sensor be used with a Raspberry Pi?
A1: Yes, but since the sensor outputs analog signals, you will need an external ADC (Analog-to-Digital Converter) to interface it with the Raspberry Pi.

Q2: What is the maximum detection range of the sensor?
A2: The sensor can detect grayscale variations at a distance of 1mm to 6mm from the surface.

Q3: How do I calibrate the sensor for my application?
A3: Use the analog output values to determine the range of readings for your specific surface and lighting conditions. Adjust your code or circuit accordingly to interpret the data.

Q4: Can this sensor detect colors?
A4: No, the Grayscale 3CH Sensor is designed to detect light intensity variations (grayscale) and cannot differentiate between colors.