How to Use SIM800A: Examples, Pinouts, and Specs

Introduction
The SIM800A is a versatile GSM/GPRS module that provides cellular connectivity for voice, SMS, and data transmission. It supports quad-band frequencies (850/900/1800/1900 MHz), making it suitable for global use. The module is widely used in IoT applications, remote monitoring systems, and other projects requiring reliable wireless communication.
Explore Projects Built with SIM800A
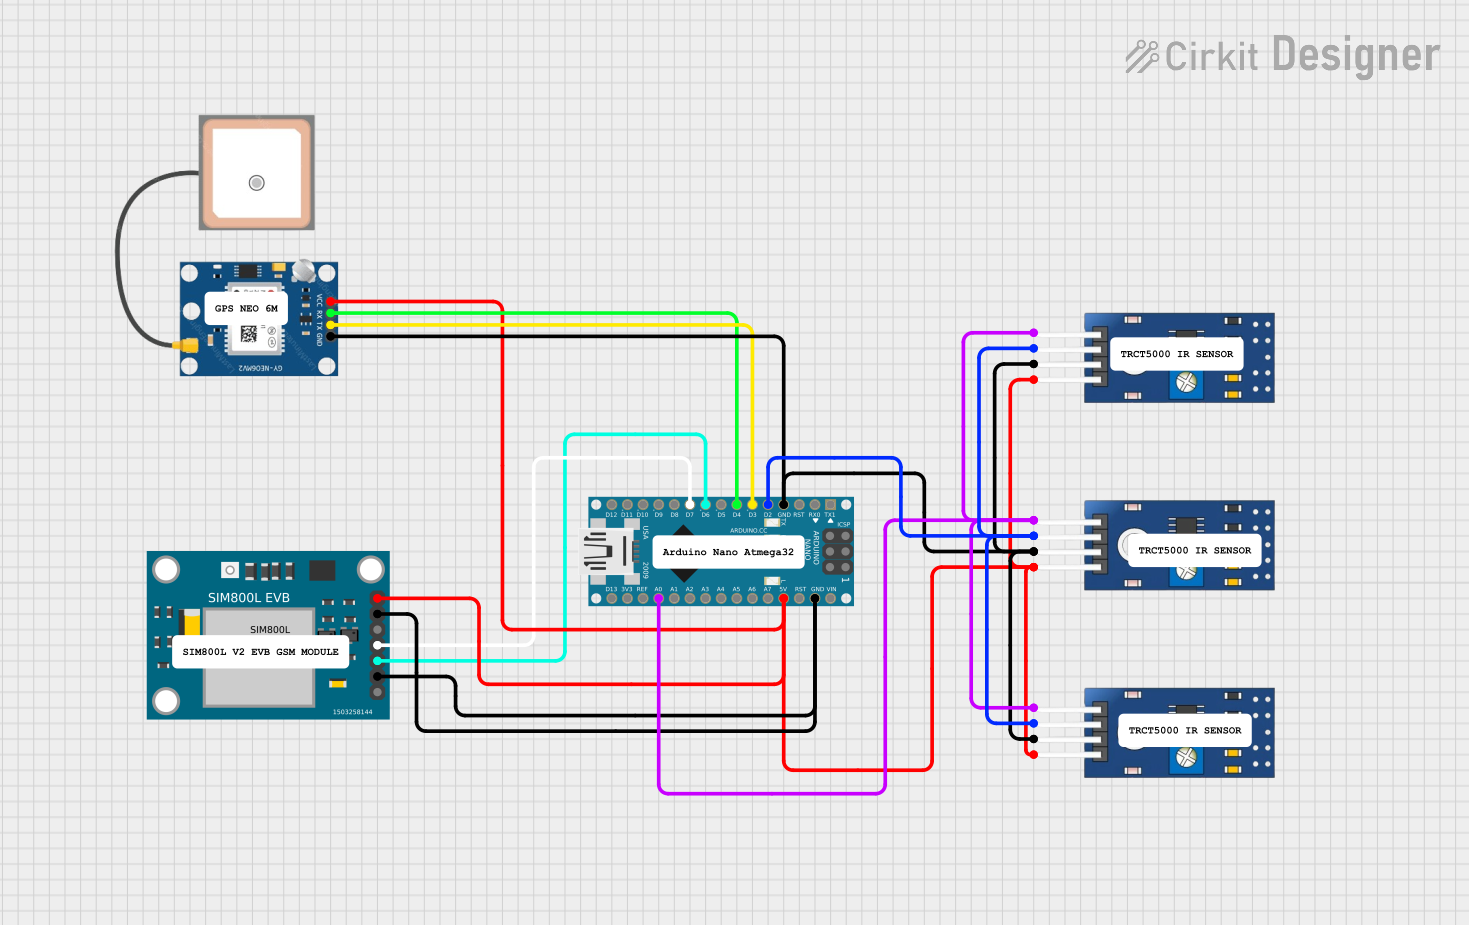


Explore Projects Built with SIM800A
Common Applications and Use Cases
- IoT Devices: Remote monitoring and control of IoT devices.
- Telematics: Vehicle tracking and fleet management.
- Home Automation: Remote control of home appliances.
- Security Systems: SMS alerts for security breaches.
- Data Transmission: Sending sensor data to remote servers.
Technical Specifications
Key Technical Details
| Parameter | Value |
|---|---|
| Operating Voltage | 3.4V - 4.4V |
| Operating Current | 1.0A (peak), 20mA (idle) |
| Frequency Bands | 850/900/1800/1900 MHz |
| Data Transmission | GPRS multi-slot class 12/10 |
| SMS | Text and PDU mode |
| Voice | Support for voice calls |
| Interface | UART, GPIO, ADC, PWM |
| Dimensions | 24mm x 24mm x 3mm |
Pin Configuration and Descriptions
| Pin Number | Pin Name | Description |
|---|---|---|
| 1 | NETLIGHT | Network status indicator |
| 2 | VCC | Power supply (3.4V - 4.4V) |
| 3 | GND | Ground |
| 4 | RXD | UART receive data |
| 5 | TXD | UART transmit data |
| 6 | DTR | Data terminal ready |
| 7 | RST | Reset |
| 8 | MIC_P | Microphone positive |
| 9 | MIC_N | Microphone negative |
| 10 | SPK_P | Speaker positive |
| 11 | SPK_N | Speaker negative |
| 12 | ADC | Analog to digital converter input |
| 13 | GPIO1 | General purpose input/output 1 |
| 14 | GPIO2 | General purpose input/output 2 |
Usage Instructions
How to Use the SIM800A in a Circuit
- Power Supply: Connect the VCC pin to a stable 3.4V - 4.4V power supply and the GND pin to ground.
- UART Communication: Connect the RXD pin to the TX pin of your microcontroller and the TXD pin to the RX pin of your microcontroller.
- Network Status: Use the NETLIGHT pin to monitor the network status (blinking indicates network activity).
- Antenna: Connect an appropriate GSM antenna to the antenna connector for better signal reception.
Important Considerations and Best Practices
- Power Supply: Ensure a stable power supply to avoid unexpected resets or malfunctions.
- Antenna Placement: Place the antenna in a location with good signal strength to ensure reliable communication.
- UART Configuration: Configure the UART baud rate to match the module's default (usually 9600 bps).
- Command Set: Familiarize yourself with the AT command set for controlling the module.
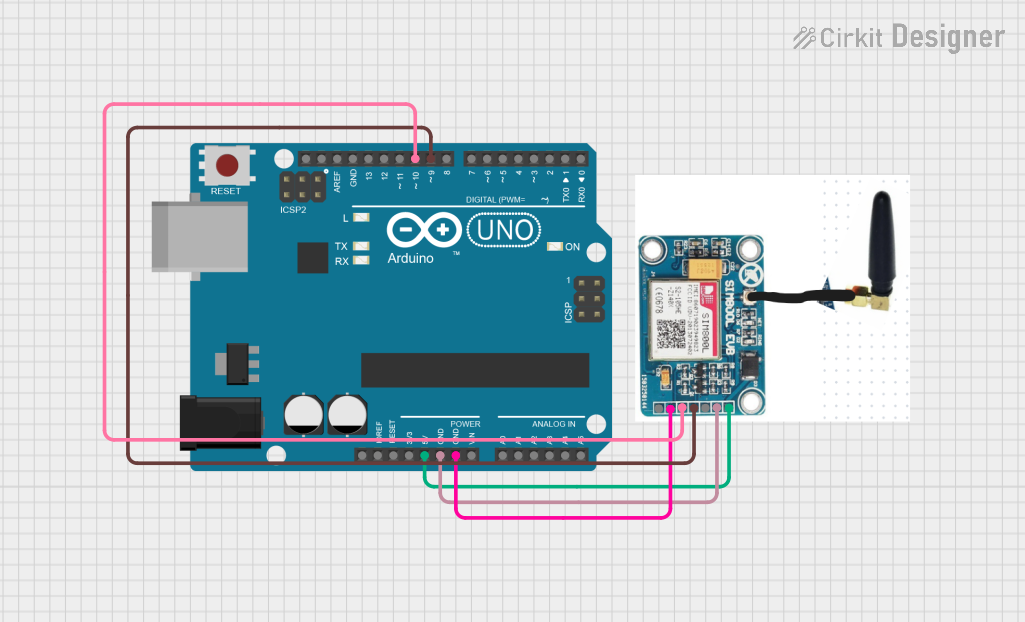
Example: Connecting SIM800A to Arduino UNO
#include <SoftwareSerial.h>

// Create a software serial port on pins 7 (RX) and 8 (TX)
SoftwareSerial sim800(7, 8);

void setup() {
  // Start communication with the SIM800A module at 9600 bps
  sim800.begin(9600);
  // Start communication with the serial monitor at 9600 bps
  Serial.begin(9600);
  delay(1000); // Wait for the module to initialize

  // Send an AT command to check communication
  sim800.println("AT");
}

void loop() {
  // Check if data is available from the SIM800A module
  if (sim800.available()) {
    // Read the data and send it to the serial monitor
    Serial.write(sim800.read());
  }

  // Check if data is available from the serial monitor
  if (Serial.available()) {
    // Read the data and send it to the SIM800A module
    sim800.write(Serial.read());
  }
}
Troubleshooting and FAQs
Common Issues and Solutions
No Response from Module:
- Solution: Check the power supply and ensure it is within the specified range. Verify the connections to the RXD and TXD pins.
Network Connection Issues:
- Solution: Ensure the antenna is properly connected and placed in an area with good signal strength. Check the SIM card for proper insertion and activation.
Unexpected Resets:
- Solution: Verify that the power supply can provide sufficient current, especially during peak transmission periods.
FAQs
Q1: How do I send an SMS using the SIM800A?
- A1: Use the AT command
AT+CMGS="phone_number"followed by the message text and a Ctrl+Z character to send an SMS.
Q2: Can the SIM800A be used for internet connectivity?
- A2: Yes, the SIM800A supports GPRS for data transmission. Use AT commands to configure and establish a GPRS connection.
Q3: What is the default baud rate of the SIM800A?
- A3: The default baud rate is usually 9600 bps, but it can be changed using AT commands.
Q4: How do I reset the SIM800A module?
- A4: You can reset the module by pulling the RST pin low for a short duration (e.g., 100ms).
This documentation provides a comprehensive guide to using the SIM800A GSM/GPRS module. Whether you are a beginner or an experienced user, following these instructions and best practices will help you integrate the module into your projects successfully.