How to Use thermostat stc1000: Examples, Pinouts, and Specs

Introduction
The STC-1000 is a versatile digital temperature controller manufactured by SMKN 2 PAS (Part ID: 0002). It is designed for precise temperature regulation in both heating and cooling applications. Equipped with a dual relay output, the STC-1000 can simultaneously control heating and cooling devices, making it ideal for a wide range of temperature-sensitive environments. Its user-friendly LCD display allows for easy monitoring and adjustment of temperature settings.
Explore Projects Built with thermostat stc1000

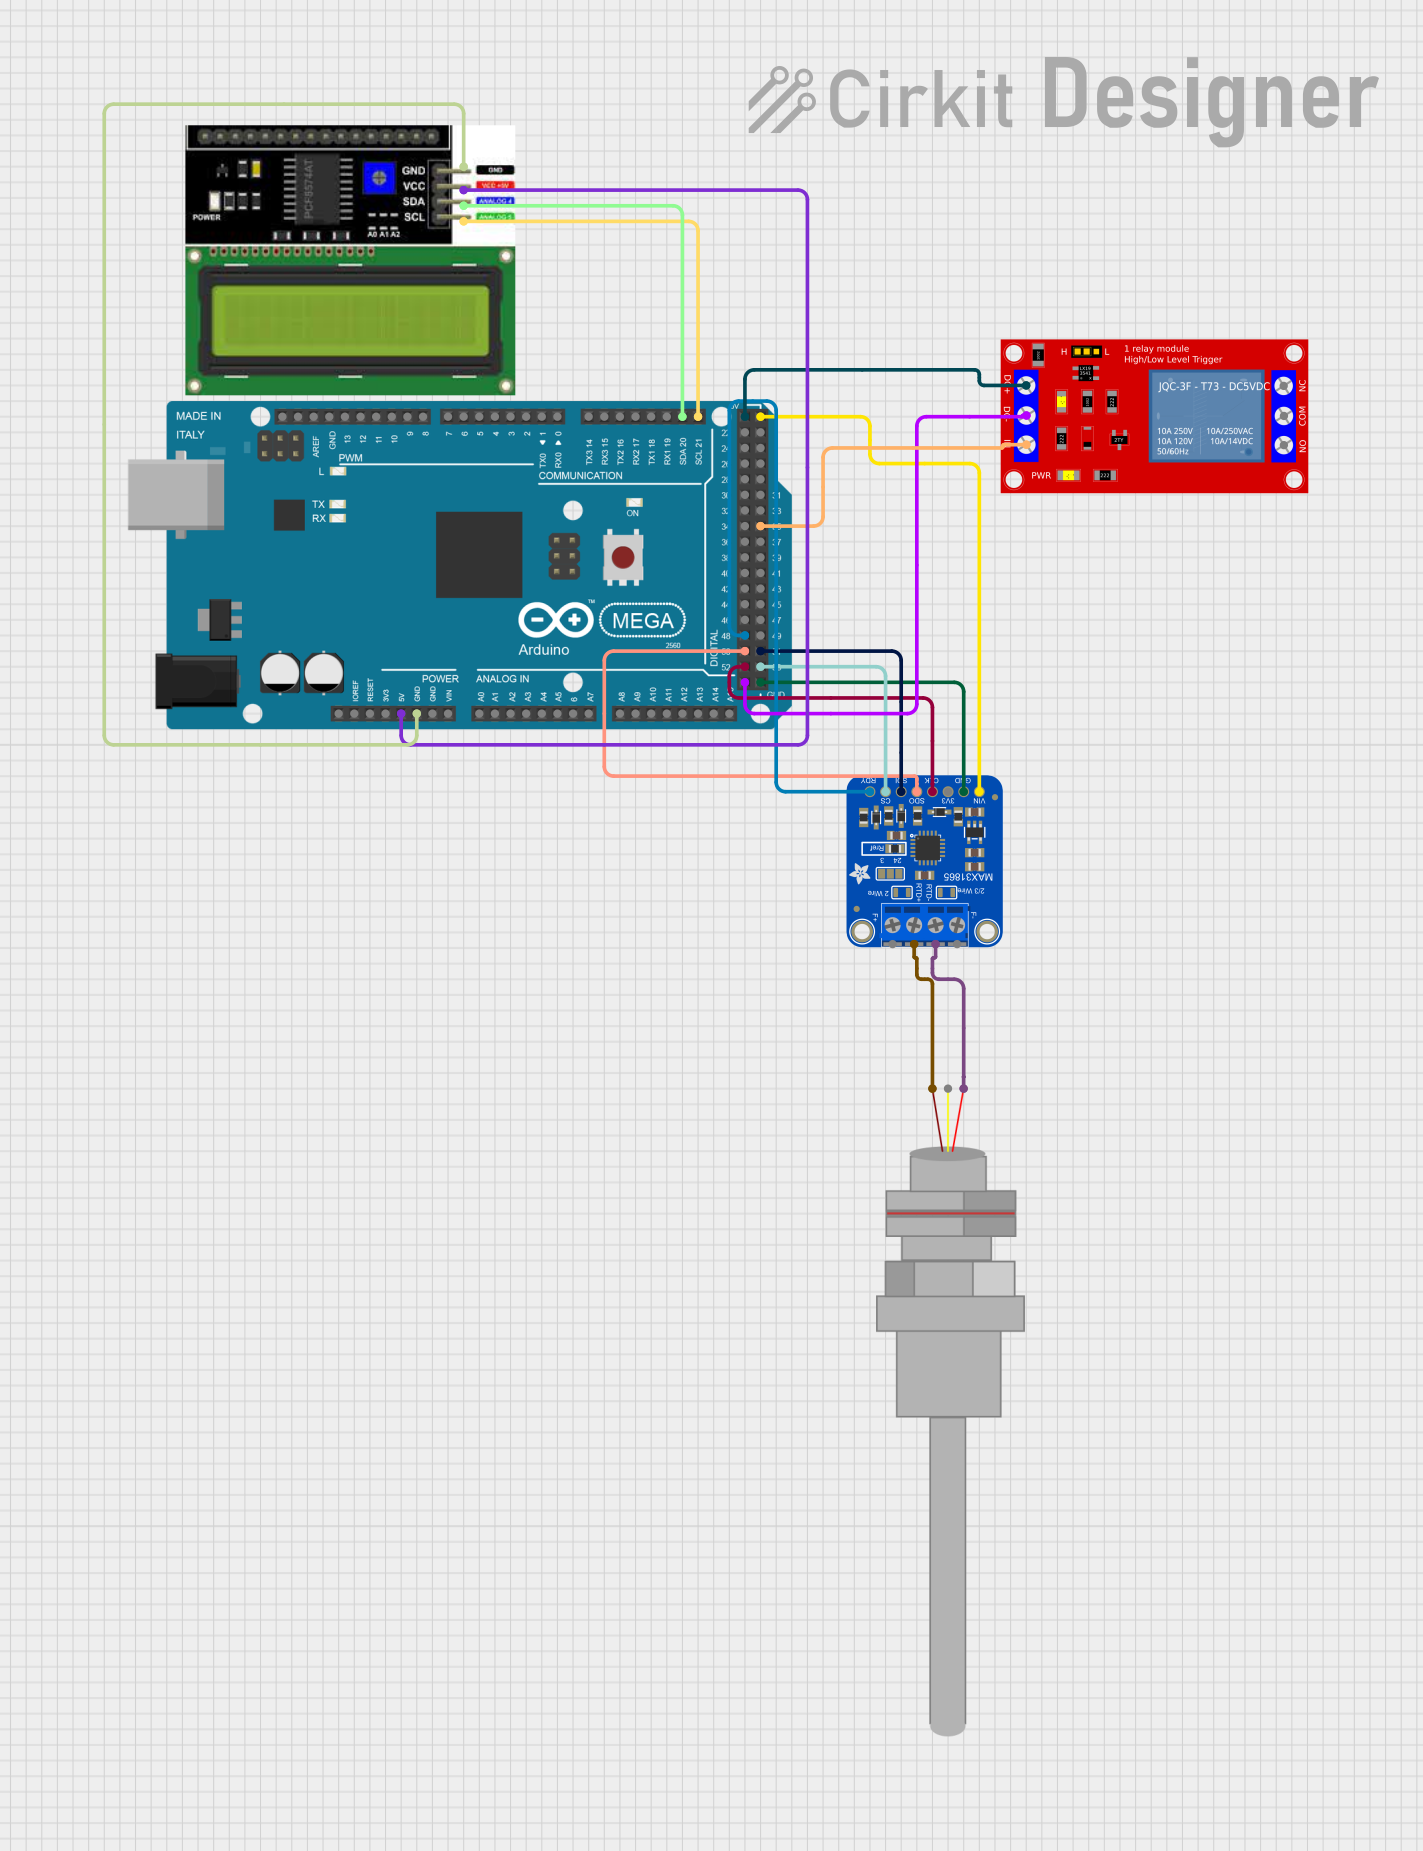
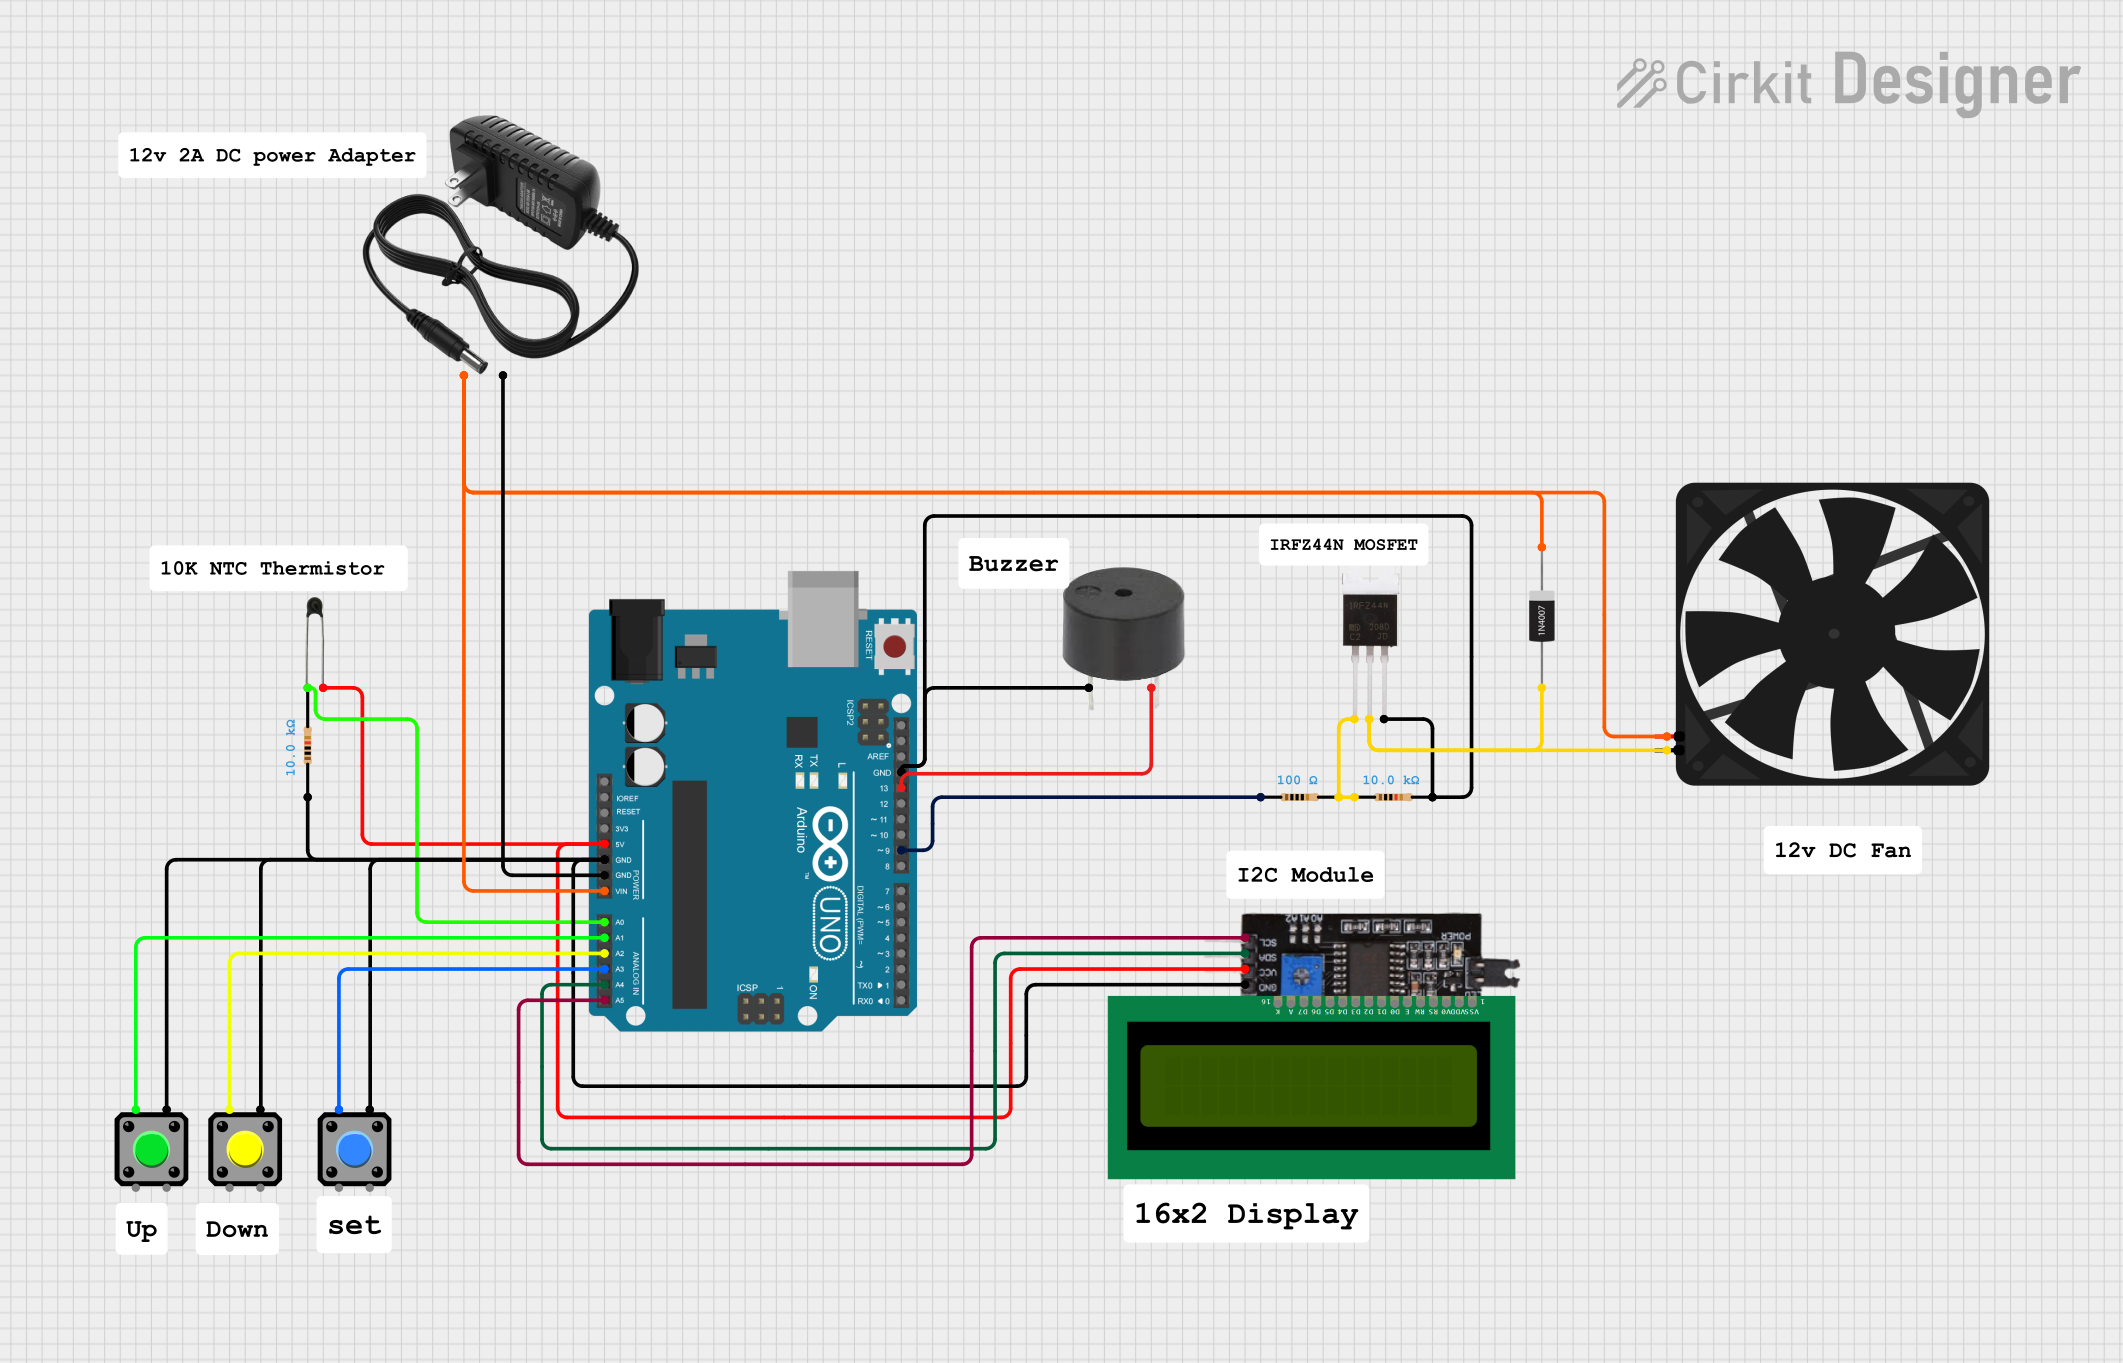

Explore Projects Built with thermostat stc1000
Common Applications
- Home brewing and fermentation temperature control
- Aquarium temperature regulation
- Incubators for eggs or scientific experiments
- HVAC systems for maintaining room temperature
- Food storage and refrigeration systems
Technical Specifications
Key Specifications
| Parameter | Value |
|---|---|
| Operating Voltage | 110V AC or 220V AC (±10%) |
| Temperature Range | -50°C to 99°C |
| Temperature Accuracy | ±1°C |
| Sensor Type | NTC (10kΩ) sensor, included |
| Relay Output Capacity | 10A at 220V AC (per relay) |
| Power Consumption | ≤3W |
| Display Type | LCD with backlight |
| Operating Temperature | -10°C to 60°C |
| Storage Temperature | -20°C to 75°C |
Pin Configuration and Descriptions
The STC-1000 has a total of 8 terminals for wiring. Below is the pin configuration:
| Terminal Number | Description |
|---|---|
| 1 | Power Input (Live/Hot wire) |
| 2 | Power Input (Neutral wire) |
| 3 | Cooling Device Output (Live/Hot wire) |
| 4 | Cooling Device Output (Neutral wire) |
| 5 | Heating Device Output (Live/Hot wire) |
| 6 | Heating Device Output (Neutral wire) |
| 7 | Temperature Sensor Input (Sensor wire 1) |
| 8 | Temperature Sensor Input (Sensor wire 2) |
Usage Instructions
How to Use the STC-1000 in a Circuit
- Wiring the Power Supply: Connect terminals 1 and 2 to the AC power source. Ensure the live wire is connected to terminal 1 and the neutral wire to terminal 2.
- Connecting the Heating and Cooling Devices:
- Connect the live wire of the cooling device to terminal 3 and the neutral wire to terminal 4.
- Connect the live wire of the heating device to terminal 5 and the neutral wire to terminal 6.
- Connecting the Temperature Sensor: Attach the two wires of the NTC sensor to terminals 7 and 8. Ensure the sensor is placed in the environment where temperature control is required.
- Power On: Once all connections are secure, power on the device. The LCD display will light up, showing the current temperature.
- Set the Desired Temperature:
- Press and hold the "SET" button to enter the temperature setting mode.
- Use the arrow buttons to adjust the desired temperature.
- Press "SET" again to save the settings.
Important Considerations and Best Practices
- Ensure all connections are secure and insulated to prevent electrical hazards.
- Place the temperature sensor in a location that accurately represents the environment's temperature.
- Avoid exposing the STC-1000 to moisture or extreme conditions beyond its operating range.
- Use a fuse or circuit breaker to protect the device and connected appliances from overcurrent.
Arduino UNO Integration Example
The STC-1000 is a standalone device and does not require an Arduino for operation. However, if you wish to monitor the temperature readings via an Arduino, you can connect an additional temperature sensor (e.g., DS18B20) to the Arduino. Below is an example code snippet for reading temperature using a DS18B20 sensor:
#include <OneWire.h>
#include <DallasTemperature.h>

// Pin where the DS18B20 sensor is connected
#define ONE_WIRE_BUS 2

// Setup a oneWire instance to communicate with the sensor
OneWire oneWire(ONE_WIRE_BUS);

// Pass the oneWire reference to DallasTemperature library
DallasTemperature sensors(&oneWire);

void setup() {
  Serial.begin(9600); // Initialize serial communication
  sensors.begin();    // Start the DS18B20 sensor
}

void loop() {
  sensors.requestTemperatures(); // Request temperature readings
  float temperature = sensors.getTempCByIndex(0); // Get temperature in Celsius

  // Print the temperature to the Serial Monitor
  Serial.print("Temperature: ");
  Serial.print(temperature);
  Serial.println(" °C");

  delay(1000); // Wait 1 second before the next reading
}
Troubleshooting and FAQs
Common Issues and Solutions
The STC-1000 does not power on:
- Check the power supply connections to terminals 1 and 2.
- Ensure the AC voltage matches the device's operating voltage (110V or 220V).
Temperature readings are inaccurate:
- Verify the sensor is properly connected to terminals 7 and 8.
- Ensure the sensor is placed in an appropriate location and is not damaged.
Heating or cooling devices do not activate:
- Check the wiring of the devices to terminals 3-6.
- Ensure the devices are functional and within the relay's output capacity (10A at 220V AC).
The device keeps resetting:
- Inspect the power supply for stability. Voltage fluctuations may cause resets.
- Check for loose connections or damaged wires.
FAQs
Q: Can I use the STC-1000 with a DC power supply?
A: No, the STC-1000 is designed for AC power input only (110V or 220V).
Q: Can I extend the length of the temperature sensor cable?
A: Yes, but ensure the extension wire is of good quality to avoid signal loss or interference.
Q: What happens if the temperature exceeds the set range?
A: The STC-1000 will activate the heating or cooling relay to bring the temperature back within the set range.
Q: Is the STC-1000 waterproof?
A: No, the device is not waterproof. Avoid exposing it to moisture or liquids.
By following this documentation, users can effectively utilize the STC-1000 for precise temperature control in various applications.