Cirkit Designer Logo
Cirkit Designer
Your all-in-one circuit design IDE
Home / 
Component Documentation

How to Use Waveshare AD Hat: Examples, Pinouts, and Specs

Image of Waveshare AD Hat
Cirkit Designer LogoDesign with Waveshare AD Hat in Cirkit Designer

Introduction

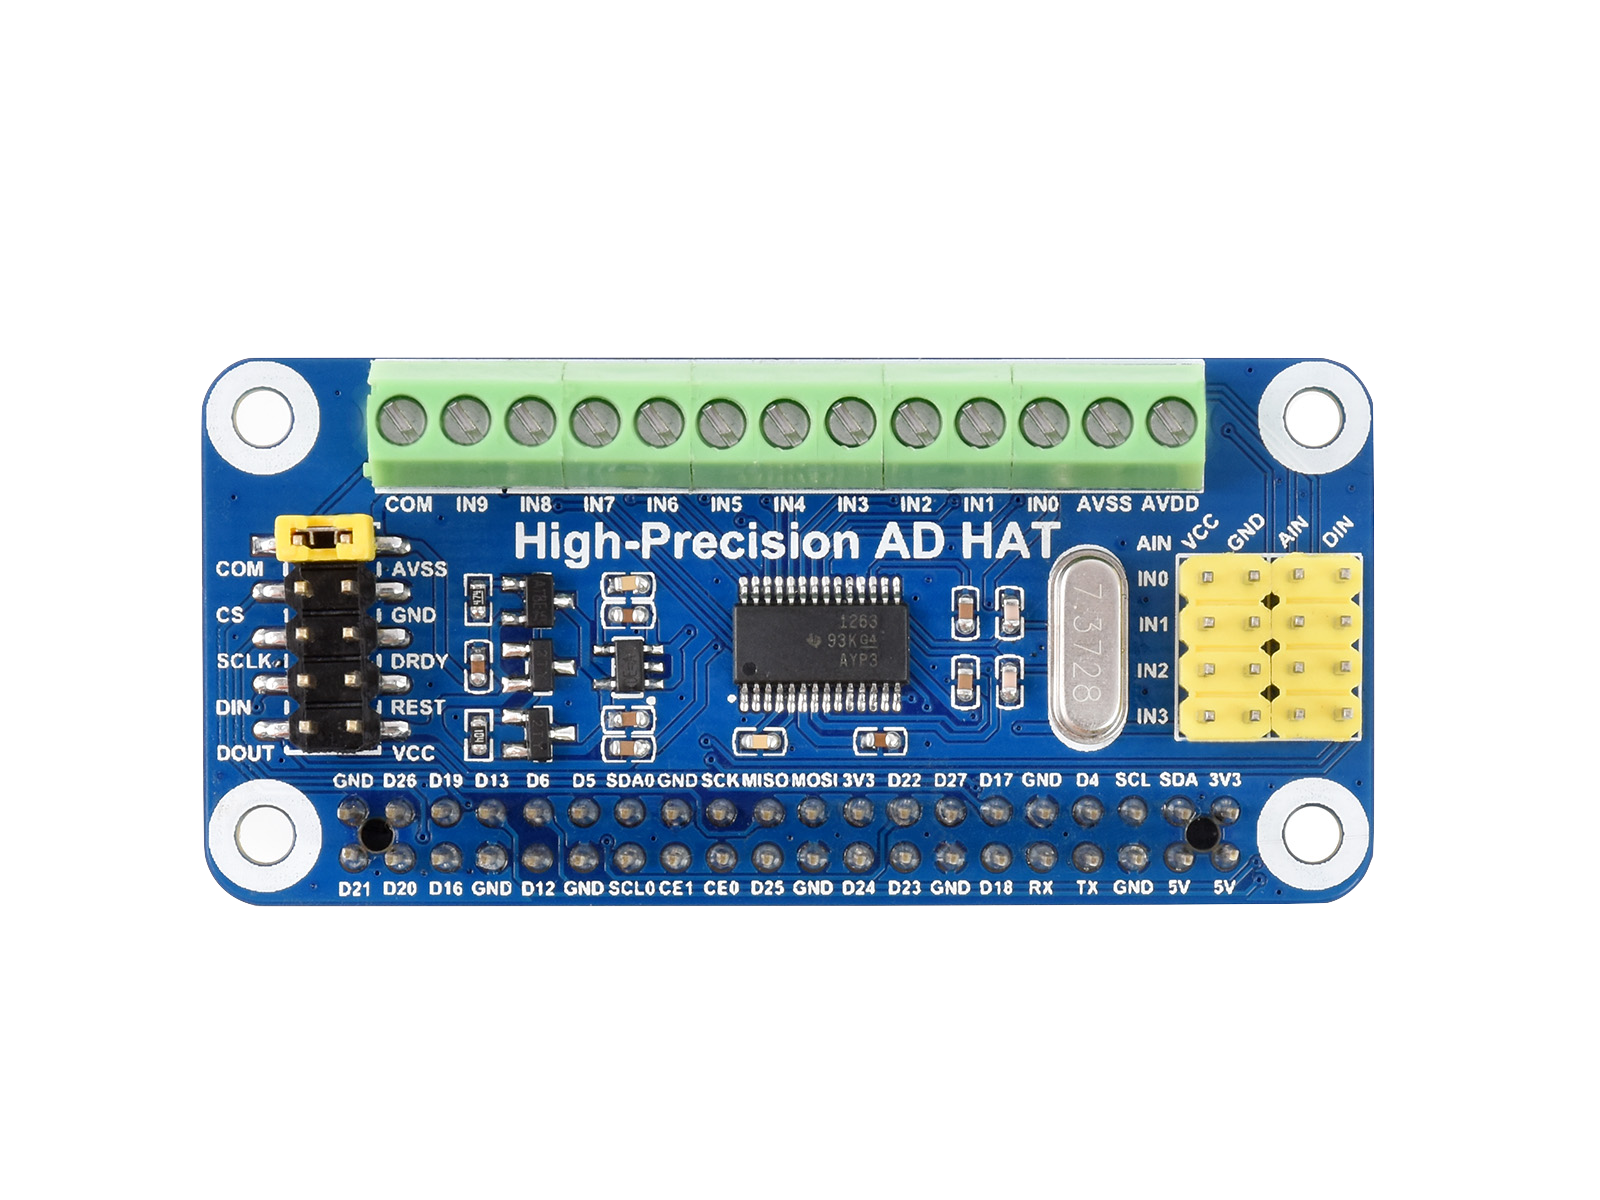
The Waveshare AD Hat is a versatile add-on board designed for Raspberry Pi, providing an analog-to-digital converter (ADC) interface. This component enables Raspberry Pi to read analog signals from various sensors and devices, bridging the gap between digital systems and analog inputs. It is particularly useful for applications requiring precise measurement of physical parameters such as temperature, light intensity, or pressure.

Explore Projects Built with Waveshare AD Hat

Use Cirkit Designer to design, explore, and prototype these projects online. Some projects support real-time simulation. Click "Open Project" to start designing instantly!
Raspberry Pi 4B-Based Multi-Sensor Interface Hub with GPS and GSM
Image of Rocket: A project utilizing Waveshare AD Hat in a practical application
This circuit features a Raspberry Pi 4B interfaced with an IMX296 color global shutter camera, a Neo 6M GPS module, an Adafruit BMP388 barometric pressure sensor, an MPU-6050 accelerometer/gyroscope, and a Sim800l GSM module for cellular connectivity. Power management is handled by an MT3608 boost converter, which steps up the voltage from a Lipo battery, with a resettable fuse PTC and a 1N4007 diode for protection. The Adafruit Perma-Proto HAT is used for organizing connections and interfacing the sensors and modules with the Raspberry Pi via I2C and GPIO pins.
Cirkit Designer LogoOpen Project in Cirkit Designer
Raspberry Pi 4B-Based Current Monitoring System with I2C OLED Display
Image of Virtual Energy Monitoring Circuit: A project utilizing Waveshare AD Hat in a practical application
This circuit features a Raspberry Pi 4B as the central processing unit, interfaced with an Adafruit ADS1115 16-bit I2C ADC for analog-to-digital conversion and a 0.96" OLED display for visual output. The ADS1115 is connected to a current sensor for measuring electrical current, with the sensor's output and burden pins connected to the ADC's analog input channels. The Raspberry Pi communicates with both the ADC and the OLED display over the I2C bus, using its GPIO2 and GPIO3 pins for data (SDA) and clock (SCL) lines, respectively.
Cirkit Designer LogoOpen Project in Cirkit Designer
Raspberry Pi 4B with I2C Current Sensing and OLED Display
Image of iot task 2: A project utilizing Waveshare AD Hat in a practical application
This circuit features a Raspberry Pi 4B as the central processing unit, interfaced with an Adafruit ADS1115 16-bit I2C ADC for analog-to-digital conversion and a 0.96" OLED display for visual output. The ADC is connected to a current sensor for measuring electrical current, with the sensor's output connected to the ADC's AIN0 pin and the burden resistor connected to AIN1. The Raspberry Pi communicates with both the ADC and the OLED display over the I2C bus, using GPIO2 (SDA) and GPIO3 (SCL) for data exchange.
Cirkit Designer LogoOpen Project in Cirkit Designer
Raspberry Pi 4B-based Current Monitoring System with OLED Display
Image of TASK – 2: A project utilizing Waveshare AD Hat in a practical application
This circuit features a Raspberry Pi 4B as the central processing unit, interfaced with an ADS1115 analog-to-digital converter (ADC) and a 0.96" OLED display via I2C communication (using GPIO2 and GPIO3 for SDA and SCL, respectively). The ADS1115 is connected to two current sensors: a generic current sensor and an ACS712, to measure current and report values to the Raspberry Pi, which can display the data on the OLED. Power is distributed from the Raspberry Pi's 5V pin to the other components, and all components share a common ground.
Cirkit Designer LogoOpen Project in Cirkit Designer

Explore Projects Built with Waveshare AD Hat

Use Cirkit Designer to design, explore, and prototype these projects online. Some projects support real-time simulation. Click "Open Project" to start designing instantly!
Image of Rocket: A project utilizing Waveshare AD Hat in a practical application
Raspberry Pi 4B-Based Multi-Sensor Interface Hub with GPS and GSM
This circuit features a Raspberry Pi 4B interfaced with an IMX296 color global shutter camera, a Neo 6M GPS module, an Adafruit BMP388 barometric pressure sensor, an MPU-6050 accelerometer/gyroscope, and a Sim800l GSM module for cellular connectivity. Power management is handled by an MT3608 boost converter, which steps up the voltage from a Lipo battery, with a resettable fuse PTC and a 1N4007 diode for protection. The Adafruit Perma-Proto HAT is used for organizing connections and interfacing the sensors and modules with the Raspberry Pi via I2C and GPIO pins.
Cirkit Designer LogoOpen Project in Cirkit Designer
Image of Virtual Energy Monitoring Circuit: A project utilizing Waveshare AD Hat in a practical application
Raspberry Pi 4B-Based Current Monitoring System with I2C OLED Display
This circuit features a Raspberry Pi 4B as the central processing unit, interfaced with an Adafruit ADS1115 16-bit I2C ADC for analog-to-digital conversion and a 0.96" OLED display for visual output. The ADS1115 is connected to a current sensor for measuring electrical current, with the sensor's output and burden pins connected to the ADC's analog input channels. The Raspberry Pi communicates with both the ADC and the OLED display over the I2C bus, using its GPIO2 and GPIO3 pins for data (SDA) and clock (SCL) lines, respectively.
Cirkit Designer LogoOpen Project in Cirkit Designer
Image of iot task 2: A project utilizing Waveshare AD Hat in a practical application
Raspberry Pi 4B with I2C Current Sensing and OLED Display
This circuit features a Raspberry Pi 4B as the central processing unit, interfaced with an Adafruit ADS1115 16-bit I2C ADC for analog-to-digital conversion and a 0.96" OLED display for visual output. The ADC is connected to a current sensor for measuring electrical current, with the sensor's output connected to the ADC's AIN0 pin and the burden resistor connected to AIN1. The Raspberry Pi communicates with both the ADC and the OLED display over the I2C bus, using GPIO2 (SDA) and GPIO3 (SCL) for data exchange.
Cirkit Designer LogoOpen Project in Cirkit Designer
Image of TASK – 2: A project utilizing Waveshare AD Hat in a practical application
Raspberry Pi 4B-based Current Monitoring System with OLED Display
This circuit features a Raspberry Pi 4B as the central processing unit, interfaced with an ADS1115 analog-to-digital converter (ADC) and a 0.96" OLED display via I2C communication (using GPIO2 and GPIO3 for SDA and SCL, respectively). The ADS1115 is connected to two current sensors: a generic current sensor and an ACS712, to measure current and report values to the Raspberry Pi, which can display the data on the OLED. Power is distributed from the Raspberry Pi's 5V pin to the other components, and all components share a common ground.
Cirkit Designer LogoOpen Project in Cirkit Designer

Common Applications and Use Cases

  • Reading analog sensor data (e.g., temperature sensors, potentiometers, light sensors)
  • Data acquisition systems
  • IoT projects requiring analog input
  • Educational projects for learning ADC concepts
  • Prototyping and testing analog circuits

Technical Specifications

The Waveshare AD Hat is built around the MCP3008 ADC chip, which provides 10-bit resolution and supports up to 8 analog input channels. Below are the key technical details:

Key Technical Details

  • ADC Chip: MCP3008
  • Resolution: 10-bit (0–1023)
  • Number of Channels: 8 single-ended or 4 differential
  • Input Voltage Range: 0–3.3V (matches Raspberry Pi GPIO voltage levels)
  • Communication Protocol: SPI (Serial Peripheral Interface)
  • Power Supply: 3.3V (powered directly from Raspberry Pi)
  • Dimensions: 65mm × 56mm
  • Operating Temperature: -40°C to 85°C

Pin Configuration and Descriptions

The Waveshare AD Hat connects to the Raspberry Pi via the GPIO header. Below is the pin configuration for the MCP3008 ADC chip used on the board:

Pin Name Pin Number Description
VDD 16 Power supply for the ADC (3.3V)
VREF 15 Reference voltage for ADC (3.3V)
AGND 14 Analog ground
CLK 13 SPI clock input
DOUT 12 SPI data output (MISO)
DIN 11 SPI data input (MOSI)
CS/SHDN 10 Chip select (active low)
CH0–CH7 1–8 Analog input channels

Usage Instructions

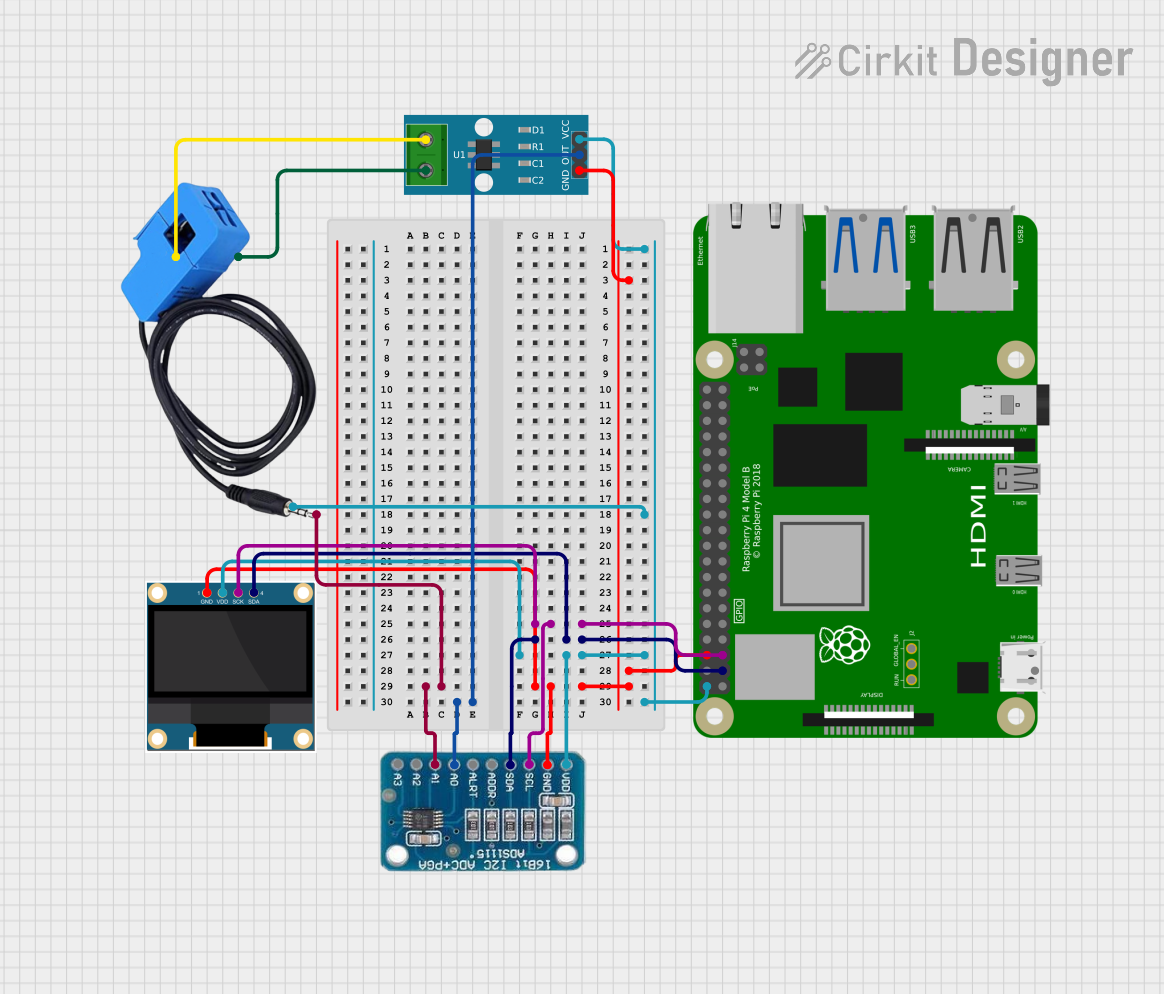
How to Use the Waveshare AD Hat in a Circuit

  1. Attach the Hat: Mount the Waveshare AD Hat onto the Raspberry Pi GPIO header.
  2. Connect Analog Sensors: Connect the analog sensors to the CH0–CH7 pins on the AD Hat. Ensure the input voltage does not exceed 3.3V.
  3. Enable SPI on Raspberry Pi:
    • Open the Raspberry Pi terminal.
    • Run sudo raspi-config.
    • Navigate to Interface Options > SPI and enable it.
  4. Install Required Libraries:
    • Install the spidev Python library using the command:
      pip install spidev
      
  5. Write and Run Code: Use the following Python code to read data from the ADC.

Example Python Code

import spidev  # Import SPI library for communication with the ADC
import time    # Import time library for delays

Initialize SPI

spi = spidev.SpiDev() # Create an SPI object spi.open(0, 0) # Open SPI bus 0, device 0 spi.max_speed_hz = 1350000 # Set SPI clock speed

def read_adc(channel): """ Reads data from the specified ADC channel (0-7). Returns the 10-bit ADC value (0-1023). """ if channel < 0 or channel > 7: raise ValueError("Channel must be between 0 and 7")

# Send start bit, single-ended mode, and channel selection
adc = spi.xfer2([1, (8 + channel) << 4, 0])
# Combine the two bytes to get the 10-bit result
data = ((adc[1] & 3) << 8) + adc[2]
return data

try: while True: # Read data from channel 0 adc_value = read_adc(0) print(f"ADC Value: {adc_value}") time.sleep(1) # Delay for 1 second except KeyboardInterrupt: print("Exiting program...") finally: spi.close() # Close the SPI connection


Important Considerations and Best Practices

  • Voltage Levels: Ensure the input voltage to the analog channels does not exceed 3.3V to avoid damaging the ADC.
  • Noise Reduction: Use proper grounding and shielding to minimize noise in analog signals.
  • Sampling Rate: The sampling rate depends on the SPI clock speed. Adjust the spi.max_speed_hz parameter as needed.
  • Channel Selection: Use the correct channel number (0–7) when reading data.

Troubleshooting and FAQs

Common Issues and Solutions

  1. No Data or Incorrect Readings:

    • Ensure SPI is enabled on the Raspberry Pi.
    • Verify the connections between the AD Hat and the Raspberry Pi GPIO header.
    • Check that the analog input voltage is within the 0–3.3V range.
  2. SPI Communication Errors:

    • Confirm that the spidev library is installed.
    • Ensure the SPI bus and device numbers in the code match your setup.
  3. High Noise in Readings:

    • Use shorter wires for analog connections.
    • Add decoupling capacitors near the analog input pins.

FAQs

Q: Can I use the Waveshare AD Hat with other microcontrollers?
A: Yes, the AD Hat can be used with other microcontrollers that support SPI communication. However, you may need to adapt the code accordingly.

Q: What is the maximum sampling rate of the MCP3008?
A: The MCP3008 supports a maximum sampling rate of 200 ksps (kilosamples per second) at 5V. However, at 3.3V, the sampling rate is slightly lower.

Q: Can I use differential inputs with the AD Hat?
A: Yes, the MCP3008 supports differential input mode. Refer to the MCP3008 datasheet for details on configuring differential inputs.

Q: How do I power external sensors?
A: You can use the 3.3V and GND pins on the Raspberry Pi GPIO header to power low-power sensors. Ensure the total current draw does not exceed the Raspberry Pi's power supply capacity.