Cirkit Designer Logo
Cirkit Designer
Your all-in-one circuit design IDE
Home / 
Component Documentation

How to Use Shelly Pro 1: Examples, Pinouts, and Specs

Image of Shelly Pro 1
Cirkit Designer LogoDesign with Shelly Pro 1 in Cirkit Designer

Introduction

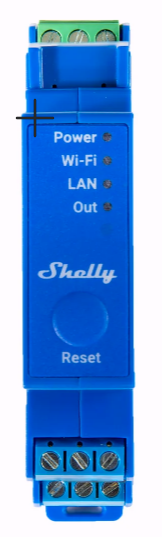
The Shelly Pro 1 is a smart relay switch designed for home and industrial automation. It enables remote control of electrical devices via Wi-Fi, allowing users to automate and monitor their systems through a mobile app or third-party platforms. With its compact design and advanced features, the Shelly Pro 1 is ideal for controlling lights, appliances, and other electrical loads.

Explore Projects Built with Shelly Pro 1

Use Cirkit Designer to design, explore, and prototype these projects online. Some projects support real-time simulation. Click "Open Project" to start designing instantly!
Battery-Powered Game Controller with SparkFun Pro Micro and Raspberry Pi 4B
Image of Raspberry Pi handheld: A project utilizing Shelly Pro 1 in a practical application
This circuit is a custom game controller featuring a SparkFun Pro Micro microcontroller, multiple tactile pushbuttons, and two analog joysticks. The Pro Micro reads inputs from the buttons and joysticks, processes them, and sends the corresponding gamepad signals. Additionally, a Raspberry Pi 4B is powered by a Pisugar S Pro battery module.
Cirkit Designer LogoOpen Project in Cirkit Designer
Bluetooth-Controlled Robotic Vehicle with Ultrasonic Obstacle Detection and Motion Sensing
Image of 아두이노 드론: A project utilizing Shelly Pro 1 in a practical application
This circuit features a SparkFun Pro Micro microcontroller interfaced with an L298N DC motor driver to control two DC motors, an HC-SR04 ultrasonic sensor for distance measurement, a Bluetooth module HM-10 for wireless communication, and an MPU-6050 for motion tracking. The Pro Micro is responsible for processing sensor data and managing motor speeds and directions via the motor driver. Power is supplied by a 5V battery connected to the Pro Micro and a separate battery case providing 12V to the motor driver.
Cirkit Designer LogoOpen Project in Cirkit Designer
Raspberry Pi 4B-Based Multi-Sensor Interface Hub with GPS and GSM
Image of Rocket: A project utilizing Shelly Pro 1 in a practical application
This circuit features a Raspberry Pi 4B interfaced with an IMX296 color global shutter camera, a Neo 6M GPS module, an Adafruit BMP388 barometric pressure sensor, an MPU-6050 accelerometer/gyroscope, and a Sim800l GSM module for cellular connectivity. Power management is handled by an MT3608 boost converter, which steps up the voltage from a Lipo battery, with a resettable fuse PTC and a 1N4007 diode for protection. The Adafruit Perma-Proto HAT is used for organizing connections and interfacing the sensors and modules with the Raspberry Pi via I2C and GPIO pins.
Cirkit Designer LogoOpen Project in Cirkit Designer
Arduino Pro Mini and HC-05 Bluetooth Controlled Coreless Motor Clock with MPU-6050 Feedback
Image of drone: A project utilizing Shelly Pro 1 in a practical application
This is a motion-controlled device with wireless capabilities, powered by a LiPo battery with voltage regulation. It uses an Arduino Pro Mini to process MPU-6050 sensor data and control coreless motors via MOSFETs, interfacing with an external device through an HC-05 Bluetooth module.
Cirkit Designer LogoOpen Project in Cirkit Designer

Explore Projects Built with Shelly Pro 1

Use Cirkit Designer to design, explore, and prototype these projects online. Some projects support real-time simulation. Click "Open Project" to start designing instantly!
Image of Raspberry Pi handheld: A project utilizing Shelly Pro 1 in a practical application
Battery-Powered Game Controller with SparkFun Pro Micro and Raspberry Pi 4B
This circuit is a custom game controller featuring a SparkFun Pro Micro microcontroller, multiple tactile pushbuttons, and two analog joysticks. The Pro Micro reads inputs from the buttons and joysticks, processes them, and sends the corresponding gamepad signals. Additionally, a Raspberry Pi 4B is powered by a Pisugar S Pro battery module.
Cirkit Designer LogoOpen Project in Cirkit Designer
Image of 아두이노 드론: A project utilizing Shelly Pro 1 in a practical application
Bluetooth-Controlled Robotic Vehicle with Ultrasonic Obstacle Detection and Motion Sensing
This circuit features a SparkFun Pro Micro microcontroller interfaced with an L298N DC motor driver to control two DC motors, an HC-SR04 ultrasonic sensor for distance measurement, a Bluetooth module HM-10 for wireless communication, and an MPU-6050 for motion tracking. The Pro Micro is responsible for processing sensor data and managing motor speeds and directions via the motor driver. Power is supplied by a 5V battery connected to the Pro Micro and a separate battery case providing 12V to the motor driver.
Cirkit Designer LogoOpen Project in Cirkit Designer
Image of Rocket: A project utilizing Shelly Pro 1 in a practical application
Raspberry Pi 4B-Based Multi-Sensor Interface Hub with GPS and GSM
This circuit features a Raspberry Pi 4B interfaced with an IMX296 color global shutter camera, a Neo 6M GPS module, an Adafruit BMP388 barometric pressure sensor, an MPU-6050 accelerometer/gyroscope, and a Sim800l GSM module for cellular connectivity. Power management is handled by an MT3608 boost converter, which steps up the voltage from a Lipo battery, with a resettable fuse PTC and a 1N4007 diode for protection. The Adafruit Perma-Proto HAT is used for organizing connections and interfacing the sensors and modules with the Raspberry Pi via I2C and GPIO pins.
Cirkit Designer LogoOpen Project in Cirkit Designer
Image of drone: A project utilizing Shelly Pro 1 in a practical application
Arduino Pro Mini and HC-05 Bluetooth Controlled Coreless Motor Clock with MPU-6050 Feedback
This is a motion-controlled device with wireless capabilities, powered by a LiPo battery with voltage regulation. It uses an Arduino Pro Mini to process MPU-6050 sensor data and control coreless motors via MOSFETs, interfacing with an external device through an HC-05 Bluetooth module.
Cirkit Designer LogoOpen Project in Cirkit Designer

Common Applications and Use Cases

  • Home automation for controlling lights, fans, and appliances.
  • Industrial automation for managing electrical equipment.
  • Energy monitoring and optimization.
  • Integration with smart home ecosystems like Google Home, Amazon Alexa, and Home Assistant.

Technical Specifications

The Shelly Pro 1 is a versatile device with robust technical capabilities. Below are its key specifications:

General Specifications

Parameter Value
Power Supply 110-240V AC, 50/60Hz
Maximum Load 16A
Connectivity Wi-Fi 802.11 b/g/n (2.4 GHz)
Operating Temperature -20°C to +40°C
Dimensions 90 x 52 x 18 mm
Certifications CE, RoHS

Pin Configuration and Descriptions

The Shelly Pro 1 features a set of terminals for input and output connections. Below is the pin configuration:

Pin Name Description
L Live input for AC power
N Neutral input for AC power
O Output terminal for the controlled device
SW Input for an external switch (optional)
GND Ground terminal for safety

Usage Instructions

The Shelly Pro 1 is straightforward to use and can be integrated into various automation systems. Follow the steps below to set up and use the device:

Step 1: Wiring the Shelly Pro 1

  1. Turn off the power supply to avoid electrical hazards.
  2. Connect the L and N terminals to the live and neutral wires of your AC power source.
  3. Connect the O terminal to the live wire of the device you want to control.
  4. Optionally, connect an external switch to the SW terminal for manual control.
  5. Ensure all connections are secure and insulated.

Step 2: Configuring the Device

  1. Power on the Shelly Pro 1 by restoring the power supply.
  2. Download the Shelly mobile app from the App Store or Google Play.
  3. Follow the in-app instructions to connect the device to your Wi-Fi network.
  4. Configure automation rules, schedules, and other settings as needed.

Step 3: Integrating with Arduino UNO (Optional)

The Shelly Pro 1 can be controlled via HTTP or MQTT protocols, making it compatible with Arduino-based systems. Below is an example of Arduino code to toggle the relay using HTTP:

#include <WiFi.h>
#include <HTTPClient.h>

// Wi-Fi credentials
const char* ssid = "Your_SSID";
const char* password = "Your_PASSWORD";

// Shelly Pro 1 IP address
const char* shellyIP = "192.168.1.100"; // Replace with your device's IP

void setup() {
  Serial.begin(115200);
  WiFi.begin(ssid, password);

  // Wait for Wi-Fi connection
  while (WiFi.status() != WL_CONNECTED) {
    delay(1000);
    Serial.println("Connecting to Wi-Fi...");
  }
  Serial.println("Connected to Wi-Fi");
}

void loop() {
  HTTPClient http;

  // URL to toggle the relay
  String url = String("http://") + shellyIP + "/relay/0?turn=toggle";

  // Send HTTP GET request
  http.begin(url);
  int httpResponseCode = http.GET();

  if (httpResponseCode > 0) {
    Serial.print("Response code: ");
    Serial.println(httpResponseCode);
  } else {
    Serial.print("Error on HTTP request: ");
    Serial.println(http.errorToString(httpResponseCode).c_str());
  }

  http.end();

  // Wait 5 seconds before toggling again
  delay(5000);
}

Important Considerations

  • Ensure the total load does not exceed the maximum rating of 16A.
  • Use proper insulation and grounding to prevent electrical hazards.
  • Place the device in a well-ventilated area to avoid overheating.
  • Regularly update the firmware via the Shelly app for optimal performance and security.

Troubleshooting and FAQs

Common Issues and Solutions

  1. Device not connecting to Wi-Fi:

    • Ensure the Wi-Fi network is 2.4 GHz (not 5 GHz).
    • Check that the SSID and password are entered correctly.
    • Restart the router and the Shelly Pro 1.
  2. Relay not switching:

    • Verify the wiring connections and ensure the load is within the rated capacity.
    • Check the app settings to ensure the relay is enabled.
  3. Device overheating:

    • Ensure the device is not installed in a confined space.
    • Reduce the load if it approaches the maximum rating.

FAQs

  1. Can the Shelly Pro 1 work without Wi-Fi?

    • Yes, it can be controlled manually via the external switch or locally through its web interface.
  2. Is the Shelly Pro 1 compatible with smart home platforms?

    • Yes, it supports integration with Google Home, Amazon Alexa, and Home Assistant.
  3. How do I reset the device?

    • Press and hold the reset button for 10 seconds until the LED indicator blinks.

By following this documentation, you can effectively use the Shelly Pro 1 for your automation needs.