Cirkit Designer Logo
Cirkit Designer
Your all-in-one circuit design IDE
Home / 
Component Documentation

How to Use 12V Solenoid Lock: Examples, Pinouts, and Specs

Image of 12V Solenoid Lock
Cirkit Designer LogoDesign with 12V Solenoid Lock in Cirkit Designer

Introduction

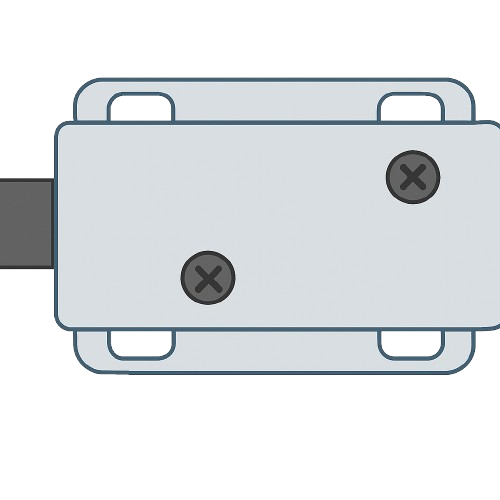
The 12V Solenoid Lock is an electromechanical device designed to secure or release a locking mechanism using an electromagnetic solenoid. When a 12V DC power supply is applied, the solenoid activates, retracting the locking pin to unlock the mechanism. Once the power is removed, the spring-loaded pin returns to its locked position. This component is widely used in access control systems, vending machines, lockers, and other security applications.

Explore Projects Built with 12V Solenoid Lock

Use Cirkit Designer to design, explore, and prototype these projects online. Some projects support real-time simulation. Click "Open Project" to start designing instantly!
Wi-Fi Controlled ESP32-Based Smart Lock with RFID and OLED Display
Image of SYTEMATIC ADASDA ELECTRONIC: A project utilizing 12V Solenoid Lock in a practical application
This circuit is designed to control a 12V solenoid lock using an ESP32 microcontroller, which is connected to a Wi-Fi network and hosts a web server. The ESP32 can receive commands to unlock the door for a specified duration via a web interface. Additional components include an OLED display and an RFID reader for user interaction, a Darlington transistor to drive the high-current solenoid, and a diode for back EMF protection.
Cirkit Designer LogoOpen Project in Cirkit Designer
Arduino UNO Controlled Solenoid Door Lock with Keypad Interface
Image of Password-Protected Door Lock System: A project utilizing 12V Solenoid Lock in a practical application
This circuit is designed to control a 12V solenoid lock using an Arduino UNO as the main controller. The Arduino interfaces with a 4x4 membrane matrix keypad to receive input commands and controls a relay module to switch the solenoid lock on and off. The solenoid lock is powered by a 12V battery, which is switched by the relay module in response to the keypad inputs processed by the Arduino.
Cirkit Designer LogoOpen Project in Cirkit Designer
Arduino UNO Based RFID Access Control with Bluetooth Connectivity and Solenoid Lock
Image of Door Lock System: A project utilizing 12V Solenoid Lock in a practical application
This circuit is designed to control a 12V solenoid lock using an Arduino UNO, which is interfaced with an RFID-RC522 module for authentication and an HC-05 Bluetooth module for wireless communication. The Arduino controls a relay to power the solenoid lock and uses LEDs and a buzzer for status indication. The 5V Adapter powers the Arduino, while the 12V power supply is used for the solenoid lock.
Cirkit Designer LogoOpen Project in Cirkit Designer
Wi-Fi Controlled ESP32-Based Solenoid Door Lock
Image of FINGER DOOR LOCK SYSTEM: A project utilizing 12V Solenoid Lock in a practical application
This circuit is designed to control a 12V solenoid lock using an ESP32 microcontroller connected to a Wi-Fi network. The ESP32 operates a relay module to switch the solenoid lock on and off. The embedded code allows for remote unlocking of the solenoid via a web server hosted on the ESP32, with the lock remaining unlocked for 5 seconds before automatically relocking.
Cirkit Designer LogoOpen Project in Cirkit Designer

Explore Projects Built with 12V Solenoid Lock

Use Cirkit Designer to design, explore, and prototype these projects online. Some projects support real-time simulation. Click "Open Project" to start designing instantly!
Image of SYTEMATIC ADASDA ELECTRONIC: A project utilizing 12V Solenoid Lock in a practical application
Wi-Fi Controlled ESP32-Based Smart Lock with RFID and OLED Display
This circuit is designed to control a 12V solenoid lock using an ESP32 microcontroller, which is connected to a Wi-Fi network and hosts a web server. The ESP32 can receive commands to unlock the door for a specified duration via a web interface. Additional components include an OLED display and an RFID reader for user interaction, a Darlington transistor to drive the high-current solenoid, and a diode for back EMF protection.
Cirkit Designer LogoOpen Project in Cirkit Designer
Image of Password-Protected Door Lock System: A project utilizing 12V Solenoid Lock in a practical application
Arduino UNO Controlled Solenoid Door Lock with Keypad Interface
This circuit is designed to control a 12V solenoid lock using an Arduino UNO as the main controller. The Arduino interfaces with a 4x4 membrane matrix keypad to receive input commands and controls a relay module to switch the solenoid lock on and off. The solenoid lock is powered by a 12V battery, which is switched by the relay module in response to the keypad inputs processed by the Arduino.
Cirkit Designer LogoOpen Project in Cirkit Designer
Image of Door Lock System: A project utilizing 12V Solenoid Lock in a practical application
Arduino UNO Based RFID Access Control with Bluetooth Connectivity and Solenoid Lock
This circuit is designed to control a 12V solenoid lock using an Arduino UNO, which is interfaced with an RFID-RC522 module for authentication and an HC-05 Bluetooth module for wireless communication. The Arduino controls a relay to power the solenoid lock and uses LEDs and a buzzer for status indication. The 5V Adapter powers the Arduino, while the 12V power supply is used for the solenoid lock.
Cirkit Designer LogoOpen Project in Cirkit Designer
Image of FINGER DOOR LOCK SYSTEM: A project utilizing 12V Solenoid Lock in a practical application
Wi-Fi Controlled ESP32-Based Solenoid Door Lock
This circuit is designed to control a 12V solenoid lock using an ESP32 microcontroller connected to a Wi-Fi network. The ESP32 operates a relay module to switch the solenoid lock on and off. The embedded code allows for remote unlocking of the solenoid via a web server hosted on the ESP32, with the lock remaining unlocked for 5 seconds before automatically relocking.
Cirkit Designer LogoOpen Project in Cirkit Designer

Common Applications and Use Cases

  • Electronic door locks
  • Smart lockers and cabinets
  • Vending machines
  • Automated access control systems
  • DIY security projects

Technical Specifications

Key Technical Details

Parameter Value
Operating Voltage 12V DC
Current Consumption ~0.8A (800mA)
Power Consumption ~9.6W
Locking Mechanism Spring-loaded
Material Metal (housing and pin)
Dimensions Varies (commonly ~55x40x27mm)
Weight ~150g
Duty Cycle Intermittent (avoid prolonged activation)

Pin Configuration and Descriptions

Pin Name Description
V+ Positive terminal for 12V DC power input
GND Ground terminal for 12V DC power input

Usage Instructions

How to Use the Component in a Circuit

  1. Power Supply: Connect the solenoid lock to a 12V DC power supply. Ensure the power supply can provide at least 1A to handle the solenoid's current draw.
  2. Control Circuit: Use a transistor, relay, or MOSFET to control the solenoid lock. Directly connecting it to a microcontroller is not recommended due to the high current requirements.
  3. Diode Protection: Place a flyback diode (e.g., 1N4007) across the solenoid terminals to protect the circuit from voltage spikes caused by the solenoid's inductive load.
  4. Activation: Apply 12V DC to the solenoid to retract the locking pin. Remove the power to return the pin to its locked position.

Important Considerations and Best Practices

  • Avoid Overheating: The solenoid lock is designed for intermittent use. Prolonged activation can cause overheating and damage the component.
  • Power Supply: Use a stable and regulated 12V DC power source to ensure reliable operation.
  • Mounting: Securely mount the solenoid lock to prevent movement during operation.
  • Polarity: Ensure correct polarity when connecting the power supply to avoid damage.

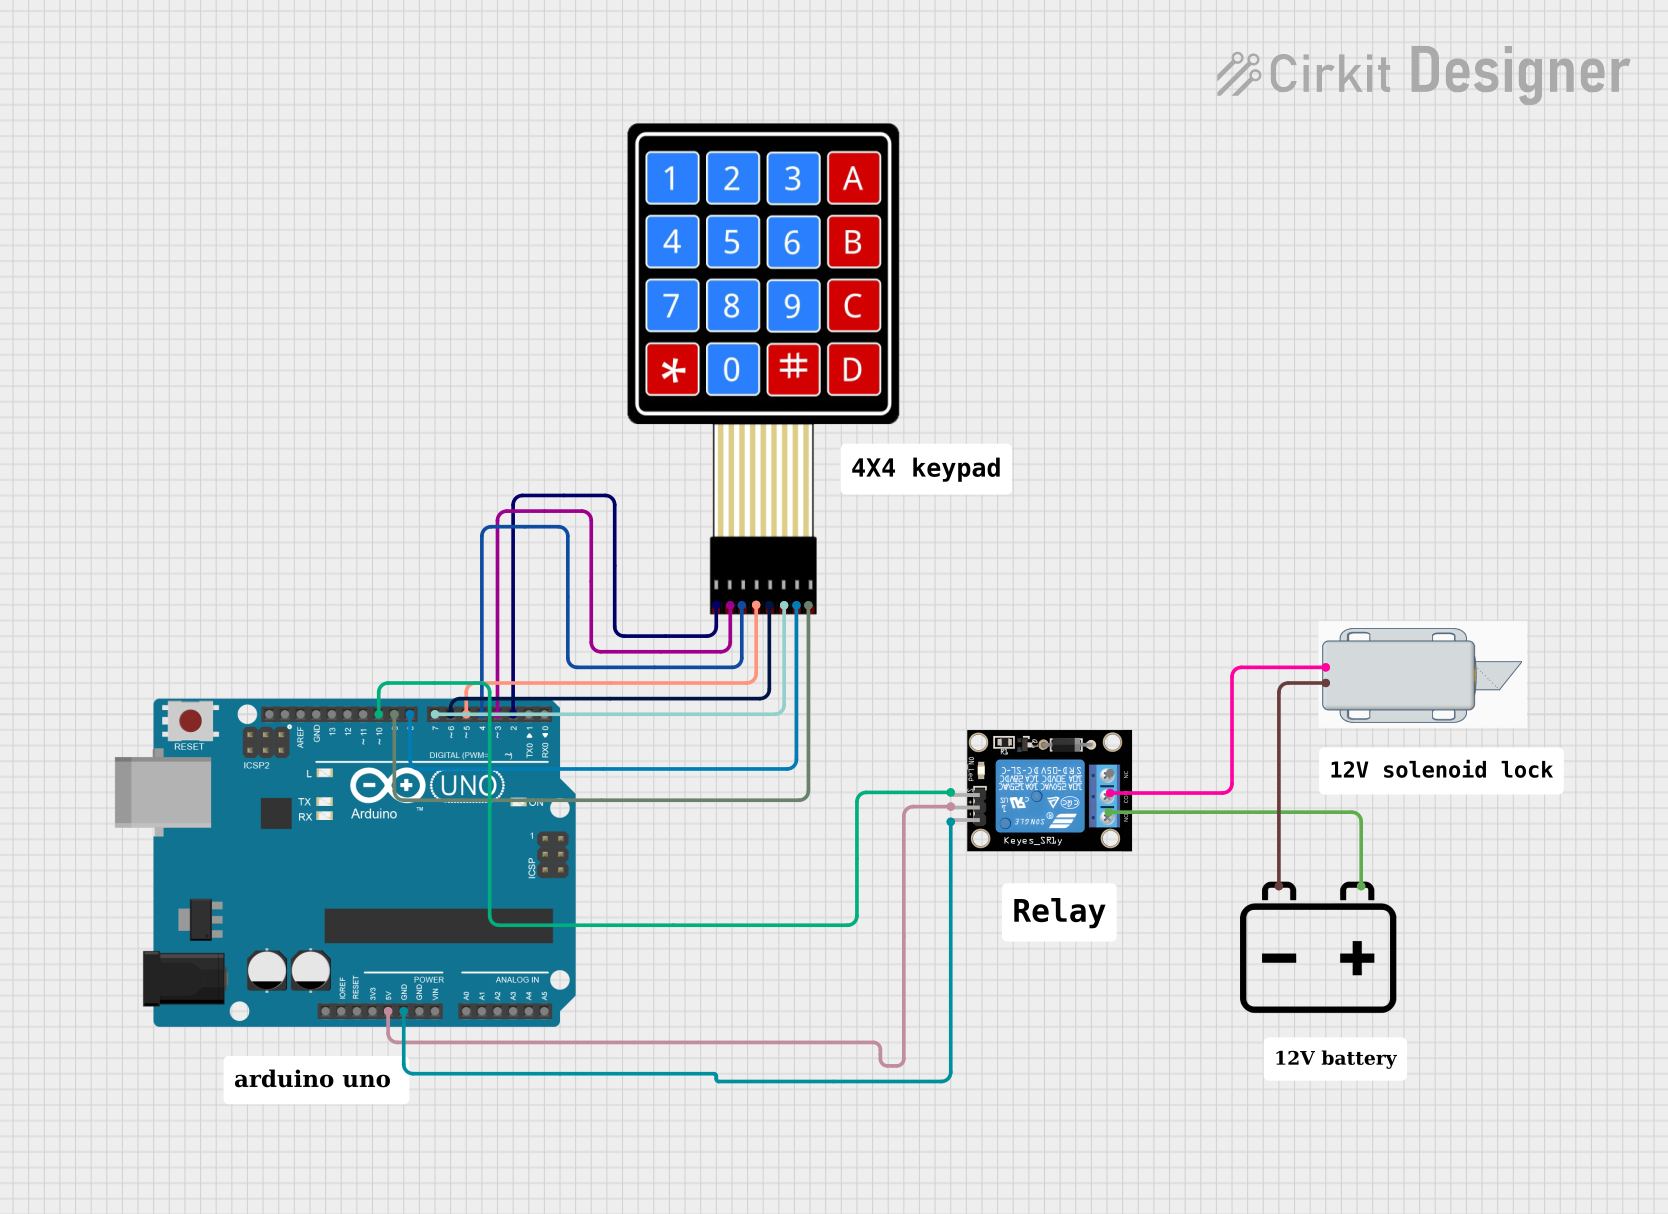
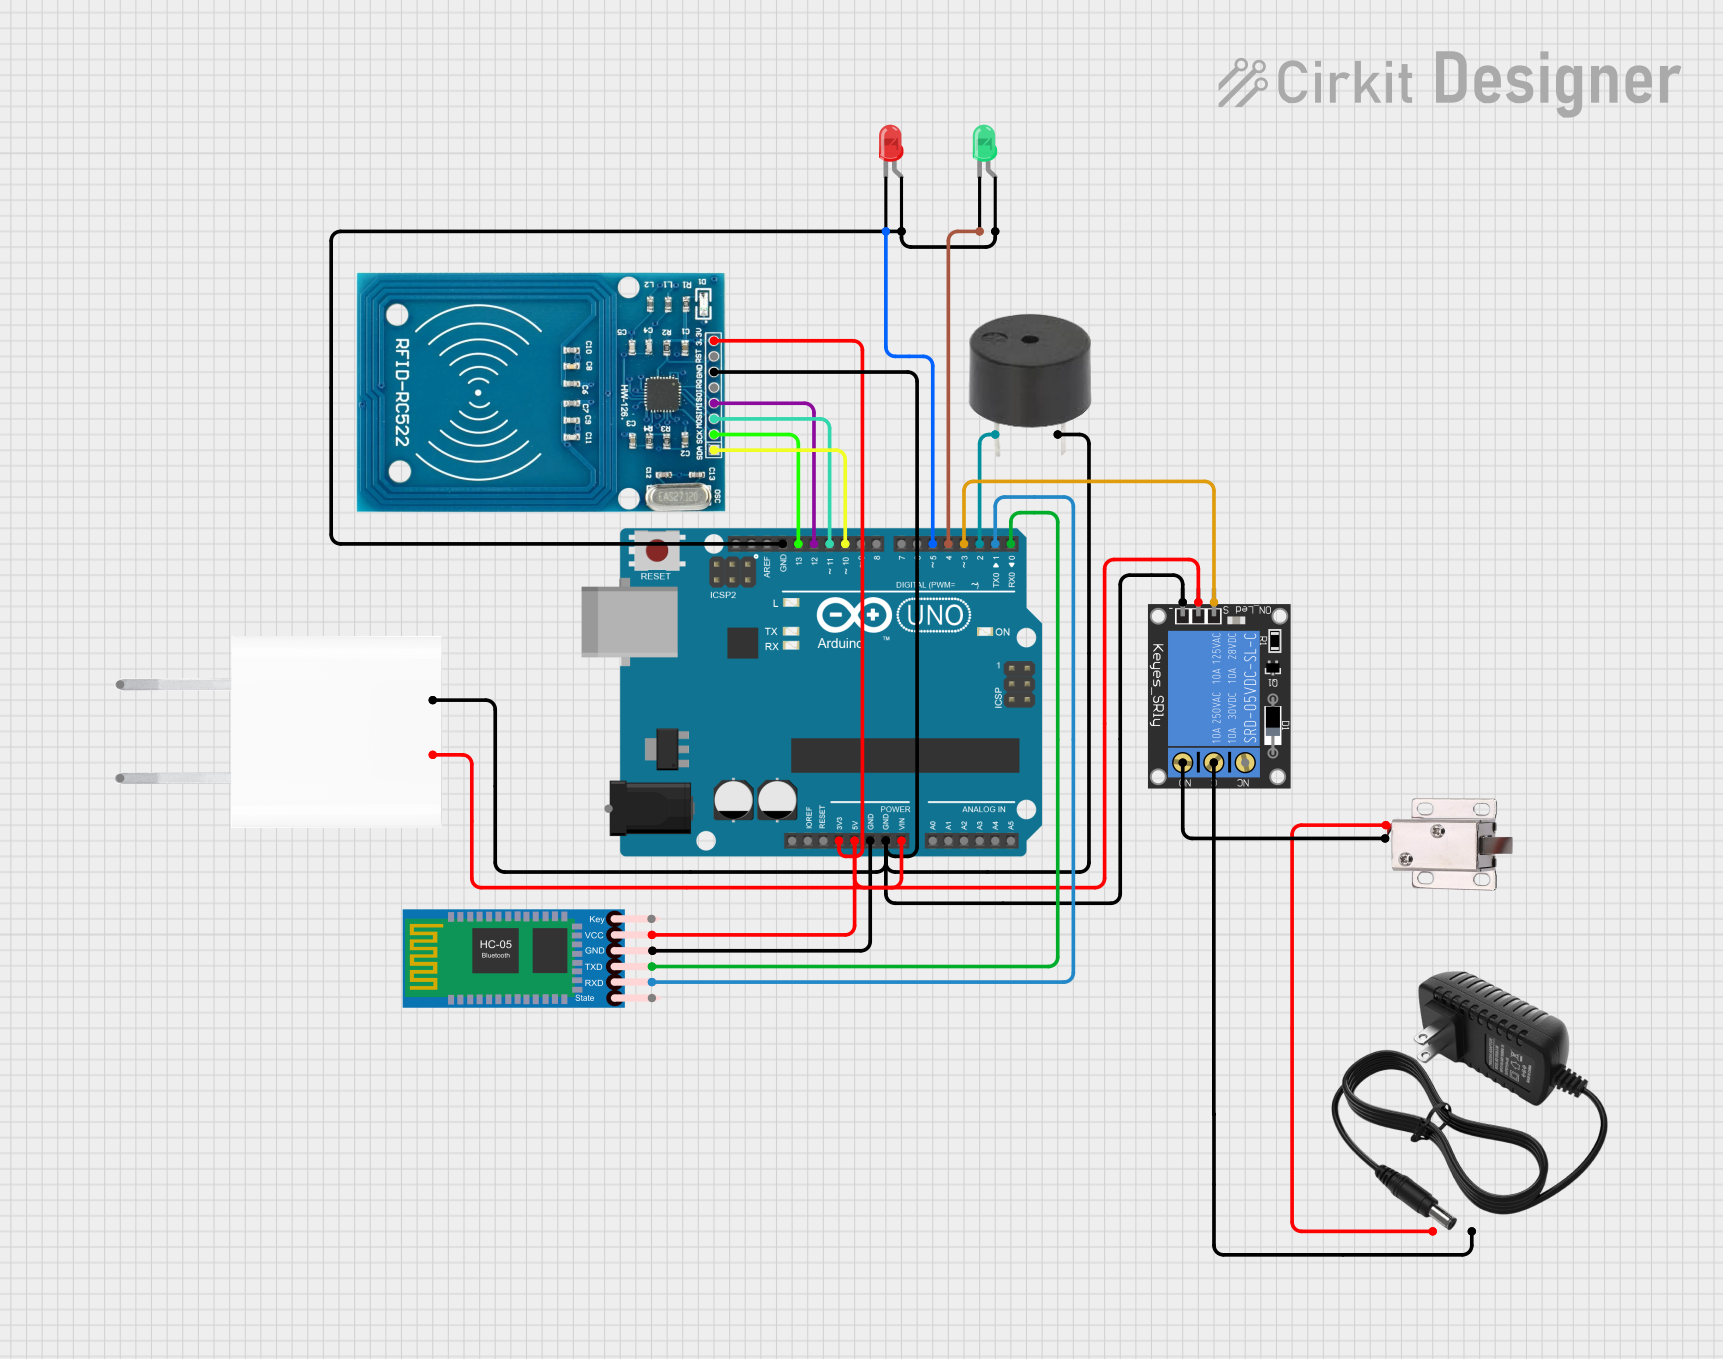
Example: Controlling the Solenoid Lock with an Arduino UNO

Below is an example of how to control the 12V Solenoid Lock using an Arduino UNO and an NPN transistor (e.g., 2N2222) as a switch.

Circuit Diagram

  • Connect the solenoid lock's V+ to the 12V power supply.
  • Connect the solenoid lock's GND to the collector of the NPN transistor.
  • Connect the emitter of the transistor to the ground of the power supply.
  • Place a flyback diode (e.g., 1N4007) across the solenoid terminals, with the cathode connected to V+.
  • Connect a 1kΩ resistor between the Arduino digital pin and the base of the transistor.

Arduino Code

// Define the pin connected to the transistor's base
const int solenoidPin = 7;

void setup() {
  // Set the solenoid control pin as an output
  pinMode(solenoidPin, OUTPUT);
}

void loop() {
  // Activate the solenoid lock
  digitalWrite(solenoidPin, HIGH);
  delay(1000); // Keep the lock open for 1 second

  // Deactivate the solenoid lock
  digitalWrite(solenoidPin, LOW);
  delay(1000); // Wait for 1 second before reactivating
}

Troubleshooting and FAQs

Common Issues and Solutions

  1. The solenoid lock does not activate:

    • Check the power supply voltage and current. Ensure it provides 12V DC and at least 1A.
    • Verify the connections, especially the polarity of the power supply.
    • Ensure the control circuit (e.g., transistor or relay) is functioning correctly.
  2. The solenoid lock overheats:

    • Avoid keeping the solenoid activated for extended periods. Use a timer or PWM control to limit activation time.
    • Check for any obstructions in the locking mechanism that may cause excessive current draw.
  3. Voltage spikes damage the circuit:

    • Ensure a flyback diode is installed across the solenoid terminals to suppress voltage spikes.
  4. The locking pin does not retract fully:

    • Verify that the power supply is providing sufficient current.
    • Check for mechanical obstructions or misalignment in the locking mechanism.

FAQs

Q: Can I power the solenoid lock directly from an Arduino?
A: No, the solenoid lock requires more current than the Arduino can provide. Use a transistor, relay, or MOSFET to control the solenoid.

Q: What type of diode should I use for flyback protection?
A: A general-purpose diode like the 1N4007 is suitable for this application.

Q: Can I use a 9V battery to power the solenoid lock?
A: No, a 9V battery cannot provide sufficient voltage or current. Use a regulated 12V DC power supply instead.

Q: How do I prevent overheating during continuous use?
A: Limit the activation time and allow the solenoid to cool between activations. Use a duty cycle of less than 50% for extended operation.