How to Use hmi nb7w-tw01b: Examples, Pinouts, and Specs
Introduction
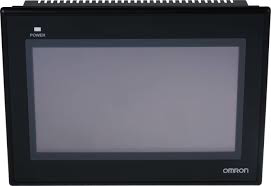
The HMI NB7W-TW01B is a human-machine interface (HMI) device manufactured by Omron. It is designed to facilitate seamless interaction between users and industrial machines or systems. Equipped with a 7-inch touchscreen display, this HMI provides an intuitive platform for monitoring, controlling, and visualizing operational data in real-time. Its robust design and versatile functionality make it an ideal choice for industrial automation applications.
Explore Projects Built with hmi nb7w-tw01b


Explore Projects Built with hmi nb7w-tw01b
Common Applications and Use Cases
- Industrial automation and process control
- Monitoring and controlling production lines
- Data visualization for programmable logic controllers (PLCs)
- Supervisory control and data acquisition (SCADA) systems
- User-friendly interfaces for machinery in manufacturing, packaging, and assembly
Technical Specifications
The following table outlines the key technical details of the HMI NB7W-TW01B:
| Specification | Details |
|---|---|
| Manufacturer | Omron |
| Model | NB7W-TW01B |
| Display Size | 7 inches |
| Display Type | TFT LCD touchscreen |
| Resolution | 800 x 480 pixels (WVGA) |
| Input Voltage | 24 V DC |
| Power Consumption | 5 W (typical) |
| Communication Ports | RS232, RS485, Ethernet, USB |
| Operating Temperature | 0°C to 50°C |
| Storage Temperature | -20°C to 60°C |
| Dimensions | 200 mm x 146 mm x 36 mm |
| Weight | Approximately 0.8 kg |
| Mounting | Panel-mounted |
| Certifications | CE, UL, RoHS |
Pin Configuration and Descriptions
The HMI NB7W-TW01B features multiple communication ports for interfacing with external devices. Below is a table describing the key ports and their functions:
| Port | Description |
|---|---|
| RS232 | Serial communication port for connecting to PLCs or other serial devices. |
| RS485 | Supports multi-drop communication for connecting multiple devices. |
| Ethernet | Enables network communication for data exchange and remote monitoring. |
| USB | Used for uploading/downloading projects or connecting external peripherals. |
| Power Input | 24 V DC input for powering the HMI. |
Usage Instructions
How to Use the HMI NB7W-TW01B in a Circuit
Power Connection:
- Connect a regulated 24 V DC power supply to the power input terminals of the HMI.
- Ensure proper polarity to avoid damage to the device.
Communication Setup:
- Use the RS232 or RS485 port to connect the HMI to a PLC or other control devices.
- Alternatively, use the Ethernet port for network-based communication.
- Configure the communication settings (baud rate, parity, etc.) in the HMI software to match the connected device.
Project Upload:
- Design the HMI interface using Omron's NB-Designer software.
- Connect the HMI to your PC via the USB port and upload the project file.
Mounting:
- Install the HMI on a panel using the provided mounting brackets.
- Ensure the device is securely fastened and properly ventilated.
Operation:
- Power on the HMI and verify that the interface loads correctly.
- Use the touchscreen to interact with the system, monitor data, and control operations.
Important Considerations and Best Practices
- Power Supply: Use a stable and noise-free 24 V DC power source to ensure reliable operation.
- Environmental Conditions: Avoid exposing the HMI to extreme temperatures, humidity, or direct sunlight.
- Firmware Updates: Regularly check for firmware updates from Omron to ensure optimal performance.
- Backup: Always back up your project files before making changes or updates.
- Grounding: Properly ground the HMI to prevent electrical noise interference.
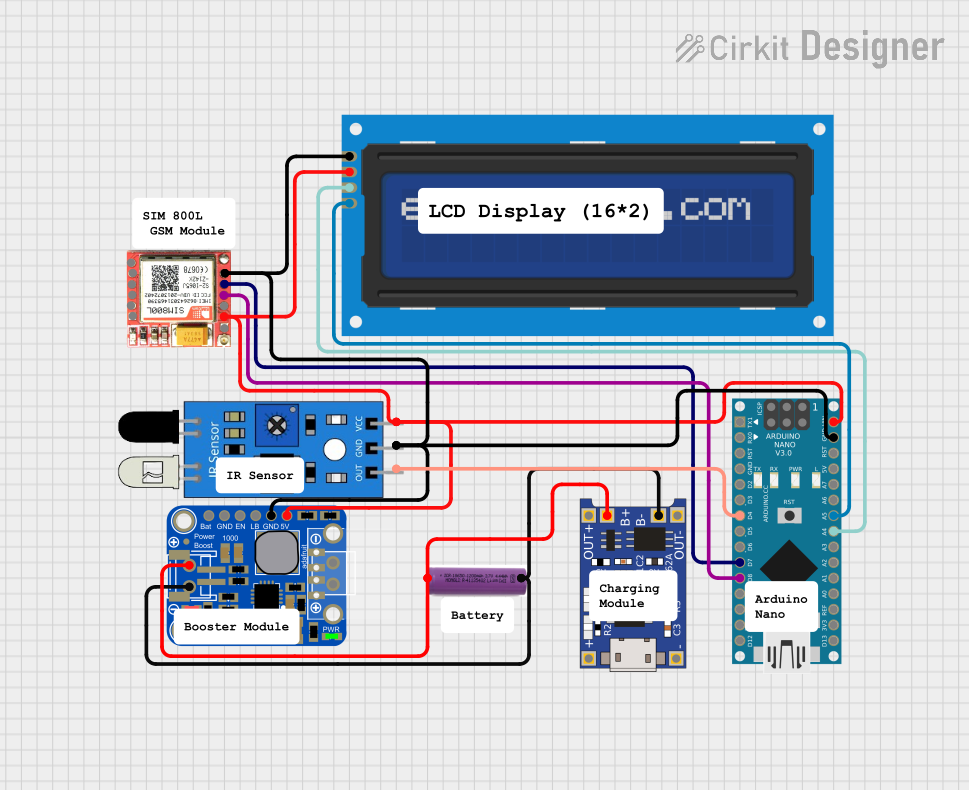
Example: Connecting to an Arduino UNO
The HMI NB7W-TW01B can be connected to an Arduino UNO via the RS232 port using an RS232-to-TTL converter. Below is an example Arduino sketch for basic serial communication:
#include <SoftwareSerial.h>

// Define RX and TX pins for SoftwareSerial
SoftwareSerial mySerial(10, 11); // RX = pin 10, TX = pin 11

void setup() {
  // Initialize hardware serial for debugging
  Serial.begin(9600);
  // Initialize software serial for HMI communication
  mySerial.begin(9600);

  Serial.println("HMI-Arduino Communication Initialized");
}

void loop() {
  // Check if data is available from the HMI
  if (mySerial.available()) {
    String hmiData = mySerial.readString(); // Read data from HMI
    Serial.print("Data from HMI: ");
    Serial.println(hmiData); // Print data to Serial Monitor
  }

  // Send data to HMI
  mySerial.println("Hello from Arduino");
  delay(1000); // Wait 1 second before sending the next message
}
Note: Ensure the RS232-to-TTL converter is properly connected to the Arduino and HMI. Match the baud rate and communication settings in the HMI software.
Troubleshooting and FAQs
Common Issues and Solutions
HMI Does Not Power On
- Cause: Incorrect power supply or loose connections.
- Solution: Verify the power input is 24 V DC and check all connections.
No Communication with PLC
- Cause: Mismatched communication settings or faulty cables.
- Solution: Ensure the baud rate, parity, and other settings match between the HMI and PLC. Test with a different cable if necessary.
Touchscreen Unresponsive
- Cause: Calibration issue or hardware fault.
- Solution: Recalibrate the touchscreen using the HMI settings menu. If the issue persists, contact Omron support.
Project File Fails to Upload
- Cause: USB connection issue or incompatible file format.
- Solution: Check the USB cable and port. Ensure the project file is created using NB-Designer software.
FAQs
Q: Can the HMI NB7W-TW01B be used outdoors?
A: No, this HMI is designed for indoor use and should be protected from direct sunlight and moisture.Q: What software is required to program the HMI?
A: Omron's NB-Designer software is used to create and upload projects to the HMI.Q: Can the HMI communicate with multiple devices simultaneously?
A: Yes, the HMI supports multi-drop communication via RS485 and can also use Ethernet for networked devices.Q: How do I reset the HMI to factory settings?
A: Refer to the user manual for detailed instructions on performing a factory reset.
This concludes the documentation for the HMI NB7W-TW01B. For further assistance, consult the official Omron support resources.