Cirkit Designer Logo
Cirkit Designer
Your all-in-one circuit design IDE
Home / 
Component Documentation

How to Use GravityI2CBME280_Environmental_Sensor: Examples, Pinouts, and Specs

Image of GravityI2CBME280_Environmental_Sensor
Cirkit Designer LogoDesign with GravityI2CBME280_Environmental_Sensor in Cirkit Designer

Introduction

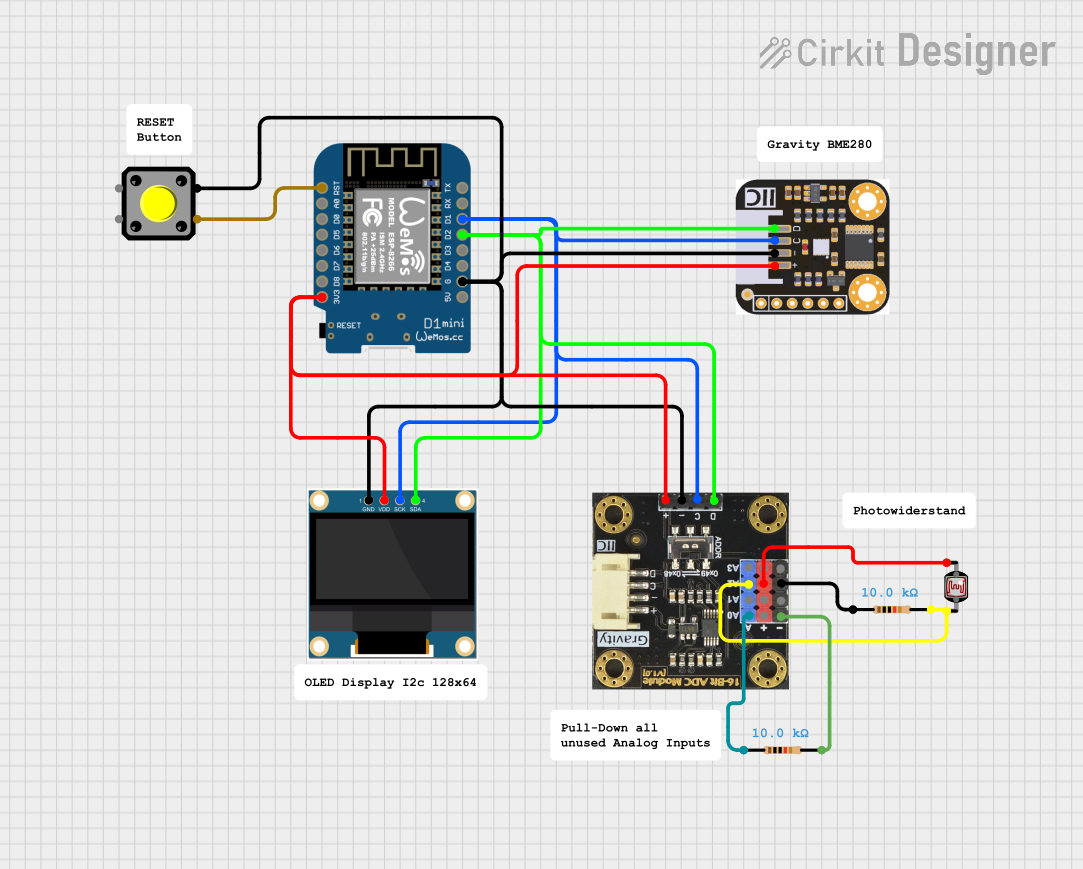
The Gravity I2C BME280 Environmental Sensor is a versatile and precise sensor module that measures temperature, humidity, and atmospheric pressure. Based on the Bosch BME280 sensor, it is designed for easy integration into weather stations, home automation systems, and IoT applications. Its I2C interface facilitates communication with most microcontrollers, including Arduino platforms.

Explore Projects Built with GravityI2CBME280_Environmental_Sensor

Use Cirkit Designer to design, explore, and prototype these projects online. Some projects support real-time simulation. Click "Open Project" to start designing instantly!
Wemos D1 Mini Based Environmental Monitoring System with OLED Display and Light Sensing
Image of WeatherStation: A project utilizing GravityI2CBME280_Environmental_Sensor in a practical application
This circuit features a Wemos D1 Mini microcontroller interfaced with a BME280 environmental sensor and an OLED display for data output, as well as an ADS1115 ADC module connected to a photocell for light intensity measurements. A pushbutton is included for resetting the microcontroller.
Cirkit Designer LogoOpen Project in Cirkit Designer
ESP32-Based Smart Weather Station with BME280, BH1750, and OLED Display
Image of Smart Station: A project utilizing GravityI2CBME280_Environmental_Sensor in a practical application
This circuit is a smart weather station that uses an ESP32 microcontroller to interface with a BME280 sensor for measuring temperature, humidity, and pressure, a BH1750 sensor for measuring light intensity, and a 0.96" OLED display to show the sensor readings. Additional components include a wind vane and a soil moisture module for environmental monitoring, all powered by a 18650 Li-ion battery managed by a TP4056 charging module.
Cirkit Designer LogoOpen Project in Cirkit Designer
ESP8266-Based Environmental Monitoring System
Image of Stacja_Pogodowa1: A project utilizing GravityI2CBME280_Environmental_Sensor in a practical application
This circuit is designed to collect environmental data using an ESP-8266 microcontroller connected to a BMP180 barometric pressure sensor, a GY-30 BH1750FVI digital light intensity sensor, and a DHT11 temperature and humidity sensor. The sensors are interfaced with the ESP-8266 via I2C (SCL and SDA lines) and digital IO pins, and they share a common power supply (3.3V) and ground. The circuit is likely intended for weather monitoring or home automation applications, with capabilities to measure temperature, humidity, barometric pressure, and light intensity.
Cirkit Designer LogoOpen Project in Cirkit Designer
ESP32-Based Environmental Sensing Station with Wi-Fi and Light Intensity Measurement
Image of multi esp32: A project utilizing GravityI2CBME280_Environmental_Sensor in a practical application
This circuit is designed to collect environmental data and light intensity measurements using the ESP32 microcontroller, which communicates with a BME/BMP280 sensor and a BH1750 sensor via I2C, and transmits the data through an LD2410C communication module using serial communication.
Cirkit Designer LogoOpen Project in Cirkit Designer

Explore Projects Built with GravityI2CBME280_Environmental_Sensor

Use Cirkit Designer to design, explore, and prototype these projects online. Some projects support real-time simulation. Click "Open Project" to start designing instantly!
Image of WeatherStation: A project utilizing GravityI2CBME280_Environmental_Sensor in a practical application
Wemos D1 Mini Based Environmental Monitoring System with OLED Display and Light Sensing
This circuit features a Wemos D1 Mini microcontroller interfaced with a BME280 environmental sensor and an OLED display for data output, as well as an ADS1115 ADC module connected to a photocell for light intensity measurements. A pushbutton is included for resetting the microcontroller.
Cirkit Designer LogoOpen Project in Cirkit Designer
Image of Smart Station: A project utilizing GravityI2CBME280_Environmental_Sensor in a practical application
ESP32-Based Smart Weather Station with BME280, BH1750, and OLED Display
This circuit is a smart weather station that uses an ESP32 microcontroller to interface with a BME280 sensor for measuring temperature, humidity, and pressure, a BH1750 sensor for measuring light intensity, and a 0.96" OLED display to show the sensor readings. Additional components include a wind vane and a soil moisture module for environmental monitoring, all powered by a 18650 Li-ion battery managed by a TP4056 charging module.
Cirkit Designer LogoOpen Project in Cirkit Designer
Image of Stacja_Pogodowa1: A project utilizing GravityI2CBME280_Environmental_Sensor in a practical application
ESP8266-Based Environmental Monitoring System
This circuit is designed to collect environmental data using an ESP-8266 microcontroller connected to a BMP180 barometric pressure sensor, a GY-30 BH1750FVI digital light intensity sensor, and a DHT11 temperature and humidity sensor. The sensors are interfaced with the ESP-8266 via I2C (SCL and SDA lines) and digital IO pins, and they share a common power supply (3.3V) and ground. The circuit is likely intended for weather monitoring or home automation applications, with capabilities to measure temperature, humidity, barometric pressure, and light intensity.
Cirkit Designer LogoOpen Project in Cirkit Designer
Image of multi esp32: A project utilizing GravityI2CBME280_Environmental_Sensor in a practical application
ESP32-Based Environmental Sensing Station with Wi-Fi and Light Intensity Measurement
This circuit is designed to collect environmental data and light intensity measurements using the ESP32 microcontroller, which communicates with a BME/BMP280 sensor and a BH1750 sensor via I2C, and transmits the data through an LD2410C communication module using serial communication.
Cirkit Designer LogoOpen Project in Cirkit Designer

Common Applications and Use Cases

  • Personal weather stations
  • Environmental monitoring
  • Indoor navigation (floor detection)
  • IoT applications
  • Home automation and climate control

Technical Specifications

Key Technical Details

  • Supply Voltage: 3.3V to 5V
  • Operating Range:
    • Temperature: -40°C to +85°C
    • Humidity: 0-100% RH
    • Pressure: 300 to 1100 hPa
  • Interface: I2C (up to 3.4 MHz)
  • I2C Address: 0x76 (default) or 0x77 (alternative)
  • Accuracy:
    • Temperature: ±1.0°C
    • Humidity: ±3% RH
    • Pressure: ±1 hPa
  • Resolution:
    • Temperature: 0.01°C
    • Humidity: 0.008% RH
    • Pressure: 0.18 hPa

Pin Configuration and Descriptions

Pin Number Pin Name Description
1 VCC Power supply (3.3V to 5V)
2 GND Ground
3 SDA I2C Data Line
4 SCL I2C Clock Line
5 CS Chip Select (active low)
6 SDI Serial Data Input (unused in I2C)
7 SDO Serial Data Output (unused in I2C)

Usage Instructions

Integration with Arduino UNO

  1. Connection:

    • Connect VCC to 3.3V or 5V on the Arduino UNO.
    • Connect GND to a ground pin on the Arduino UNO.
    • Connect SDA to A4 (SDA) on the Arduino UNO.
    • Connect SCL to A5 (SCL) on the Arduino UNO.
  2. Library Installation:

    • Install the Adafruit BME280 library via the Arduino Library Manager.
  3. Sample Code:

#include <Wire.h>
#include <Adafruit_Sensor.h>
#include <Adafruit_BME280.h>

Adafruit_BME280 bme; // Create an instance of the BME280 library

void setup() {
  Serial.begin(9600);
  if (!bme.begin(0x76)) { // Initialize the BME280 sensor
    Serial.println("Could not find a valid BME280 sensor, check wiring!");
    while (1);
  }
}

void loop() {
  Serial.print("Temperature = ");
  Serial.print(bme.readTemperature()); // Read temperature
  Serial.println(" °C");

  Serial.print("Humidity = ");
  Serial.print(bme.readHumidity()); // Read humidity
  Serial.println(" %");

  Serial.print("Pressure = ");
  Serial.print(bme.readPressure() / 100.0F); // Read pressure
  Serial.println(" hPa");

  delay(2000); // Wait for 2 seconds before next read
}

Important Considerations and Best Practices

  • Ensure that the power supply voltage matches the sensor's requirements.
  • Use pull-up resistors on the I2C lines if they are not present on the microcontroller board.
  • Avoid placing the sensor near heat sources or in direct sunlight for accurate readings.
  • For long-term stability, periodically recalibrate the sensor if necessary.

Troubleshooting and FAQs

Common Issues

  • Sensor not detected: Check the wiring, ensure that the correct I2C address is used, and that the sensor is powered correctly.
  • Inaccurate readings: Verify that the sensor is not exposed to direct sunlight or other heat sources and that it has been given enough time to acclimate to the environment.

Solutions and Tips for Troubleshooting

  • Wiring Check: Double-check all connections and ensure solid contacts.
  • I2C Scanner: Run an I2C scanner sketch to confirm the sensor's address and connectivity.
  • Reset Power: Sometimes, simply resetting the power to the sensor can resolve communication issues.

FAQs

Q: Can I use multiple BME280 sensors on the same I2C bus? A: Yes, you can use two BME280 sensors by setting one to the alternative I2C address (0x77).

Q: How do I change the I2C address of the sensor? A: The I2C address can be changed by connecting the SDO pin to GND for address 0x76 or to VCC for address 0x77.

Q: What is the maximum cable length for the I2C connection? A: I2C is designed for short-distance communication. Keep the cable length as short as possible, preferably under 50cm, to ensure reliable communication.

Q: How can I calibrate the sensor? A: Calibration procedures vary; refer to the BME280 datasheet for detailed instructions. For most applications, factory calibration is sufficient.

For further assistance, consult the manufacturer's documentation or contact technical support.