Cirkit Designer Logo
Cirkit Designer
Your all-in-one circuit design IDE
Home / 
Component Documentation

How to Use 3xAABattery: Examples, Pinouts, and Specs

Image of 3xAABattery
Cirkit Designer LogoDesign with 3xAABattery in Cirkit Designer

Introduction

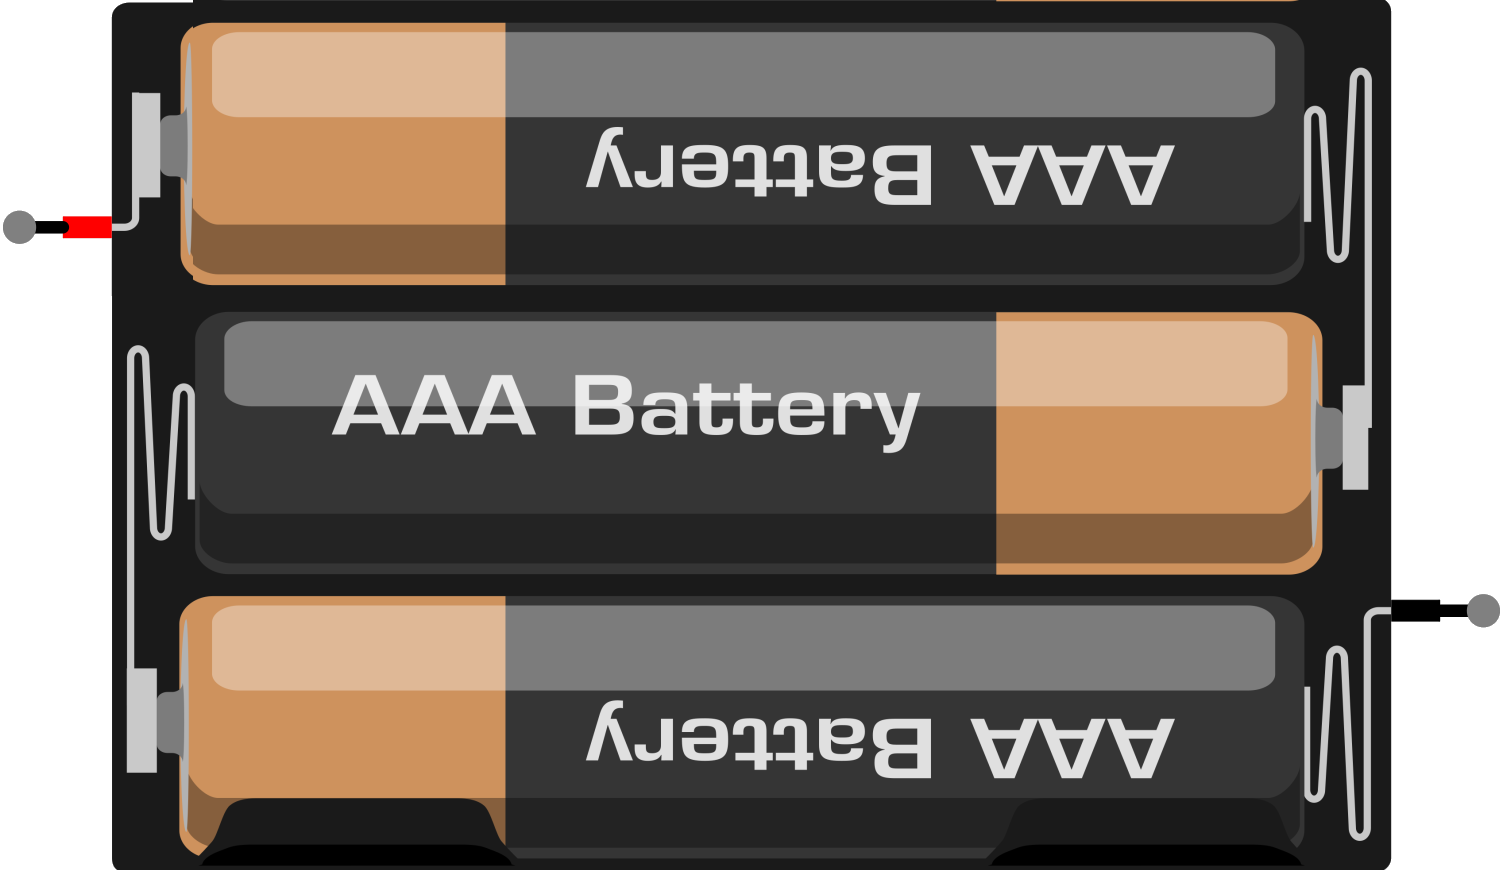
The 3xAA battery holder is a simple yet essential component in many electronic projects. It is designed to hold three AA batteries in series, providing a convenient and portable power source. This configuration typically yields a nominal voltage of 4.5V (1.5V per cell) and is commonly used in small electronic devices, DIY projects, and educational kits.

Explore Projects Built with 3xAABattery

Use Cirkit Designer to design, explore, and prototype these projects online. Some projects support real-time simulation. Click "Open Project" to start designing instantly!
Battery-Powered 18650 Li-ion Charger with USB Output and Adjustable Voltage Regulator
Image of Breadboard: A project utilizing 3xAABattery in a practical application
This circuit is a battery management and power supply system that uses three 3.7V batteries connected to a 3S 10A Li-ion 18650 Charger Protection Board Module for balanced charging and protection. The system includes a TP4056 Battery Charging Protection Module for additional charging safety, a Step Up Boost Power Converter to regulate and boost the voltage, and a USB regulator to provide a stable 5V output, controlled by a push switch.
Cirkit Designer LogoOpen Project in Cirkit Designer
3S 18650 Battery Pack with Protection Board for Safe Charging
Image of 4S BMS: A project utilizing 3xAABattery in a practical application
This circuit consists of three 18650 batteries connected in series to a 3S 10A Li-ion 18650 Charger Protection Board Module. The protection board manages the charging and discharging of the battery pack, ensuring safe operation by balancing the cells and providing overcharge, over-discharge, and short-circuit protection.
Cirkit Designer LogoOpen Project in Cirkit Designer
Battery-Powered Multi-Voltage Supply with Barrel Jack Connectors
Image of Battery Setup: A project utilizing 3xAABattery in a practical application
This circuit consists of multiple 9V batteries connected in series and parallel configurations to provide power to three separate 2.1mm barrel jacks. Each barrel jack receives a different combination of series and parallel battery connections to achieve the desired voltage and current levels.
Cirkit Designer LogoOpen Project in Cirkit Designer
Battery-Powered Arduino and ESP32 Controlled Servo System with BMS and TP4056 Charging
Image of robot: A project utilizing 3xAABattery in a practical application
This circuit integrates multiple 3.7V batteries managed by a Battery Management System (BMS) and charged via a TP4056 module. It powers an Arduino UNO, an ESP32, a DC-DC boost converter, and a servo motor, with the Arduino controlling the servo and communicating with the ESP32.
Cirkit Designer LogoOpen Project in Cirkit Designer

Explore Projects Built with 3xAABattery

Use Cirkit Designer to design, explore, and prototype these projects online. Some projects support real-time simulation. Click "Open Project" to start designing instantly!
Image of Breadboard: A project utilizing 3xAABattery in a practical application
Battery-Powered 18650 Li-ion Charger with USB Output and Adjustable Voltage Regulator
This circuit is a battery management and power supply system that uses three 3.7V batteries connected to a 3S 10A Li-ion 18650 Charger Protection Board Module for balanced charging and protection. The system includes a TP4056 Battery Charging Protection Module for additional charging safety, a Step Up Boost Power Converter to regulate and boost the voltage, and a USB regulator to provide a stable 5V output, controlled by a push switch.
Cirkit Designer LogoOpen Project in Cirkit Designer
Image of 4S BMS: A project utilizing 3xAABattery in a practical application
3S 18650 Battery Pack with Protection Board for Safe Charging
This circuit consists of three 18650 batteries connected in series to a 3S 10A Li-ion 18650 Charger Protection Board Module. The protection board manages the charging and discharging of the battery pack, ensuring safe operation by balancing the cells and providing overcharge, over-discharge, and short-circuit protection.
Cirkit Designer LogoOpen Project in Cirkit Designer
Image of Battery Setup: A project utilizing 3xAABattery in a practical application
Battery-Powered Multi-Voltage Supply with Barrel Jack Connectors
This circuit consists of multiple 9V batteries connected in series and parallel configurations to provide power to three separate 2.1mm barrel jacks. Each barrel jack receives a different combination of series and parallel battery connections to achieve the desired voltage and current levels.
Cirkit Designer LogoOpen Project in Cirkit Designer
Image of robot: A project utilizing 3xAABattery in a practical application
Battery-Powered Arduino and ESP32 Controlled Servo System with BMS and TP4056 Charging
This circuit integrates multiple 3.7V batteries managed by a Battery Management System (BMS) and charged via a TP4056 module. It powers an Arduino UNO, an ESP32, a DC-DC boost converter, and a servo motor, with the Arduino controlling the servo and communicating with the ESP32.
Cirkit Designer LogoOpen Project in Cirkit Designer

Common Applications and Use Cases

  • Portable electronic devices
  • DIY electronics projects
  • Educational kits and science projects
  • Remote controls
  • Small toys and gadgets

Technical Specifications

Key Technical Details

  • Nominal Voltage Output: 4.5V (1.5V per AA battery)
  • Maximum Recommended Current: Dependent on the batteries used
  • Material: Plastic casing with metal contacts
  • Battery Compatibility: Standard AA size (alkaline, NiMH, NiCd, etc.)

Pin Configuration and Descriptions

Pin Description
+ Positive terminal connected to the positive end of the battery series
- Negative terminal connected to the negative end of the battery series

Usage Instructions

How to Use the Component in a Circuit

  1. Inserting Batteries: Ensure the batteries are inserted with the correct polarity. The positive end of the battery (with the protruding nub) should align with the positive (+) marked end of the holder.
  2. Connecting to a Circuit: Use the leads from the battery holder to connect to your circuit. The red wire is typically the positive lead, and the black wire is the negative lead.
  3. Securing Connections: Solder or use terminal blocks to secure the connections to your circuit to prevent intermittent power issues.

Important Considerations and Best Practices

  • Battery Orientation: Always double-check the polarity of the batteries before powering your circuit.
  • Power Requirements: Ensure the total power draw of your circuit does not exceed the current capacity of the batteries.
  • Battery Replacement: Replace all batteries at the same time to ensure even discharge and prevent leakage.
  • Safety: Do not mix old and new batteries or different types of batteries to avoid damage or leakage.

Troubleshooting and FAQs

Common Issues Users Might Face

  • Device not powering on: Check the battery orientation and ensure the connections are secure.
  • Intermittent power: Inspect the battery holder contacts for corrosion or poor connection.
  • Low power output: Verify that the batteries are fresh and check for any signs of leakage.

Solutions and Tips for Troubleshooting

  • Cleaning Contacts: Clean the battery contacts with a bit of rubbing alcohol on a cotton swab to ensure a good connection.
  • Battery Testing: Use a multimeter to test the voltage of each battery to ensure they are providing the correct voltage.
  • Connection Check: Make sure all solder joints and connections are solid and not causing any intermittent contact.

FAQs

  • Q: Can I use rechargeable batteries in the holder?

    • A: Yes, rechargeable AA batteries such as NiMH or NiCd can be used.
  • Q: What happens if I put the batteries in the wrong way?

    • A: Reversing the battery polarity can damage your electronic device. Always double-check the orientation.
  • Q: Can I use this battery holder to power an Arduino UNO?

    • A: Yes, an Arduino UNO can be powered with 4.5V, but it is recommended to use a regulated 5V supply for stable operation.

Example Code for Arduino UNO

// This example demonstrates how to power an Arduino UNO using a 3xAA battery holder.

void setup() {
  // Initialize the built-in LED pin as an output.
  pinMode(LED_BUILTIN, OUTPUT);
}

void loop() {
  // Turn the LED on (HIGH is the voltage level)
  digitalWrite(LED_BUILTIN, HIGH);
  // Wait for a second
  delay(1000);
  // Turn the LED off by making the voltage LOW
  digitalWrite(LED_BUILTIN, LOW);
  // Wait for a second
  delay(1000);
}

Note: When powering an Arduino UNO with a 3xAA battery holder, connect the positive terminal to the Vin pin and the negative terminal to one of the GND pins on the Arduino. Ensure that the batteries are fresh to provide a stable power supply for the Arduino to operate correctly.