How to Use 2.8 inch TFT Display 240*320 pixels with Touchscreen - SPI - ILI9341 - 3.3V: Examples, Pinouts, and Specs
Introduction
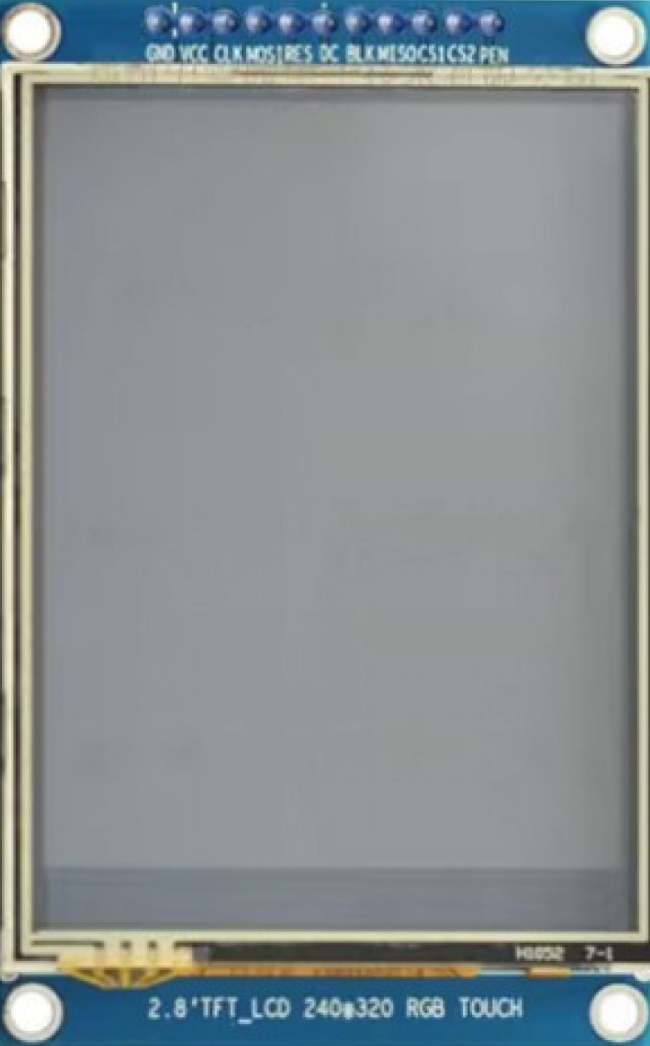
The 2.8-inch TFT display is a compact and versatile module featuring a resolution of 240x320 pixels. It is equipped with a resistive touchscreen interface, making it ideal for interactive applications. The display is powered by the ILI9341 driver IC and communicates via the SPI protocol, ensuring fast and efficient data transfer. Operating at 3.3V, this module is well-suited for integration with microcontrollers such as Arduino, ESP32, and STM32.
Explore Projects Built with 2.8 inch TFT Display 240*320 pixels with Touchscreen - SPI - ILI9341 - 3.3V


Explore Projects Built with 2.8 inch TFT Display 240*320 pixels with Touchscreen - SPI - ILI9341 - 3.3V
Common Applications
- Graphical user interfaces (GUIs) for embedded systems
- Portable devices and handheld instruments
- IoT dashboards and control panels
- Educational and hobbyist projects
- Data visualization for sensors and real-time monitoring
Technical Specifications
Key Specifications
| Parameter | Value |
|---|---|
| Display Type | TFT LCD |
| Screen Size | 2.8 inches |
| Resolution | 240x320 pixels |
| Driver IC | ILI9341 |
| Touchscreen Type | Resistive |
| Communication Protocol | SPI |
| Operating Voltage | 3.3V |
| Backlight | LED |
| Viewing Angle | ~160° |
| Operating Temperature | -20°C to 70°C |
Pin Configuration
| Pin Name | Pin Number | Description |
|---|---|---|
| VCC | 1 | Power supply input (3.3V) |
| GND | 2 | Ground connection |
| CS | 3 | Chip Select for SPI communication |
| RESET | 4 | Reset pin for the display |
| DC/RS | 5 | Data/Command control pin |
| SDI/MOSI | 6 | SPI Master Out Slave In (data input) |
| SCK | 7 | SPI Clock |
| LED | 8 | Backlight control (connect to 3.3V or PWM pin) |
| T_CLK | 9 | Touchscreen SPI Clock |
| T_CS | 10 | Touchscreen Chip Select |
| T_DIN | 11 | Touchscreen SPI Data Input |
| T_DO | 12 | Touchscreen SPI Data Output |
| T_IRQ | 13 | Touchscreen Interrupt (active low) |
Usage Instructions
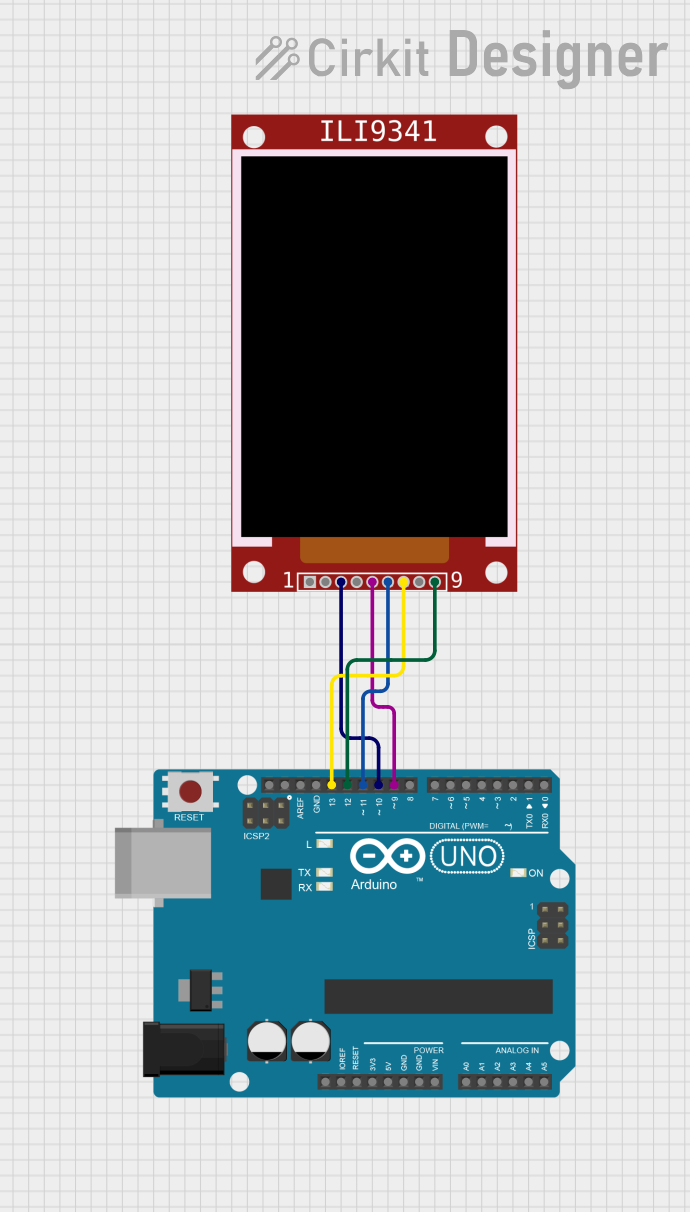
Connecting the Display to an Arduino UNO
Since the display operates at 3.3V, a logic level shifter is recommended when interfacing with 5V microcontrollers like the Arduino UNO. Below is a typical wiring configuration:
| Display Pin | Arduino Pin | Notes |
|---|---|---|
| VCC | 3.3V | Power supply |
| GND | GND | Ground |
| CS | D10 | Chip Select |
| RESET | D9 | Reset |
| DC/RS | D8 | Data/Command |
| SDI/MOSI | D11 | SPI MOSI |
| SCK | D13 | SPI Clock |
| LED | 3.3V | Backlight (can also connect to PWM pin) |
| T_CLK | D13 | Touchscreen SPI Clock |
| T_CS | D4 | Touchscreen Chip Select |
| T_DIN | D11 | Touchscreen SPI Data Input |
| T_DO | D12 | Touchscreen SPI Data Output |
| T_IRQ | D2 | Touchscreen Interrupt |
Example Code for Arduino UNO
The following example demonstrates how to initialize the display and touchscreen using the Adafruit libraries.
#include <Adafruit_GFX.h>       // Core graphics library
#include <Adafruit_ILI9341.h>   // ILI9341 driver library
#include <Adafruit_STMPE610.h> // Touchscreen controller library

// Define pins for the display
#define TFT_CS   10  // Chip Select
#define TFT_DC   8   // Data/Command
#define TFT_RST  9   // Reset

// Define pins for the touchscreen
#define TS_CS    4   // Touchscreen Chip Select
#define TS_IRQ   2   // Touchscreen Interrupt

// Create display and touchscreen objects
Adafruit_ILI9341 tft = Adafruit_ILI9341(TFT_CS, TFT_DC, TFT_RST);
Adafruit_STMPE610 ts = Adafruit_STMPE610(TS_CS);

void setup() {
  Serial.begin(9600);
  // Initialize the display
  tft.begin();
  tft.setRotation(1); // Set orientation (1 = landscape)
  tft.fillScreen(ILI9341_BLACK); // Clear screen with black color

  // Initialize the touchscreen
  if (!ts.begin()) {
    Serial.println("Touchscreen not found!");
    while (1);
  }
  Serial.println("Touchscreen initialized.");
}

void loop() {
  // Check if the touchscreen is being touched
  if (ts.touched()) {
    TS_Point p = ts.getPoint(); // Get touch coordinates
    // Map touchscreen coordinates to display coordinates
    int x = map(p.x, 0, 240, 0, tft.width());
    int y = map(p.y, 0, 320, 0, tft.height());
    // Draw a circle at the touch point
    tft.fillCircle(x, y, 3, ILI9341_RED);
  }
}
Important Considerations
- Voltage Levels: Ensure all signal lines are at 3.3V logic levels. Use level shifters if necessary.
- Power Supply: Provide a stable 3.3V power source to avoid flickering or instability.
- SPI Speed: Configure the SPI clock speed appropriately to balance performance and reliability.
- Touchscreen Calibration: Depending on your application, you may need to calibrate the touchscreen for accurate input.
Troubleshooting and FAQs
Common Issues
Display Not Turning On
- Verify the power supply voltage (3.3V).
- Check all connections for loose or incorrect wiring.
- Ensure the
RESETpin is properly connected or pulled high.
No Response from Touchscreen
- Confirm the touchscreen SPI pins (T_CLK, T_CS, T_DIN, T_DO) are correctly connected.
- Check if the touchscreen library is initialized properly in the code.
- Test the
T_IRQpin to ensure it detects touch events.
Flickering or Unstable Display
- Use a decoupling capacitor (e.g., 10µF) across the power supply pins.
- Reduce the SPI clock speed in the code.
Incorrect Touch Coordinates
- Calibrate the touchscreen using a calibration sketch.
- Verify the mapping logic in the code matches the display orientation.
FAQs
Q: Can I use this display with a 5V microcontroller?
A: Yes, but you must use logic level shifters to convert 5V signals to 3.3V.
Q: Does the display support other communication protocols?
A: No, this module is designed to work exclusively with the SPI protocol.
Q: How do I control the backlight?
A: Connect the LED pin to a 3.3V source for constant backlight or to a PWM pin for brightness control.
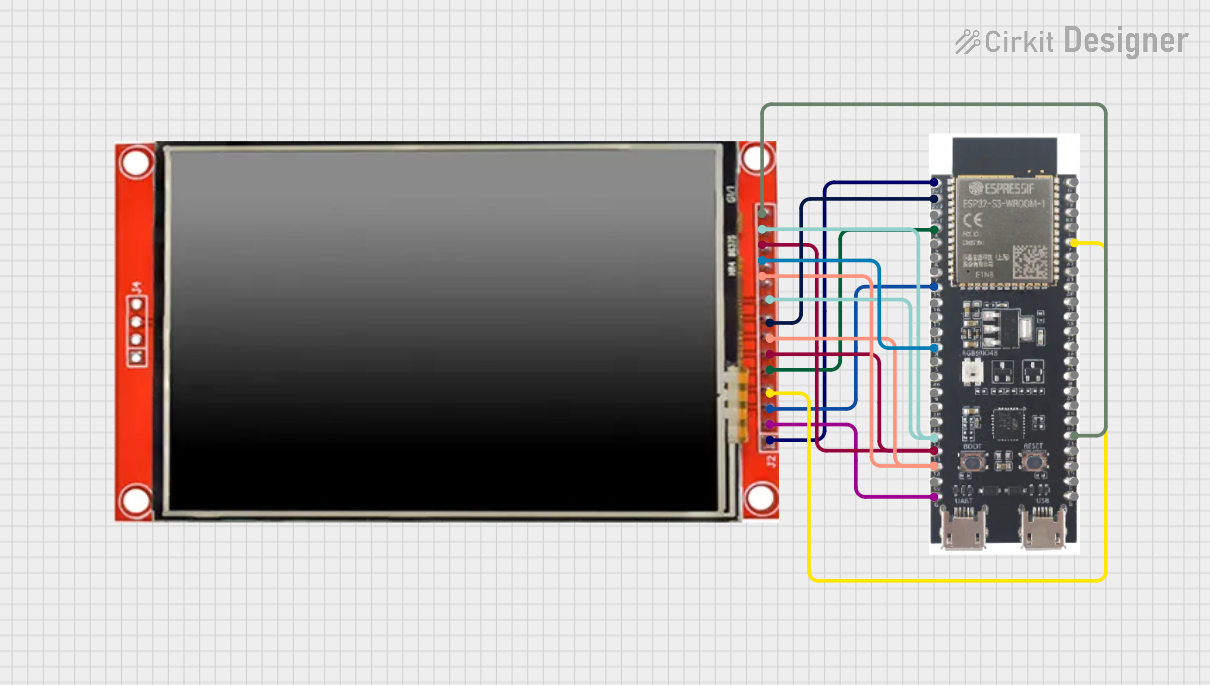
Q: Can I use this display with an ESP32?
A: Yes, the ESP32 operates at 3.3V logic levels and is compatible with this display.
Q: Is the touchscreen resistive or capacitive?
A: The touchscreen is resistive, requiring pressure to detect input.