How to Use Barometer-BMP180: Examples, Pinouts, and Specs
Introduction
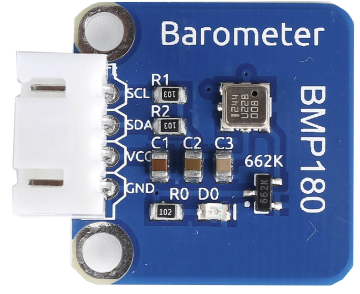
The Barometer-BMP180, manufactured by SunFounder, is a digital barometric pressure sensor designed to measure atmospheric pressure and temperature. This versatile sensor is commonly used in weather stations, altimeters, and various environmental monitoring applications. Its compact size and high precision make it an ideal choice for both hobbyists and professionals.
Explore Projects Built with Barometer-BMP180
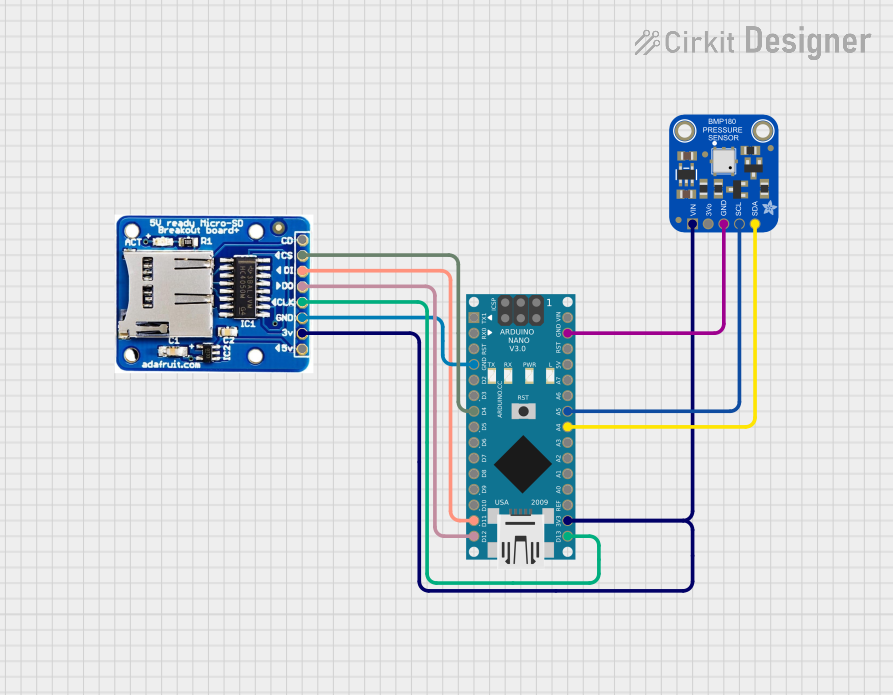
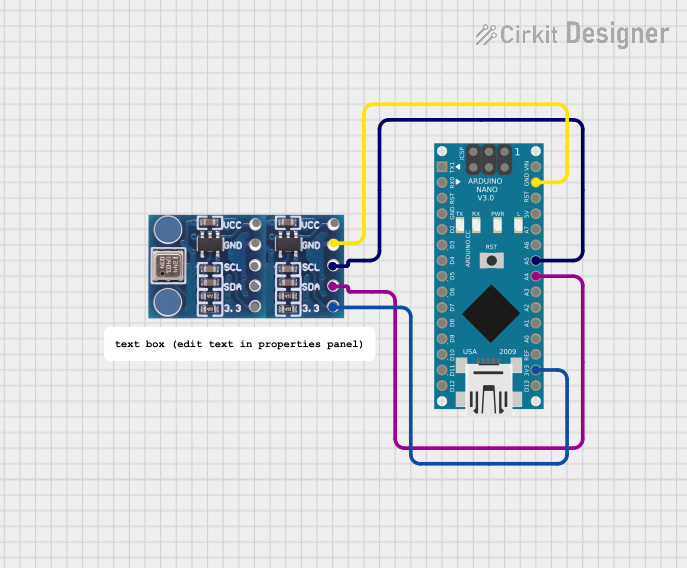

Explore Projects Built with Barometer-BMP180
Technical Specifications
Key Technical Details
| Parameter | Value |
|---|---|
| Operating Voltage | 1.8V to 3.6V |
| Supply Current | 12 µA (typical) |
| Pressure Range | 300 hPa to 1100 hPa |
| Temperature Range | -40°C to +85°C |
| Interface | I2C |
| Resolution | 0.01 hPa (pressure), 0.1°C |
| Accuracy | ±1 hPa (pressure), ±0.5°C |
Pin Configuration and Descriptions
| Pin Number | Pin Name | Description |
|---|---|---|
| 1 | VCC | Power supply (1.8V to 3.6V) |
| 2 | GND | Ground |
| 3 | SDA | I2C data line |
| 4 | SCL | I2C clock line |
| 5 | EOC | End of conversion (optional) |
| 6 | XCLR | Master clear (optional, active low) |
Usage Instructions
How to Use the Component in a Circuit
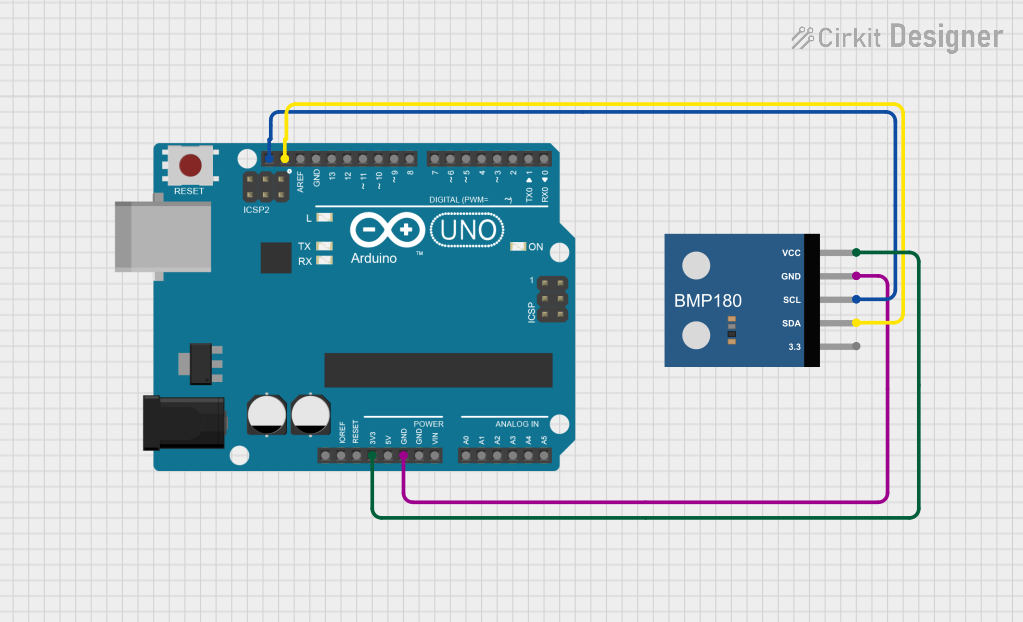
- Power Supply: Connect the VCC pin to a 3.3V power supply and the GND pin to the ground.
- I2C Communication: Connect the SDA pin to the SDA pin on your microcontroller and the SCL pin to the SCL pin on your microcontroller.
- Optional Pins: The EOC and XCLR pins are optional and can be left unconnected if not used.
Important Considerations and Best Practices
- Voltage Levels: Ensure that the voltage levels on the I2C lines are compatible with the BMP180's operating voltage.
- Pull-up Resistors: Use appropriate pull-up resistors (typically 4.7kΩ) on the SDA and SCL lines if not already provided by your microcontroller.
- Environmental Factors: Avoid exposing the sensor to extreme temperatures or humidity, as this can affect its accuracy and longevity.
Example Circuit Diagram

Arduino UNO Integration
Required Libraries
To use the BMP180 with an Arduino UNO, you will need the Adafruit_BMP085 library, which is compatible with the BMP180.
Sample Code
#include <Wire.h>
#include <Adafruit_BMP085.h>

// Create an instance of the sensor
Adafruit_BMP085 bmp;

void setup() {
  Serial.begin(9600);
  if (!bmp.begin()) {
    Serial.println("Could not find a valid BMP180 sensor, check wiring!");
    while (1) {}
  }
}

void loop() {
  // Read and display the temperature
  Serial.print("Temperature = ");
  Serial.print(bmp.readTemperature());
  Serial.println(" *C");

  // Read and display the pressure
  Serial.print("Pressure = ");
  Serial.print(bmp.readPressure());
  Serial.println(" Pa");

  // Read and display the altitude
  Serial.print("Altitude = ");
  Serial.print(bmp.readAltitude());
  Serial.println(" meters");

  delay(2000); // Wait for 2 seconds before the next reading
}
Troubleshooting and FAQs
Common Issues and Solutions
Sensor Not Detected:
- Issue: The sensor is not detected by the microcontroller.
- Solution: Check the wiring connections, ensure the I2C lines have proper pull-up resistors, and verify the power supply voltage.
Inaccurate Readings:
- Issue: The sensor provides inaccurate pressure or temperature readings.
- Solution: Ensure the sensor is not exposed to extreme environmental conditions. Calibrate the sensor if necessary.
Intermittent Data:
- Issue: The sensor data is intermittent or unreliable.
- Solution: Check for loose connections and ensure the I2C bus is not overloaded with too many devices.
FAQs
Q: Can the BMP180 measure altitude?
- A: Yes, the BMP180 can calculate altitude based on the pressure readings.
Q: What is the maximum distance for I2C communication?
- A: The maximum distance for reliable I2C communication is typically around 1 meter, but this can vary based on the pull-up resistor values and the operating environment.
Q: Can I use the BMP180 with a 5V microcontroller?
- A: Yes, but you will need a level shifter to ensure the I2C lines are at a safe voltage level for the BMP180.
Conclusion
The Barometer-BMP180 is a highly accurate and versatile sensor suitable for a wide range of applications. By following the guidelines and best practices outlined in this documentation, you can effectively integrate the BMP180 into your projects and achieve reliable performance.