How to Use ECG: Examples, Pinouts, and Specs
Introduction
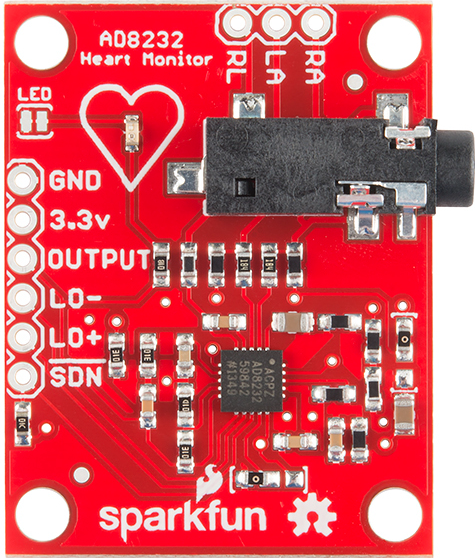
The SEN12650 is an Electrocardiogram (ECG) module designed to record the electrical activity of the heart. It provides a non-invasive method to monitor heart rhythms and detect potential abnormalities. This module is widely used in medical diagnostics, fitness tracking devices, and research applications. Its compact design and ease of integration make it suitable for both professional and hobbyist projects.
Explore Projects Built with ECG
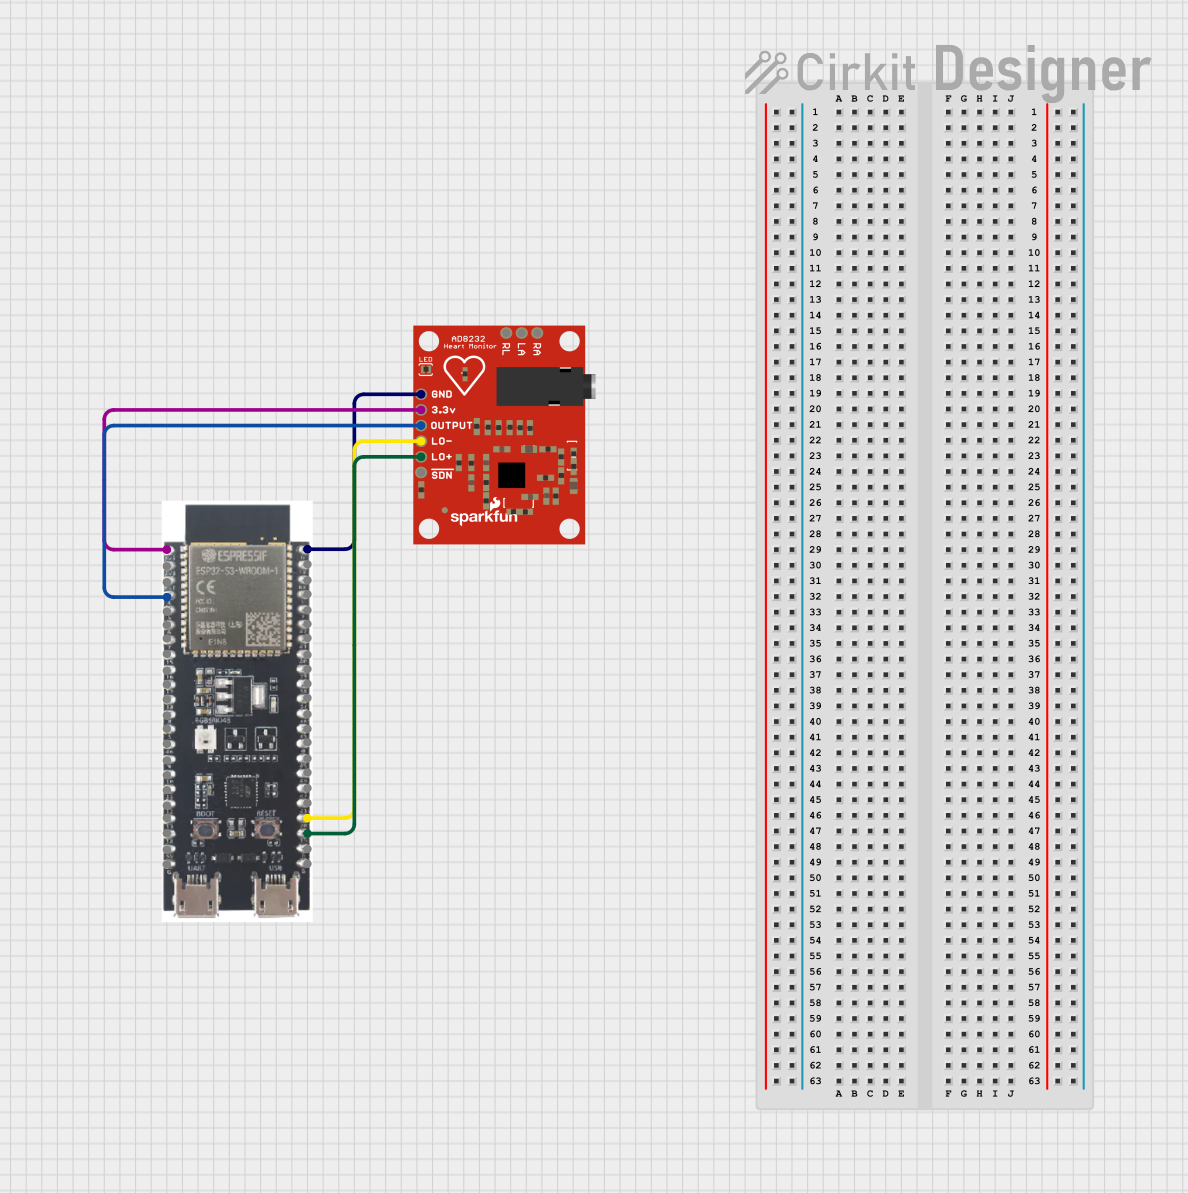

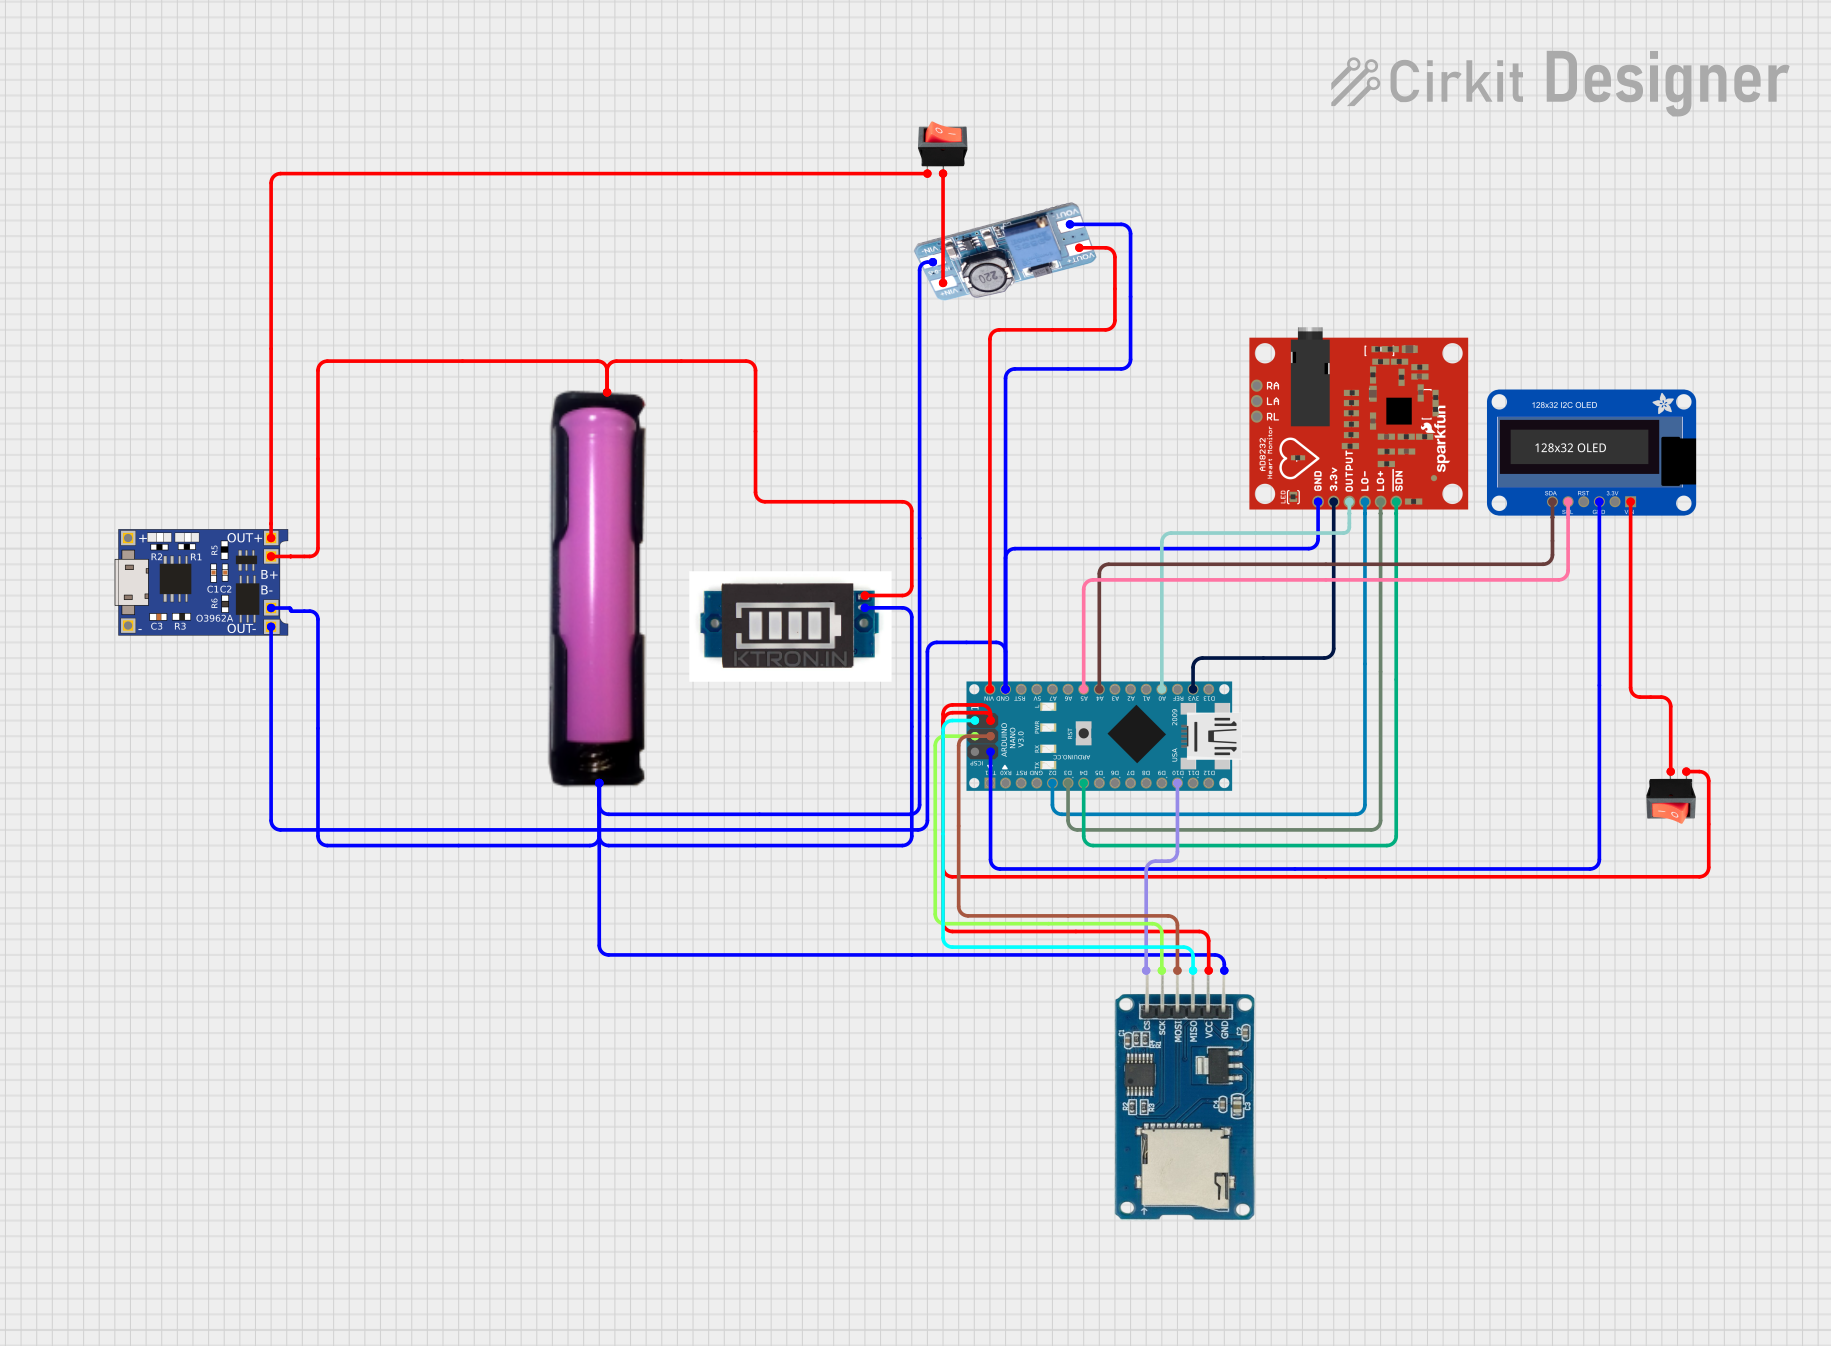
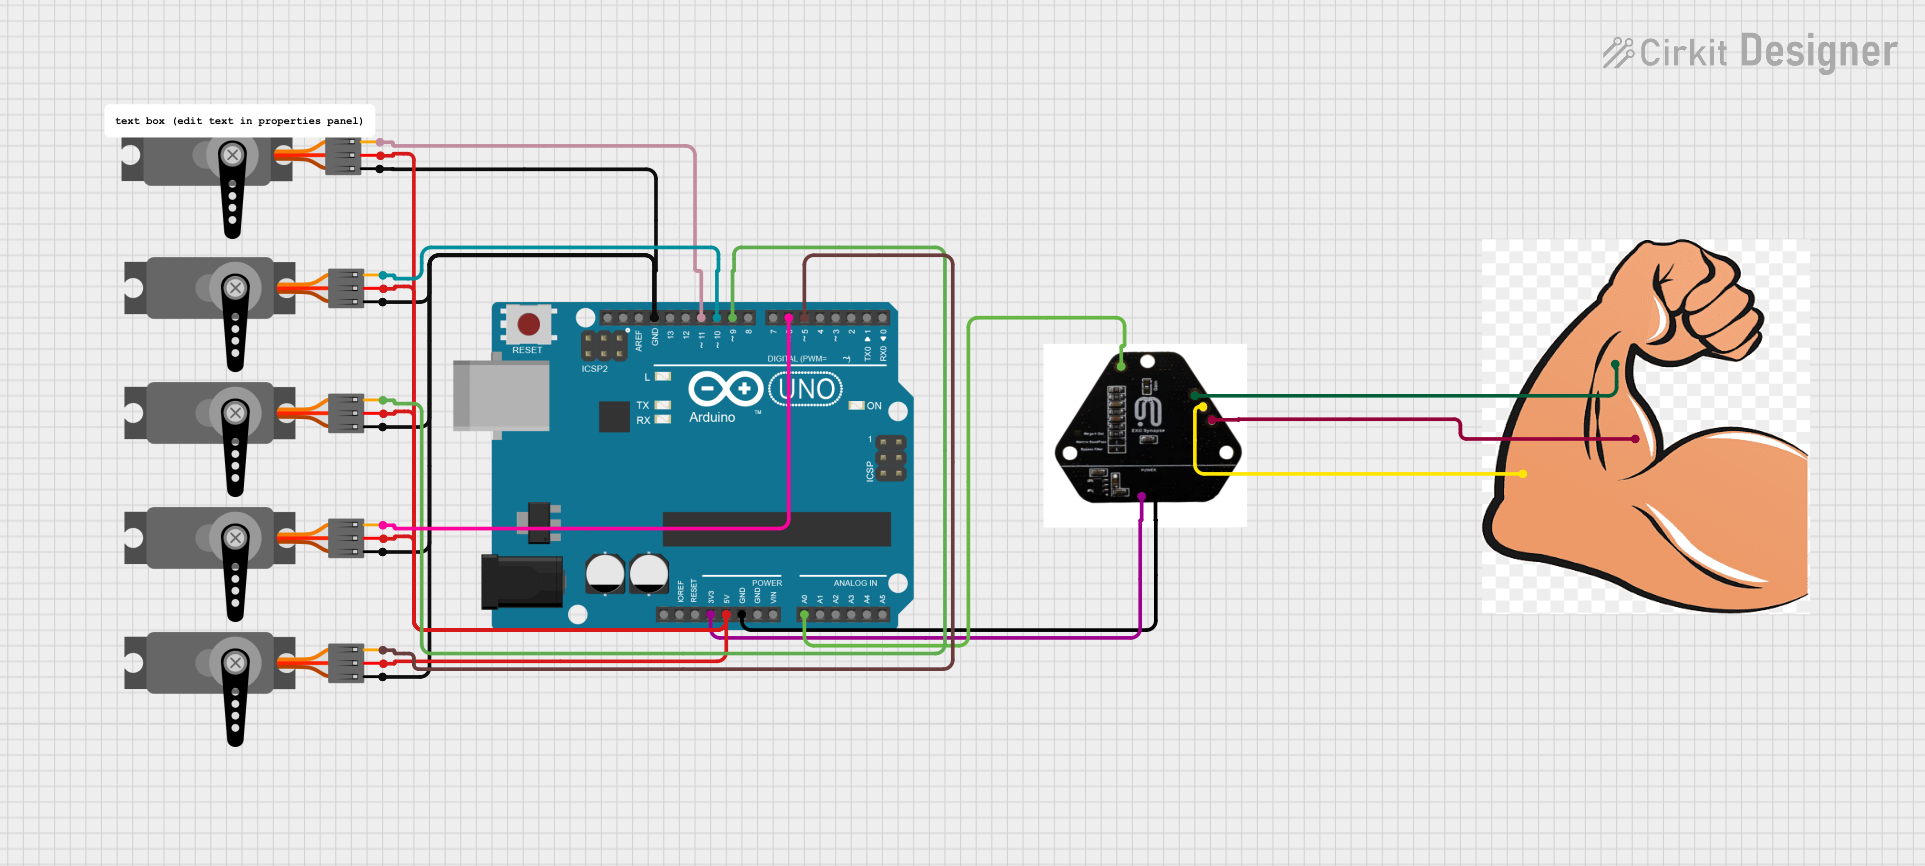
Explore Projects Built with ECG
Common Applications and Use Cases
- Medical diagnostics for detecting arrhythmias and other heart conditions
- Fitness and health monitoring devices
- Biomedical research and development
- Educational projects in electronics and healthcare
- Wearable health technology
Technical Specifications
The SEN12650 ECG module is designed for precision and ease of use. Below are its key technical details:
Key Technical Details
- Operating Voltage: 3.3V to 5V DC
- Operating Current: ~5mA
- Output Signal: Analog voltage proportional to heart activity
- Input Impedance: >10MΩ
- Bandwidth: 0.05Hz to 100Hz
- Gain: Adjustable (default: 200)
- Electrode Connection: 3-lead system (RA, LA, RL)
- Dimensions: 35mm x 22mm x 5mm
- Weight: ~5g
Pin Configuration and Descriptions
The SEN12650 ECG module has a simple pinout for easy integration into circuits. Below is the pin configuration:
| Pin | Name | Description |
|---|---|---|
| 1 | VCC | Power supply input (3.3V to 5V DC) |
| 2 | GND | Ground connection |
| 3 | OUT | Analog output signal representing the ECG waveform |
| 4 | RA | Right Arm electrode input |
| 5 | LA | Left Arm electrode input |
| 6 | RL | Right Leg (or ground/reference) electrode input |
Usage Instructions
The SEN12650 ECG module is straightforward to use in a circuit. Follow the steps below to integrate and operate the module effectively:
How to Use the Component in a Circuit
- Power the Module: Connect the
VCCpin to a 3.3V or 5V DC power source and theGNDpin to the ground. - Connect Electrodes: Attach the RA, LA, and RL pins to the corresponding electrodes. Place the electrodes on the body as follows:
- RA (Right Arm): Near the right shoulder or wrist
- LA (Left Arm): Near the left shoulder or wrist
- RL (Right Leg): Near the right ankle or as a reference ground
- Read the Output: Connect the
OUTpin to an analog input of a microcontroller (e.g., Arduino UNO) or an oscilloscope to visualize the ECG waveform. - Filter and Amplify: Use additional filtering and amplification circuits if needed to enhance the signal quality.
Important Considerations and Best Practices
- Ensure proper placement of electrodes for accurate readings.
- Avoid movement or muscle contractions during measurements to minimize noise.
- Use shielded cables for electrode connections to reduce electromagnetic interference.
- Do not use the module for critical medical diagnostics without proper certification and validation.
- Always handle the module and electrodes with clean, dry hands to prevent damage or inaccurate readings.
Example: Connecting to an Arduino UNO
Below is an example of how to connect the SEN12650 ECG module to an Arduino UNO and read the ECG signal:
Circuit Connections
- Connect
VCCto the 5V pin on the Arduino. - Connect
GNDto the GND pin on the Arduino. - Connect
OUTto the A0 analog input pin on the Arduino. - Attach the RA, LA, and RL electrodes to the body as described above.
Arduino Code
// Simple ECG signal reading example for SEN12650 module
const int ecgPin = A0; // Analog pin connected to the OUT pin of the ECG module

void setup() {
  Serial.begin(9600); // Initialize serial communication at 9600 baud
  pinMode(ecgPin, INPUT); // Set the ECG pin as input
}

void loop() {
  int ecgValue = analogRead(ecgPin); // Read the analog value from the ECG module
  Serial.println(ecgValue); // Print the ECG value to the Serial Monitor
  delay(10); // Small delay to control the sampling rate
}
Notes:
- Open the Arduino Serial Monitor to view the ECG signal values in real-time.
- For better visualization, use a plotting tool or software to graph the output.
Troubleshooting and FAQs
Common Issues and Solutions
No Output Signal
- Cause: Improper power connection or loose electrodes.
- Solution: Verify the power supply and ensure the electrodes are securely attached.
Noisy or Distorted Signal
- Cause: Electromagnetic interference or poor electrode placement.
- Solution: Use shielded cables, minimize movement, and ensure proper electrode placement.
Flatline Output
- Cause: Faulty module or disconnected electrodes.
- Solution: Check all connections and replace the module if necessary.
Inconsistent Readings
- Cause: Dry or improperly attached electrodes.
- Solution: Use conductive gel or replace the electrodes.
FAQs
Q1: Can I use this module for real-time heart monitoring?
A1: Yes, but it is recommended for educational or research purposes. For medical-grade monitoring, use certified devices.
Q2: How do I improve the signal quality?
A2: Use proper filtering circuits, ensure good electrode contact, and minimize movement during measurements.
Q3: Can I connect this module to a Raspberry Pi?
A3: Yes, you can use an ADC (Analog-to-Digital Converter) to interface the analog output with the Raspberry Pi.
Q4: Is this module safe to use on humans?
A4: Yes, it is safe for non-invasive use. However, avoid using it on individuals with implanted medical devices like pacemakers.
By following this documentation, you can effectively integrate and use the SEN12650 ECG module in your projects.