Cirkit Designer Logo
Cirkit Designer
Your all-in-one circuit design IDE
Home / 
Component Documentation

How to Use SAMD21 WeMos D1 SAMD21 M0 ARM Cortex M0 32-Bit Extension UNO R3: Examples, Pinouts, and Specs

Image of SAMD21 WeMos D1 SAMD21 M0 ARM Cortex M0 32-Bit Extension  UNO R3
Cirkit Designer LogoDesign with SAMD21 WeMos D1 SAMD21 M0 ARM Cortex M0 32-Bit Extension UNO R3 in Cirkit Designer

Introduction

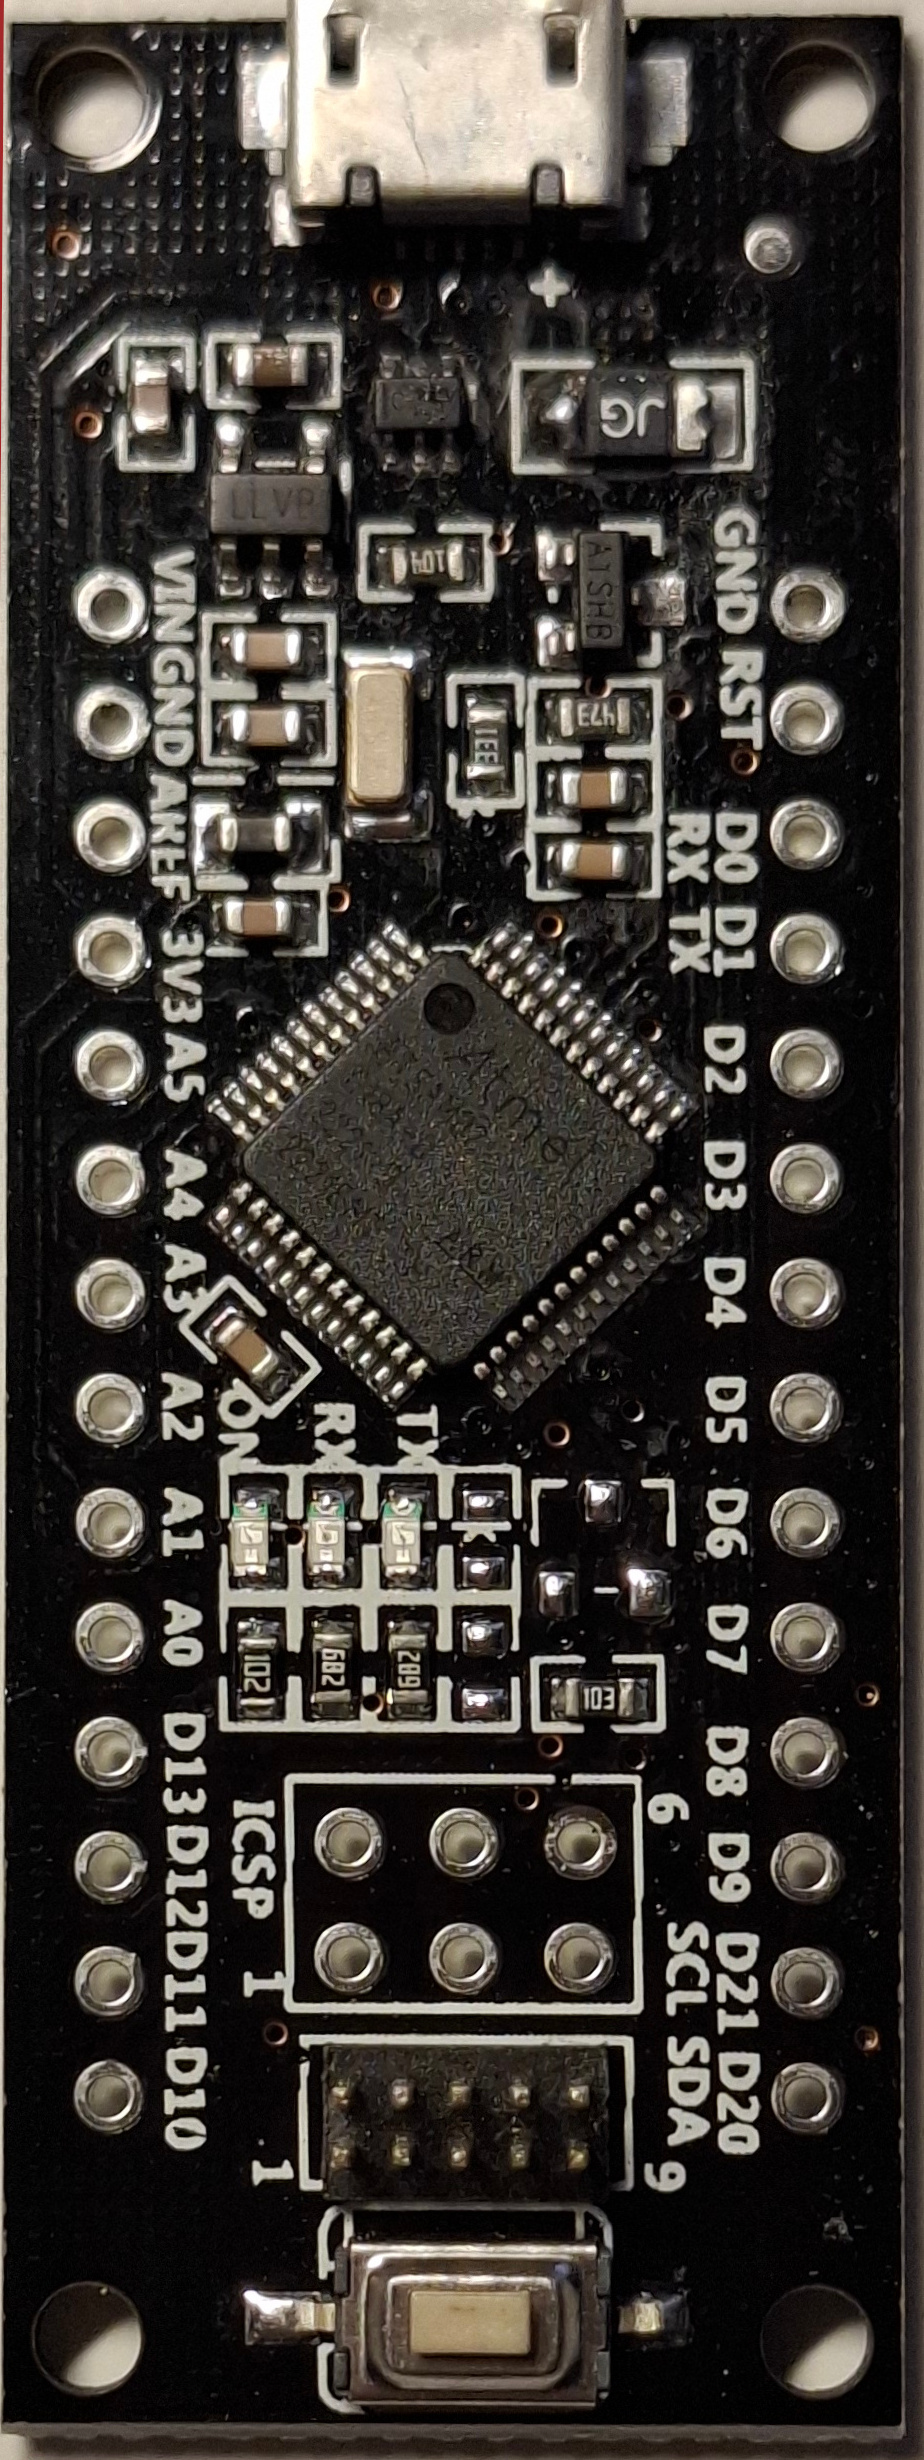
The SAMD21 WeMos D1 SAMD21 M0 is a microcontroller development board based on the Atmel/Microchip SAMD21 ARM Cortex-M0+ 32-bit processor. It is designed to be compatible with the Arduino UNO R3 form factor, making it an excellent choice for users who want to leverage the power of a 32-bit ARM processor while maintaining compatibility with Arduino shields and libraries.

This board is ideal for applications requiring low power consumption, high performance, and compatibility with Arduino IDE. It is commonly used in IoT projects, robotics, data logging, and other embedded systems.

Explore Projects Built with SAMD21 WeMos D1 SAMD21 M0 ARM Cortex M0 32-Bit Extension UNO R3

Use Cirkit Designer to design, explore, and prototype these projects online. Some projects support real-time simulation. Click "Open Project" to start designing instantly!
I2C-Controlled OLED Display with External EEPROM and Interactive Pushbuttons
Image of godmode: A project utilizing SAMD21 WeMos D1 SAMD21 M0 ARM Cortex M0 32-Bit Extension  UNO R3 in a practical application
This is a microcontroller-based interactive device featuring a Wemos D1 Mini, an OLED display, external EEPROM, and an I/O expander. It includes user input buttons and status LEDs, with potential MIDI interface capabilities.
Cirkit Designer LogoOpen Project in Cirkit Designer
Arduino UNO R4 WiFi Environmental Data Logger with I2C Multiplexing and SD Storage
Image of scannerII: A project utilizing SAMD21 WeMos D1 SAMD21 M0 ARM Cortex M0 32-Bit Extension  UNO R3 in a practical application
This circuit features an Arduino UNO R4 WiFi as the central microcontroller, interfaced with a BME280 Breakout sensor for environmental data, an SD card module for data logging, and a TCA9548A I2C multiplexer to manage multiple I2C devices. It also includes a U078-V-M12 sensor and an SPS30 particulate matter sensor, both connected through the I2C multiplexer. Power distribution is managed by a dedicated board that receives 3.3V from the Arduino and distributes it to the SD card module and other components.
Cirkit Designer LogoOpen Project in Cirkit Designer
Arduino UNO and ESP32 CAM Controlled Fire Detection and Alert System with GSM Notification
Image of ASO BOT: A project utilizing SAMD21 WeMos D1 SAMD21 M0 ARM Cortex M0 32-Bit Extension  UNO R3 in a practical application
This circuit features an Arduino UNO as the central microcontroller, interfaced with a variety of sensors, actuators, and modules. It includes a 5-channel fire sensor, temperature and humidity sensor (DHT11), two buzzers, and two servomotors controlled by an L293D driver shield. The circuit also integrates an ESP32 CAM for wireless capabilities, a 2-channel relay module controlling a mini water pump, an LCD display for user interface, a SIM 800L GSM module for cellular connectivity, and is powered by a 9V battery.
Cirkit Designer LogoOpen Project in Cirkit Designer
Arduino and ESP32-Based Smart Sensor Hub with LCD Display
Image of Miner HAT: A project utilizing SAMD21 WeMos D1 SAMD21 M0 ARM Cortex M0 32-Bit Extension  UNO R3 in a practical application
This circuit integrates an Arduino UNO and an ESP32 to interface with various sensors including an HC-SR04 ultrasonic sensor, a DHT11 temperature and humidity sensor, an MQ-2 gas sensor, and a GPS NEO 6M module. The Arduino UNO handles sensor data acquisition and displays information on a 16x2 I2C LCD, while the ESP32 manages GPS data and communicates with the Arduino.
Cirkit Designer LogoOpen Project in Cirkit Designer

Explore Projects Built with SAMD21 WeMos D1 SAMD21 M0 ARM Cortex M0 32-Bit Extension UNO R3

Use Cirkit Designer to design, explore, and prototype these projects online. Some projects support real-time simulation. Click "Open Project" to start designing instantly!
Image of godmode: A project utilizing SAMD21 WeMos D1 SAMD21 M0 ARM Cortex M0 32-Bit Extension  UNO R3 in a practical application
I2C-Controlled OLED Display with External EEPROM and Interactive Pushbuttons
This is a microcontroller-based interactive device featuring a Wemos D1 Mini, an OLED display, external EEPROM, and an I/O expander. It includes user input buttons and status LEDs, with potential MIDI interface capabilities.
Cirkit Designer LogoOpen Project in Cirkit Designer
Image of scannerII: A project utilizing SAMD21 WeMos D1 SAMD21 M0 ARM Cortex M0 32-Bit Extension  UNO R3 in a practical application
Arduino UNO R4 WiFi Environmental Data Logger with I2C Multiplexing and SD Storage
This circuit features an Arduino UNO R4 WiFi as the central microcontroller, interfaced with a BME280 Breakout sensor for environmental data, an SD card module for data logging, and a TCA9548A I2C multiplexer to manage multiple I2C devices. It also includes a U078-V-M12 sensor and an SPS30 particulate matter sensor, both connected through the I2C multiplexer. Power distribution is managed by a dedicated board that receives 3.3V from the Arduino and distributes it to the SD card module and other components.
Cirkit Designer LogoOpen Project in Cirkit Designer
Image of ASO BOT: A project utilizing SAMD21 WeMos D1 SAMD21 M0 ARM Cortex M0 32-Bit Extension  UNO R3 in a practical application
Arduino UNO and ESP32 CAM Controlled Fire Detection and Alert System with GSM Notification
This circuit features an Arduino UNO as the central microcontroller, interfaced with a variety of sensors, actuators, and modules. It includes a 5-channel fire sensor, temperature and humidity sensor (DHT11), two buzzers, and two servomotors controlled by an L293D driver shield. The circuit also integrates an ESP32 CAM for wireless capabilities, a 2-channel relay module controlling a mini water pump, an LCD display for user interface, a SIM 800L GSM module for cellular connectivity, and is powered by a 9V battery.
Cirkit Designer LogoOpen Project in Cirkit Designer
Image of Miner HAT: A project utilizing SAMD21 WeMos D1 SAMD21 M0 ARM Cortex M0 32-Bit Extension  UNO R3 in a practical application
Arduino and ESP32-Based Smart Sensor Hub with LCD Display
This circuit integrates an Arduino UNO and an ESP32 to interface with various sensors including an HC-SR04 ultrasonic sensor, a DHT11 temperature and humidity sensor, an MQ-2 gas sensor, and a GPS NEO 6M module. The Arduino UNO handles sensor data acquisition and displays information on a 16x2 I2C LCD, while the ESP32 manages GPS data and communicates with the Arduino.
Cirkit Designer LogoOpen Project in Cirkit Designer

Technical Specifications

  • Microcontroller: Atmel/Microchip SAMD21G18 ARM Cortex-M0+
  • Operating Voltage: 3.3V
  • Input Voltage (recommended): 7-12V
  • Input Voltage (limits): 6-20V
  • Digital I/O Pins: 14 (of which 12 support PWM output)
  • Analog Input Pins: 6
  • Flash Memory: 256 KB
  • SRAM: 32 KB
  • Clock Speed: 48 MHz
  • USB Interface: Native USB 2.0
  • Communication Protocols: UART, I2C, SPI
  • Dimensions: Compatible with Arduino UNO R3 form factor

Pin Configuration and Descriptions

The SAMD21 WeMos D1 SAMD21 M0 has a pinout similar to the Arduino UNO R3. Below is a table describing the pin configuration:

Pin Function Description
D0 RX UART Receive Pin
D1 TX UART Transmit Pin
D2-D13 Digital I/O General-purpose digital input/output pins
D3, D5, D6, D9, D10, D11 PWM Digital pins with PWM capability
A0-A5 Analog Input Analog input pins (10-bit resolution)
VIN Voltage Input External power input (7-12V recommended)
3.3V 3.3V Output Regulated 3.3V output
5V 5V Output Regulated 5V output
GND Ground Ground pins
RESET Reset Resets the microcontroller
ICSP SPI Interface SPI communication pins (MISO, MOSI, SCK)
USB USB Interface Native USB for programming and communication

Usage Instructions

How to Use the SAMD21 WeMos D1 SAMD21 M0 in a Circuit

  1. Powering the Board:

    • Connect the board to your computer via a micro-USB cable for programming and power.
    • Alternatively, supply power through the VIN pin (7-12V recommended).
  2. Programming:

    • Install the Arduino IDE if not already installed.
    • Add the SAMD21 board support package:
      • Open the Arduino IDE.
      • Go to File > Preferences.
      • Add the following URL to the "Additional Board Manager URLs" field:
        https://www.arduino.cc/en/Guide/Cores
      • Go to Tools > Board > Boards Manager, search for "SAMD" and install the package.
    • Select the board: Tools > Board > Arduino SAMD (32-bits ARM Cortex-M0+) Boards > Arduino Zero (Native USB Port).
    • Select the correct port under Tools > Port.
  3. Connecting Components:

    • Use the digital and analog pins to connect sensors, actuators, and other peripherals.
    • Ensure that all components operate at 3.3V logic levels to avoid damaging the board.
  4. Uploading Code:

    • Write your code in the Arduino IDE.
    • Click the upload button to program the board.

Example Code: Blinking an LED

The following example demonstrates how to blink an LED connected to pin D13:

// Define the LED pin
const int ledPin = 13;

void setup() {
  // Set the LED pin as an output
  pinMode(ledPin, OUTPUT);
}

void loop() {
  // Turn the LED on
  digitalWrite(ledPin, HIGH);
  delay(1000); // Wait for 1 second

  // Turn the LED off
  digitalWrite(ledPin, LOW);
  delay(1000); // Wait for 1 second
}

Important Considerations and Best Practices

  • Voltage Levels: The SAMD21 operates at 3.3V logic levels. Avoid connecting 5V components directly to the pins.
  • Power Supply: Use a stable power source to avoid unexpected resets or malfunctions.
  • USB Communication: The native USB port can be used for both programming and serial communication. Ensure the correct port is selected in the Arduino IDE.

Troubleshooting and FAQs

Common Issues

  1. The board is not detected by the Arduino IDE:

    • Ensure the correct board and port are selected in the IDE.
    • Verify that the SAMD21 board support package is installed.
  2. Code upload fails:

    • Check the USB connection and cable.
    • Double-tap the reset button to enter bootloader mode and try uploading again.
  3. Connected components are not working:

    • Verify wiring and ensure components are compatible with 3.3V logic levels.
    • Check for loose connections or damaged components.

FAQs

Q: Can I use 5V sensors with this board?
A: The SAMD21 operates at 3.3V logic levels. Use a level shifter or voltage divider to interface with 5V sensors.

Q: How do I reset the board?
A: Press the reset button on the board. For bootloader mode, double-tap the reset button.

Q: Is the board compatible with Arduino shields?
A: Yes, the board is designed to be compatible with Arduino UNO R3 shields, but ensure the shield operates at 3.3V.

Q: Can I use the board for low-power applications?
A: Yes, the SAMD21 is optimized for low-power operation, making it suitable for battery-powered projects.