Cirkit Designer Logo
Cirkit Designer
Your all-in-one circuit design IDE
Home / 
Component Documentation

How to Use Adafruit AT42QT1012 Standalone Toggle Capacitive Touch Sensor Breakout: Examples, Pinouts, and Specs

Image of Adafruit AT42QT1012 Standalone Toggle Capacitive Touch Sensor Breakout
Cirkit Designer LogoDesign with Adafruit AT42QT1012 Standalone Toggle Capacitive Touch Sensor Breakout in Cirkit Designer

Introduction

The Adafruit AT42QT1012 Standalone Toggle Capacitive Touch Sensor Breakout is a compact, single-key touch sensor module using Atmel's patented QTouch technology. This sensor is designed to detect touch inputs on a conductive surface, toggling its output each time it is activated. It's an ideal choice for adding touch-based interaction to various electronics projects, including home automation systems, user interfaces, and custom keyboards.

Explore Projects Built with Adafruit AT42QT1012 Standalone Toggle Capacitive Touch Sensor Breakout

Use Cirkit Designer to design, explore, and prototype these projects online. Some projects support real-time simulation. Click "Open Project" to start designing instantly!
Capacitive Touch and Ultrasonic Sensor Interface with Adafruit Feather nRF52840 Sense
Image of Senior Design Project: A project utilizing Adafruit AT42QT1012 Standalone Toggle Capacitive Touch Sensor Breakout in a practical application
This circuit features an Adafruit Feather nRF52840 Sense microcontroller connected to an ultrasonic sensor for distance measurement and an Adafruit AT42QT1010 capacitive touch sensor for touch input. The ultrasonic sensor's Trigger and Echo pins are interfaced with the microcontroller's digital pins D6 and D9, respectively, to send and receive ultrasonic signals. Additionally, a pressure-sensitive conductive sheet (Velostat) is connected in series with a 10k Ohm resistor to the microcontroller's analog pin A0, likely forming a pressure sensor.
Cirkit Designer LogoOpen Project in Cirkit Designer
Battery-Powered Smart Sensor Hub with Adafruit QT Py RP2040
Image of wearable final: A project utilizing Adafruit AT42QT1012 Standalone Toggle Capacitive Touch Sensor Breakout in a practical application
This circuit features an Adafruit QT Py RP2040 microcontroller interfaced with an APDS9960 proximity sensor, an MPU6050 accelerometer and gyroscope, and an OLED display via I2C communication. It also includes a buzzer controlled by the microcontroller and is powered by a 3.7V LiPo battery with a toggle switch for power control.
Cirkit Designer LogoOpen Project in Cirkit Designer
Arduino 101 Based Touch-Controlled LED Matrix with DHT22 Sensor Integration
Image of PROJECT TOUCH SENSOR: A project utilizing Adafruit AT42QT1012 Standalone Toggle Capacitive Touch Sensor Breakout in a practical application
This circuit features an Arduino 101 microcontroller connected to a touch sensor, an 8x8 LED matrix, and a DHT22 temperature and humidity sensor. The Arduino provides power to all components and interfaces with the touch sensor via a digital I/O pin and the DHT22 sensor via another digital I/O pin. It controls the 8x8 LED matrix using SPI communication, with dedicated pins for data, clock, and chip select.
Cirkit Designer LogoOpen Project in Cirkit Designer
Touch-Sensitive Interface with Adafruit MPR121 and Feather 32u4 Bluefruit
Image of MPR121: A project utilizing Adafruit AT42QT1012 Standalone Toggle Capacitive Touch Sensor Breakout in a practical application
This circuit integrates an Adafruit MPR121 capacitive touch sensor with an Adafruit Feather 32u4 Bluefruit microcontroller. The MPR121 is powered by the Feather and communicates via I2C (SCL and SDA) to detect touch inputs, which can be processed or transmitted wirelessly by the Feather.
Cirkit Designer LogoOpen Project in Cirkit Designer

Explore Projects Built with Adafruit AT42QT1012 Standalone Toggle Capacitive Touch Sensor Breakout

Use Cirkit Designer to design, explore, and prototype these projects online. Some projects support real-time simulation. Click "Open Project" to start designing instantly!
Image of Senior Design Project: A project utilizing Adafruit AT42QT1012 Standalone Toggle Capacitive Touch Sensor Breakout in a practical application
Capacitive Touch and Ultrasonic Sensor Interface with Adafruit Feather nRF52840 Sense
This circuit features an Adafruit Feather nRF52840 Sense microcontroller connected to an ultrasonic sensor for distance measurement and an Adafruit AT42QT1010 capacitive touch sensor for touch input. The ultrasonic sensor's Trigger and Echo pins are interfaced with the microcontroller's digital pins D6 and D9, respectively, to send and receive ultrasonic signals. Additionally, a pressure-sensitive conductive sheet (Velostat) is connected in series with a 10k Ohm resistor to the microcontroller's analog pin A0, likely forming a pressure sensor.
Cirkit Designer LogoOpen Project in Cirkit Designer
Image of wearable final: A project utilizing Adafruit AT42QT1012 Standalone Toggle Capacitive Touch Sensor Breakout in a practical application
Battery-Powered Smart Sensor Hub with Adafruit QT Py RP2040
This circuit features an Adafruit QT Py RP2040 microcontroller interfaced with an APDS9960 proximity sensor, an MPU6050 accelerometer and gyroscope, and an OLED display via I2C communication. It also includes a buzzer controlled by the microcontroller and is powered by a 3.7V LiPo battery with a toggle switch for power control.
Cirkit Designer LogoOpen Project in Cirkit Designer
Image of PROJECT TOUCH SENSOR: A project utilizing Adafruit AT42QT1012 Standalone Toggle Capacitive Touch Sensor Breakout in a practical application
Arduino 101 Based Touch-Controlled LED Matrix with DHT22 Sensor Integration
This circuit features an Arduino 101 microcontroller connected to a touch sensor, an 8x8 LED matrix, and a DHT22 temperature and humidity sensor. The Arduino provides power to all components and interfaces with the touch sensor via a digital I/O pin and the DHT22 sensor via another digital I/O pin. It controls the 8x8 LED matrix using SPI communication, with dedicated pins for data, clock, and chip select.
Cirkit Designer LogoOpen Project in Cirkit Designer
Image of MPR121: A project utilizing Adafruit AT42QT1012 Standalone Toggle Capacitive Touch Sensor Breakout in a practical application
Touch-Sensitive Interface with Adafruit MPR121 and Feather 32u4 Bluefruit
This circuit integrates an Adafruit MPR121 capacitive touch sensor with an Adafruit Feather 32u4 Bluefruit microcontroller. The MPR121 is powered by the Feather and communicates via I2C (SCL and SDA) to detect touch inputs, which can be processed or transmitted wirelessly by the Feather.
Cirkit Designer LogoOpen Project in Cirkit Designer

Common Applications and Use Cases

  • Interactive displays
  • Touch-based controls for appliances
  • DIY projects requiring user input
  • Prototyping user interfaces
  • Wearable electronics

Technical Specifications

Key Technical Details

  • Operating Voltage: 1.8V - 5.5V
  • Current Consumption: <1mA (active mode), <15µA (low power mode)
  • Interface: Digital output (active-low or active-high configurable)
  • Response Time: <60ms
  • Sensitivity: Adjustable via external capacitor (Cs)

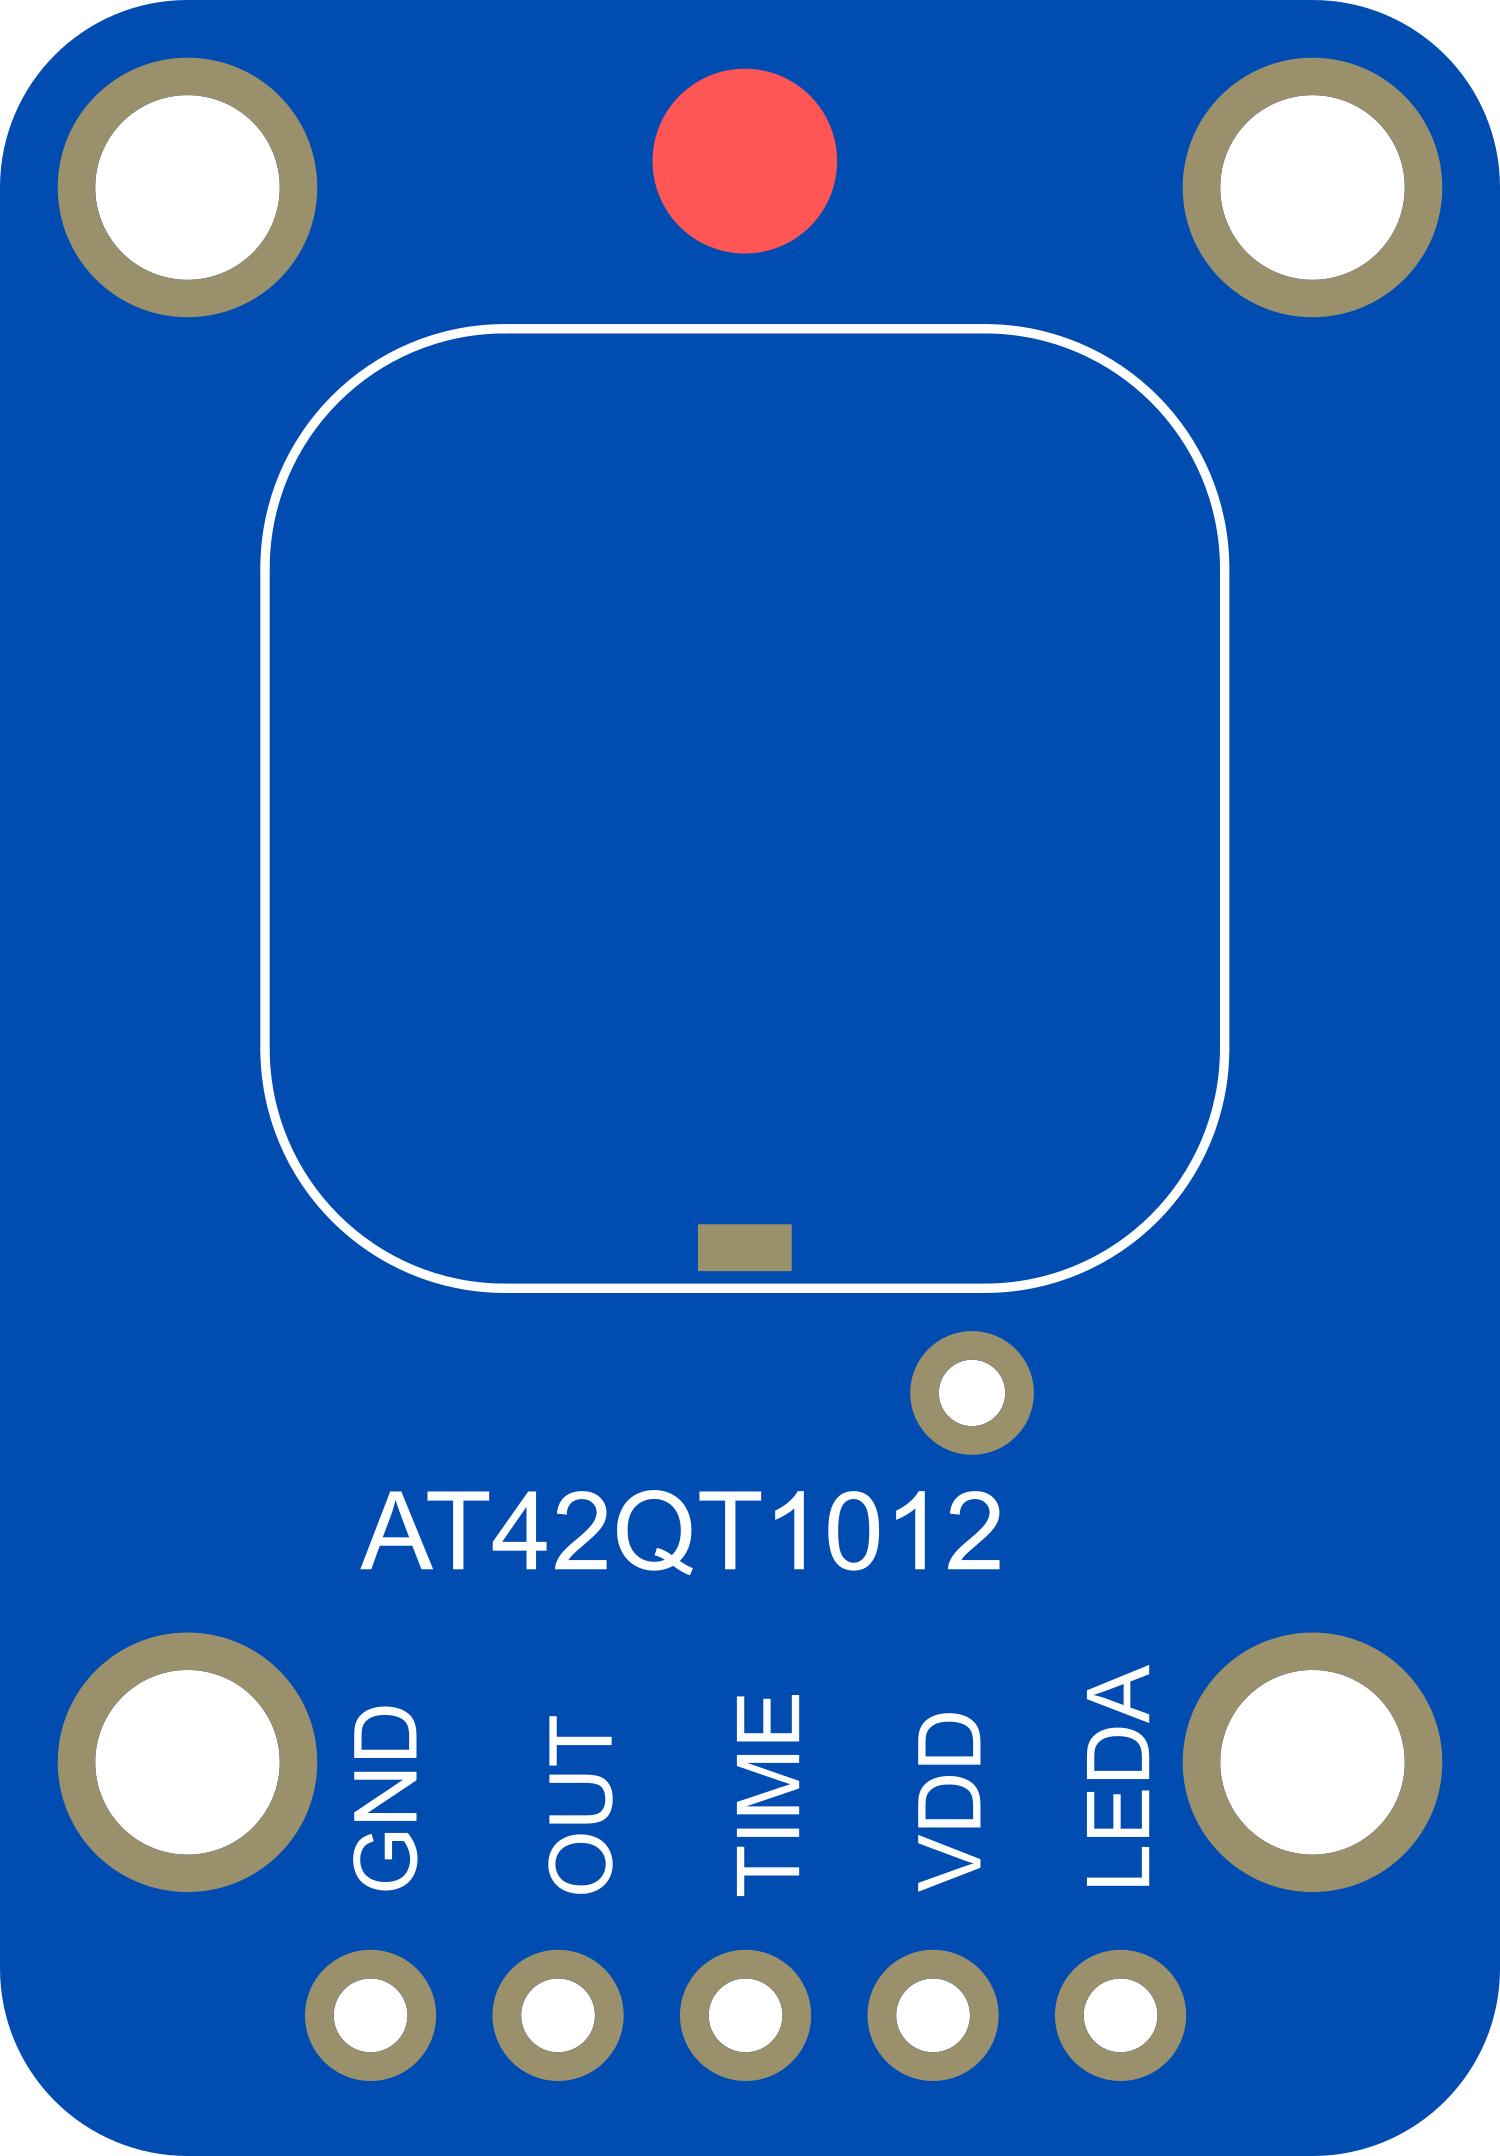
Pin Configuration and Descriptions

Pin Number Name Description
1 OUT Digital output pin; toggles state with each touch event
2 VDD Power supply input; 1.8V to 5.5V
3 GND Ground connection
4 SNSK Connection to one side of the external capacitive load
5 SNS Connection to the sensor pad and the other side of the external capacitive load

Usage Instructions

How to Use the Component in a Circuit

  1. Connect the VDD pin to your power supply (1.8V to 5.5V).
  2. Connect the GND pin to the ground of your power supply.
  3. Attach a conductive pad to the SNS pin. This pad will act as the touch surface.
  4. Connect a capacitor (typically 10nF) between the SNSK and SNS pins to set the sensitivity.
  5. The OUT pin will toggle between high and low with each touch event. Connect this pin to a digital input on your microcontroller to detect touch events.

Important Considerations and Best Practices

  • Ensure that the power supply is within the specified range to prevent damage.
  • The size of the conductive pad can affect sensitivity; larger pads can detect touch from a greater distance.
  • Avoid placing the sensor near metallic objects that may interfere with its operation.
  • Use a pull-up or pull-down resistor on the OUT pin if your microcontroller does not have an internal pull-up/pull-down.

Example Code for Arduino UNO

// Define the touch sensor output pin
const int touchPin = 2; // Connect the OUT pin of the sensor to digital pin 2

void setup() {
  pinMode(touchPin, INPUT); // Initialize the touchPin as an input
  Serial.begin(9600); // Start serial communication at 9600 baud
}

void loop() {
  // Read the state of the touch sensor
  int touchState = digitalRead(touchPin);
  
  // Check if the sensor is touched
  if (touchState == LOW) {
    // If the sensor is touched, print a message to the serial monitor
    Serial.println("Sensor touched!");
  } else {
    // If the sensor is not touched, print a different message
    Serial.println("Sensor not touched.");
  }
  
  // Wait for a short period before reading again
  delay(100);
}

Troubleshooting and FAQs

Common Issues

  • Sensor not responding to touch: Ensure the conductive pad is properly connected to the SNS pin and that the sensitivity capacitor is correctly installed.
  • False triggering: This can occur if the sensor is placed in a noisy environment. Try using a smaller conductive pad or adjusting the sensitivity capacitor.
  • Output not toggling: Check the power supply connections and ensure that the voltage is within the specified range.

Solutions and Tips for Troubleshooting

  • If the sensor is too sensitive or not sensitive enough, adjust the value of the external capacitor connected between SNSK and SNS.
  • Ensure that the OUT pin is not floating by using a pull-up or pull-down resistor.
  • Keep the sensor and conductive pad away from metal surfaces and other conductive materials that may cause interference.

FAQs

Q: Can I use the AT42QT1012 with a battery? A: Yes, as long as the battery voltage is within the 1.8V to 5.5V range.

Q: How can I adjust the sensitivity of the sensor? A: Sensitivity can be adjusted by changing the value of the capacitor connected between the SNSK and SNS pins. A larger capacitor increases sensitivity, while a smaller capacitor decreases it.

Q: Is it possible to use the AT42QT1012 with a microcontroller other than Arduino? A: Absolutely. The AT42QT1012 can be used with any microcontroller that has a digital input pin. Adjust the code accordingly for the specific microcontroller's syntax and pin configuration.