How to Use Linear Stage Motion Actuator: Examples, Pinouts, and Specs
Introduction
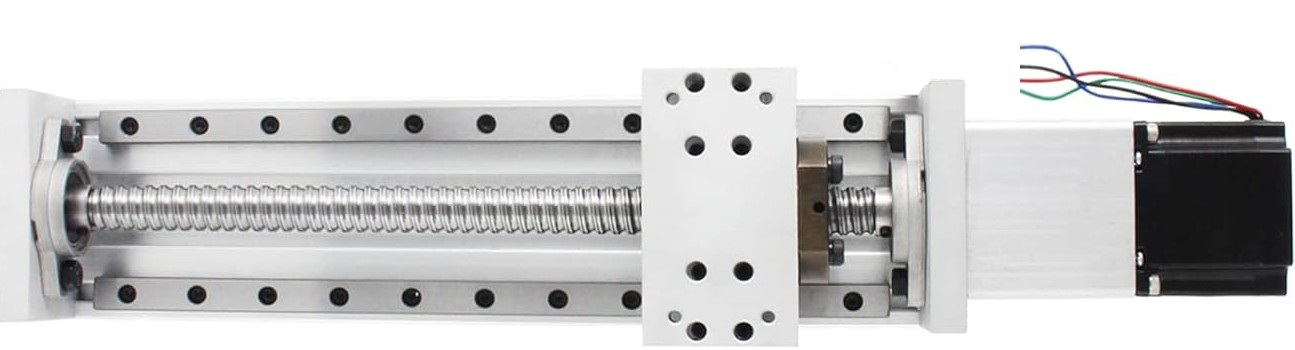
The RATTMMOTOR ZBX80 Linear Stage Motion Actuator is a precision device designed to provide accurate linear motion for a variety of applications. It is commonly used in automation, robotics, CNC machines, and laboratory equipment where precise positioning and movement of loads along a straight path are required. The ZBX80 is engineered for high accuracy, repeatability, and durability, making it an essential component in systems requiring controlled linear motion.
Explore Projects Built with Linear Stage Motion Actuator

Explore Projects Built with Linear Stage Motion Actuator
Common Applications
- Automation Systems: Used in assembly lines and pick-and-place machines.
- Robotics: Enables precise movement of robotic arms or end effectors.
- CNC Machines: Provides accurate positioning for cutting, engraving, or milling.
- Laboratory Equipment: Used in microscopes, testing rigs, and other precision instruments.
- 3D Printing: Ensures accurate layer deposition and movement of print heads.
Technical Specifications
The following table outlines the key technical details of the RATTMMOTOR ZBX80 Linear Stage Motion Actuator:
| Parameter | Specification |
|---|---|
| Manufacturer | RATTMMOTOR |
| Part ID | ZBX80 |
| Travel Range | 80 mm |
| Load Capacity | Up to 10 kg |
| Positioning Accuracy | ±0.02 mm |
| Repeatability | ±0.01 mm |
| Drive Mechanism | Ball screw |
| Motor Type | Stepper motor (NEMA 17 compatible) |
| Input Voltage | 12V to 24V DC |
| Maximum Speed | 50 mm/s |
| Material | Aluminum alloy |
| Dimensions | 200 mm x 80 mm x 50 mm |
| Weight | 1.5 kg |
Pin Configuration and Descriptions
The ZBX80 is typically paired with a stepper motor driver. Below is the pin configuration for the stepper motor:
| Pin | Name | Description |
|---|---|---|
| 1 | A+ | Positive terminal for coil A of the stepper motor. |
| 2 | A- | Negative terminal for coil A of the stepper motor. |
| 3 | B+ | Positive terminal for coil B of the stepper motor. |
| 4 | B- | Negative terminal for coil B of the stepper motor. |
Usage Instructions
How to Use the ZBX80 in a Circuit
- Power Supply: Connect a 12V to 24V DC power supply to the stepper motor driver. Ensure the power supply matches the voltage requirements of the ZBX80.
- Stepper Motor Driver: Connect the stepper motor wires (A+, A-, B+, B-) to the corresponding terminals on the driver.
- Controller: Use a microcontroller (e.g., Arduino UNO) to send step and direction signals to the stepper motor driver.
- Mounting: Secure the ZBX80 actuator to a stable surface using the mounting holes provided. Attach the load to the moving platform.
- Programming: Write a program to control the stepper motor, specifying the number of steps, speed, and direction.
Important Considerations
- Alignment: Ensure the actuator is properly aligned to prevent binding or excessive wear.
- Load Limits: Do not exceed the specified load capacity of 10 kg.
- Lubrication: Periodically lubricate the ball screw for smooth operation.
- Step Resolution: Configure the stepper motor driver for the desired microstepping resolution to achieve finer control.
Example Code for Arduino UNO
Below is an example Arduino sketch to control the ZBX80 using a stepper motor driver:
// Include the Arduino Stepper library
#include <Stepper.h>

// Define the number of steps per revolution for the stepper motor
#define STEPS_PER_REV 200

// Initialize the stepper motor object
// Pins 8 and 9 control direction and step signals
Stepper stepperMotor(STEPS_PER_REV, 8, 9);

void setup() {
  // Set the speed of the stepper motor (in RPM)
  stepperMotor.setSpeed(60); // 60 RPM

  // Initialize serial communication for debugging
  Serial.begin(9600);
  Serial.println("ZBX80 Linear Stage Motion Actuator Initialized");
}

void loop() {
  // Move the actuator forward by 100 steps
  Serial.println("Moving forward...");
  stepperMotor.step(100);
  delay(1000); // Wait for 1 second

  // Move the actuator backward by 100 steps
  Serial.println("Moving backward...");
  stepperMotor.step(-100);
  delay(1000); // Wait for 1 second
}
Notes:
- Adjust the
STEPS_PER_REVvalue based on the stepper motor's specifications. - Ensure the stepper motor driver is properly configured for current limits and microstepping.
Troubleshooting and FAQs
Common Issues and Solutions
Actuator Not Moving:
- Cause: Incorrect wiring or loose connections.
- Solution: Double-check all connections between the stepper motor, driver, and power supply.
Inconsistent Movement:
- Cause: Misalignment or excessive load.
- Solution: Ensure the actuator is properly aligned and the load does not exceed 10 kg.
Stepper Motor Overheating:
- Cause: Current limit on the driver is set too high.
- Solution: Adjust the current limit on the stepper motor driver to match the motor's rating.
Noisy Operation:
- Cause: Lack of lubrication or incorrect microstepping settings.
- Solution: Lubricate the ball screw and adjust the microstepping settings on the driver.
FAQs
Q: Can the ZBX80 be used in vertical applications?
- A: Yes, but ensure the load is within the specified capacity and consider using a brake mechanism to prevent back-driving.
Q: What type of stepper motor is compatible with the ZBX80?
- A: The ZBX80 is compatible with NEMA 17 stepper motors.
Q: How often should the actuator be maintained?
- A: Perform maintenance, such as lubrication, every 6 months or after 500 hours of operation.
Q: Can I use the ZBX80 with a servo motor?
- A: Yes, with appropriate modifications and a compatible servo motor driver.
This documentation provides a comprehensive guide to using the RATTMMOTOR ZBX80 Linear Stage Motion Actuator effectively. For further assistance, refer to the manufacturer's user manual or contact technical support.