How to Use 2.4-inch TFT Display with EC11 Rotary Encoder ST7789: Examples, Pinouts, and Specs
Introduction
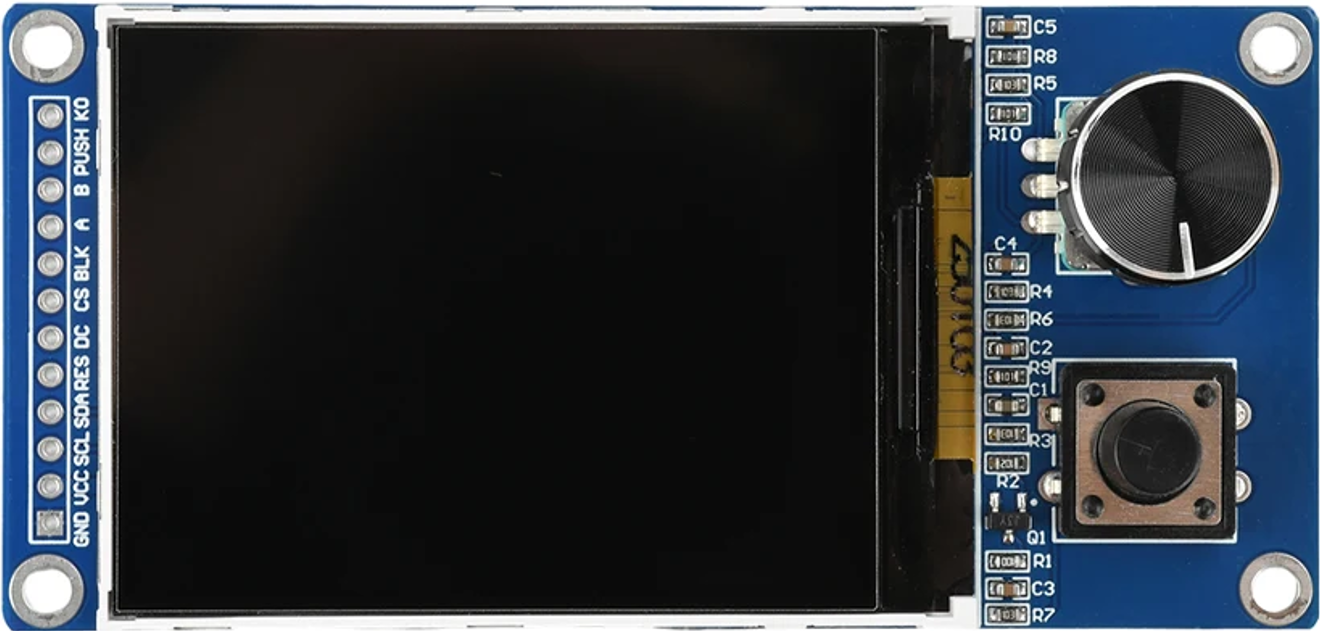
The 2.4-inch TFT Display with EC11 Rotary Encoder, manufactured by EGBO, is a versatile and compact display module designed for a wide range of applications. It features a vibrant 2.4-inch screen driven by the ST7789 controller, offering high-resolution graphics and a rich color palette. The integrated EC11 rotary encoder provides an intuitive interface for user input, making it ideal for projects requiring both display and control functionality.
Explore Projects Built with 2.4-inch TFT Display with EC11 Rotary Encoder ST7789


Explore Projects Built with 2.4-inch TFT Display with EC11 Rotary Encoder ST7789
Common Applications and Use Cases
- User interfaces for embedded systems
- IoT devices with graphical displays
- Control panels for industrial or home automation
- Educational projects and prototyping
- Audio equipment and media players
Technical Specifications
Display Specifications
| Parameter | Value |
|---|---|
| Display Type | TFT LCD |
| Screen Size | 2.4 inches |
| Resolution | 240 x 320 pixels |
| Controller IC | ST7789 |
| Color Depth | 65K (16-bit RGB) |
| Interface | SPI (Serial Peripheral Interface) |
| Operating Voltage | 3.3V |
| Backlight | LED, adjustable brightness |
Rotary Encoder Specifications
| Parameter | Value |
|---|---|
| Model | EC11 |
| Type | Incremental |
| Operating Voltage | 3.3V - 5V |
| Pulses per Revolution | 20 |
| Push Button | Integrated |
| Debouncing | Required (external capacitor recommended) |
Pin Configuration and Descriptions
TFT Display Pins
| Pin Name | Description |
|---|---|
| VCC | Power supply (3.3V) |
| GND | Ground |
| SCL | SPI Clock |
| SDA | SPI Data |
| RES | Reset (active low) |
| DC | Data/Command control |
| BLK | Backlight control (PWM or ON/OFF) |
Rotary Encoder Pins
| Pin Name | Description |
|---|---|
| VCC | Power supply (3.3V - 5V) |
| GND | Ground |
| CLK | Clock signal (rotary output A) |
| DT | Data signal (rotary output B) |
| SW | Push button switch |
Usage Instructions
Connecting the Component
- Power Supply: Connect the VCC and GND pins of both the TFT display and the rotary encoder to a 3.3V or 5V power source, depending on your system.
- SPI Interface: Connect the SCL, SDA, RES, and DC pins of the display to the corresponding SPI pins on your microcontroller.
- Backlight Control: Use the BLK pin to control the backlight. It can be connected to a PWM pin for brightness adjustment or directly to VCC for full brightness.
- Rotary Encoder: Connect the CLK and DT pins to digital input pins on your microcontroller. The SW pin can be connected to another digital input for button functionality.
Example Code for Arduino UNO
Below is an example code to interface the 2.4-inch TFT display and EC11 rotary encoder with an Arduino UNO. The code uses the Adafruit_GFX and Adafruit_ST7789 libraries for the display.
#include <Adafruit_GFX.h>
#include <Adafruit_ST7789.h>

// Define TFT display pins
#define TFT_CS    10  // Chip select pin
#define TFT_RST   9   // Reset pin
#define TFT_DC    8   // Data/Command pin

// Define rotary encoder pins
#define ENCODER_CLK 2  // Clock pin
#define ENCODER_DT  3  // Data pin
#define ENCODER_SW  4  // Switch pin

// Initialize the TFT display
Adafruit_ST7789 tft = Adafruit_ST7789(TFT_CS, TFT_DC, TFT_RST);

// Variables for rotary encoder
int lastEncoderState = LOW;
int currentEncoderState;
int counter = 0;

void setup() {
  // Initialize serial communication
  Serial.begin(9600);

  // Initialize TFT display
  tft.init(240, 320);  // Initialize with 240x320 resolution
  tft.setRotation(1);  // Set display orientation
  tft.fillScreen(ST77XX_BLACK);  // Clear screen

  // Display welcome message
  tft.setTextColor(ST77XX_WHITE);
  tft.setTextSize(2);
  tft.setCursor(10, 10);
  tft.println("Welcome!");

  // Initialize rotary encoder pins
  pinMode(ENCODER_CLK, INPUT);
  pinMode(ENCODER_DT, INPUT);
  pinMode(ENCODER_SW, INPUT_PULLUP);
}

void loop() {
  // Read rotary encoder state
  currentEncoderState = digitalRead(ENCODER_CLK);

  // Check for rotation
  if (currentEncoderState != lastEncoderState) {
    if (digitalRead(ENCODER_DT) != currentEncoderState) {
      counter++;
    } else {
      counter--;
    }

    // Update display with counter value
    tft.fillRect(10, 50, 200, 30, ST77XX_BLACK);  // Clear previous value
    tft.setCursor(10, 50);
    tft.print("Counter: ");
    tft.print(counter);
  }

  lastEncoderState = currentEncoderState;

  // Check for button press
  if (digitalRead(ENCODER_SW) == LOW) {
    tft.fillRect(10, 100, 200, 30, ST77XX_BLACK);  // Clear previous message
    tft.setCursor(10, 100);
    tft.println("Button Pressed!");
    delay(500);  // Debounce delay
  }
}
Important Considerations
- Voltage Levels: Ensure the display and encoder are powered with the correct voltage (3.3V or 5V).
- Debouncing: Use hardware or software debouncing for the rotary encoder to avoid erratic behavior.
- SPI Speed: Configure the SPI clock speed appropriately to avoid communication errors with the ST7789 controller.
- Library Compatibility: Use the latest versions of Adafruit_GFX and Adafruit_ST7789 libraries for optimal performance.
Troubleshooting and FAQs
Common Issues
Display Not Turning On:
- Verify the power connections and ensure the VCC and GND pins are correctly connected.
- Check the SPI connections and ensure the correct pins are used.
Rotary Encoder Not Responding:
- Ensure the CLK and DT pins are connected to digital input pins.
- Add a small capacitor (e.g., 0.1µF) between the CLK and GND pins to reduce noise.
Flickering or Unstable Display:
- Check the SPI clock speed and reduce it if necessary.
- Ensure proper grounding and minimize noise in the circuit.
FAQs
Q: Can I use this display with a 5V microcontroller?
A: Yes, but you may need a level shifter for the SPI signals to avoid damaging the display.
Q: How do I adjust the backlight brightness?
A: Connect the BLK pin to a PWM-capable pin on your microcontroller and use analogWrite() to control brightness.
Q: Is the rotary encoder compatible with interrupts?
A: Yes, the CLK and DT pins can be connected to interrupt-capable pins for more responsive input handling.