How to Use 10000mah power bank: Examples, Pinouts, and Specs
Introduction
The Anker 10000mAh Power Bank is a portable battery storage device designed to provide reliable and efficient charging for electronic devices such as smartphones, tablets, and other USB-powered gadgets. With a capacity of 10,000 milliamp hours (mAh), this power bank ensures extended usage for your devices, making it an essential accessory for travel, outdoor activities, and emergency power needs.
Explore Projects Built with 10000mah power bank


Explore Projects Built with 10000mah power bank
Common Applications and Use Cases
- Charging smartphones, tablets, and smartwatches on the go.
- Providing backup power during travel or outdoor adventures.
- Emergency power supply during power outages.
- Charging USB-powered devices such as Bluetooth headphones, fitness trackers, and portable speakers.
Technical Specifications
The following table outlines the key technical details of the Anker 10000mAh Power Bank:
| Specification | Details |
|---|---|
| Battery Capacity | 10,000mAh |
| Input Ports | Micro-USB (5V/2A) or USB-C (5V/2A) |
| Output Ports | 1x USB-A (5V/2.4A max) |
| Charging Time | Approximately 4-5 hours (using a 5V/2A charger) |
| Dimensions | 92 x 60 x 22 mm (approx.) |
| Weight | ~180g |
| Safety Features | Overcharge protection, short-circuit protection, temperature control |
| LED Indicators | 4 LEDs to indicate remaining battery level (25%, 50%, 75%, 100%) |
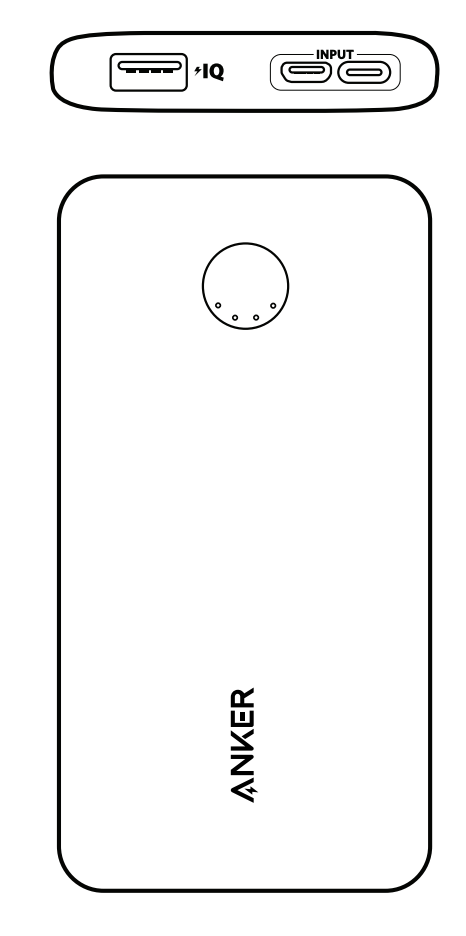
Pin Configuration and Descriptions
The Anker 10000mAh Power Bank does not have traditional pins but includes the following ports and indicators:
| Port/Indicator | Description |
|---|---|
| Micro-USB Input | Used to charge the power bank (5V/2A input). |
| USB-C Input | Alternative input for charging the power bank (5V/2A input). |
| USB-A Output | Provides power to charge external devices (5V/2.4A max output). |
| LED Indicators | Displays the remaining battery level in 25% increments. |
| Power Button | Activates the power bank and displays the battery level via LED indicators. |
Usage Instructions
How to Use the Power Bank in a Circuit
The Anker 10000mAh Power Bank is a standalone device and does not require integration into a circuit. However, it can be used to power electronic projects or charge devices via its USB-A output port. Follow these steps to use the power bank:
Charging the Power Bank:
- Connect a Micro-USB or USB-C cable to the input port of the power bank.
- Plug the other end of the cable into a wall adapter (5V/2A recommended) or a USB power source.
- The LED indicators will blink to show the charging progress. When all four LEDs are solid, the power bank is fully charged.
Charging Devices:
- Connect your device to the USB-A output port using a compatible charging cable.
- Press the power button to start charging. The LED indicators will show the remaining battery level.
- Disconnect the device once it is fully charged to conserve power.
Powering Arduino Projects:
- Use a USB-A to Micro-USB cable to connect the power bank to the Arduino UNO's power input.
- Ensure the Arduino's power requirements do not exceed the power bank's output (5V/2.4A max).
Important Considerations and Best Practices
- Use only high-quality charging cables to ensure efficient power transfer and avoid damage to the power bank or connected devices.
- Avoid exposing the power bank to extreme temperatures, moisture, or direct sunlight.
- Do not attempt to disassemble or modify the power bank, as this may void the warranty and pose safety risks.
- Charge the power bank at least once every three months if not in regular use to maintain battery health.
Example Code for Arduino UNO
If you are using the power bank to power an Arduino UNO, here is a simple example code to blink an LED:
// Simple LED Blink Example
// This code blinks an LED connected to pin 13 of the Arduino UNO.
// Ensure the Arduino is powered by the Anker 10000mAh Power Bank.

void setup() {
  pinMode(13, OUTPUT); // Set pin 13 as an output pin
}

void loop() {
  digitalWrite(13, HIGH); // Turn the LED on
  delay(1000);            // Wait for 1 second
  digitalWrite(13, LOW);  // Turn the LED off
  delay(1000);            // Wait for 1 second
}
Troubleshooting and FAQs
Common Issues and Solutions
Power Bank Not Charging:
- Ensure the charging cable and adapter are functioning properly.
- Check that the input port is free of dust or debris.
- Use a 5V/2A charger for optimal charging speed.
Device Not Charging:
- Verify that the device is compatible with the power bank's output (5V/2.4A max).
- Check the charging cable for damage or loose connections.
- Press the power button to activate the power bank if it does not start charging automatically.
LED Indicators Not Working:
- Ensure the power bank has sufficient charge. If completely drained, charge it for at least 30 minutes before checking the LEDs.
- If the issue persists, contact Anker customer support.
Power Bank Overheating:
- Avoid using the power bank while it is charging.
- Ensure the power bank is not exposed to high temperatures or direct sunlight.
FAQs
Q: Can I charge the power bank and a device simultaneously?
A: No, the Anker 10000mAh Power Bank does not support pass-through charging. Charge the power bank and your device separately.
Q: How many times can this power bank charge my smartphone?
A: The number of charges depends on your smartphone's battery capacity. For example, a phone with a 3,000mAh battery can be charged approximately 2-3 times.
Q: Is the power bank safe to carry on an airplane?
A: Yes, the Anker 10000mAh Power Bank complies with airline regulations for portable batteries and can be carried in your hand luggage.
Q: Can I use the power bank to power a Raspberry Pi?
A: Yes, the power bank can power a Raspberry Pi as long as the current draw does not exceed 2.4A.