Cirkit Designer Logo
Cirkit Designer
Your all-in-one circuit design IDE
Home / 
Component Documentation

How to Use Adafruit Bluefruit LE Micro: Examples, Pinouts, and Specs

Image of Adafruit Bluefruit LE Micro
Cirkit Designer LogoDesign with Adafruit Bluefruit LE Micro in Cirkit Designer

Introduction

The Adafruit Bluefruit LE Micro is a versatile Bluetooth Low Energy (BLE) breakout board that combines a BLE module with an ATmega32u4 microcontroller. This compact component is designed to add wireless communication capabilities to a wide range of projects, allowing them to interact with smartphones, tablets, and other BLE-compatible devices. It is particularly useful for wearable electronics, wireless sensor networks, and IoT applications.

Explore Projects Built with Adafruit Bluefruit LE Micro

Use Cirkit Designer to design, explore, and prototype these projects online. Some projects support real-time simulation. Click "Open Project" to start designing instantly!
Battery-Powered Sensor Hub with Adafruit QT Py RP2040 and OLED Display
Image of 512: A project utilizing Adafruit Bluefruit LE Micro in a practical application
This circuit features an Adafruit QT Py RP2040 microcontroller interfacing with an MPU-6050 accelerometer, an Adafruit APDS-9960 sensor, and a 0.96" OLED display via I2C communication. It is powered by a 3.7V LiPo battery and includes a green LED with a current-limiting resistor connected to an analog pin of the microcontroller.
Cirkit Designer LogoOpen Project in Cirkit Designer
Touch-Sensitive Interface with Adafruit MPR121 and Feather 32u4 Bluefruit
Image of MPR121: A project utilizing Adafruit Bluefruit LE Micro in a practical application
This circuit integrates an Adafruit MPR121 capacitive touch sensor with an Adafruit Feather 32u4 Bluefruit microcontroller. The MPR121 is powered by the Feather and communicates via I2C (SCL and SDA) to detect touch inputs, which can be processed or transmitted wirelessly by the Feather.
Cirkit Designer LogoOpen Project in Cirkit Designer
STM32F103C8T6 Bluetooth-Controlled Arcade Joystick Interface
Image of RC카 조이스틱: A project utilizing Adafruit Bluefruit LE Micro in a practical application
This circuit features an STM32F103C8T6 microcontroller interfaced with a Bluetooth HC-06 module for wireless communication and an Adafruit Arcade Joystick for user input. The microcontroller's pins B0 and B10 are connected to the TXD and RXD pins of the Bluetooth module, enabling serial communication, while pins B14 and B15 interface with the joystick's directional controls. The circuit is powered by a battery, with power distribution managed through the microcontroller's 3.3V pin and common ground connections.
Cirkit Designer LogoOpen Project in Cirkit Designer
Adafruit Feather 32u4 Bluefruit with MPR121 Capacitive Touch Sensor Interface
Image of ALi WTSE: A project utilizing Adafruit Bluefruit LE Micro in a practical application
This circuit integrates an Adafruit MPR121 capacitive touch sensor with an Adafruit Feather 32u4 Bluefruit microcontroller. The MPR121 is powered by the 3.3V supply from the Feather and communicates with the microcontroller via I2C, with SCL connected to pin 3 and SDA connected to pin 2 of the Feather. This setup allows the Feather to detect touch inputs from the MPR121 for further processing or wireless communication.
Cirkit Designer LogoOpen Project in Cirkit Designer

Explore Projects Built with Adafruit Bluefruit LE Micro

Use Cirkit Designer to design, explore, and prototype these projects online. Some projects support real-time simulation. Click "Open Project" to start designing instantly!
Image of 512: A project utilizing Adafruit Bluefruit LE Micro in a practical application
Battery-Powered Sensor Hub with Adafruit QT Py RP2040 and OLED Display
This circuit features an Adafruit QT Py RP2040 microcontroller interfacing with an MPU-6050 accelerometer, an Adafruit APDS-9960 sensor, and a 0.96" OLED display via I2C communication. It is powered by a 3.7V LiPo battery and includes a green LED with a current-limiting resistor connected to an analog pin of the microcontroller.
Cirkit Designer LogoOpen Project in Cirkit Designer
Image of MPR121: A project utilizing Adafruit Bluefruit LE Micro in a practical application
Touch-Sensitive Interface with Adafruit MPR121 and Feather 32u4 Bluefruit
This circuit integrates an Adafruit MPR121 capacitive touch sensor with an Adafruit Feather 32u4 Bluefruit microcontroller. The MPR121 is powered by the Feather and communicates via I2C (SCL and SDA) to detect touch inputs, which can be processed or transmitted wirelessly by the Feather.
Cirkit Designer LogoOpen Project in Cirkit Designer
Image of RC카 조이스틱: A project utilizing Adafruit Bluefruit LE Micro in a practical application
STM32F103C8T6 Bluetooth-Controlled Arcade Joystick Interface
This circuit features an STM32F103C8T6 microcontroller interfaced with a Bluetooth HC-06 module for wireless communication and an Adafruit Arcade Joystick for user input. The microcontroller's pins B0 and B10 are connected to the TXD and RXD pins of the Bluetooth module, enabling serial communication, while pins B14 and B15 interface with the joystick's directional controls. The circuit is powered by a battery, with power distribution managed through the microcontroller's 3.3V pin and common ground connections.
Cirkit Designer LogoOpen Project in Cirkit Designer
Image of ALi WTSE: A project utilizing Adafruit Bluefruit LE Micro in a practical application
Adafruit Feather 32u4 Bluefruit with MPR121 Capacitive Touch Sensor Interface
This circuit integrates an Adafruit MPR121 capacitive touch sensor with an Adafruit Feather 32u4 Bluefruit microcontroller. The MPR121 is powered by the 3.3V supply from the Feather and communicates with the microcontroller via I2C, with SCL connected to pin 3 and SDA connected to pin 2 of the Feather. This setup allows the Feather to detect touch inputs from the MPR121 for further processing or wireless communication.
Cirkit Designer LogoOpen Project in Cirkit Designer

Technical Specifications

Key Technical Details

  • Microcontroller: ATmega32u4
  • Bluetooth Module: Nordic nRF51822 (ARM Cortex-M0)
  • Operating Voltage: 3.3V
  • Input Voltage (recommended): 4-12V DC
  • Input Voltage (limits): 3.3-16V DC
  • I/O Pins: 20 (including 7 PWM outputs and 12 analog inputs)
  • Flash Memory: 32 KB (ATmega32u4) of which 4 KB used by bootloader
  • SRAM: 2.5 KB (ATmega32u4)
  • EEPROM: 1 KB (ATmega32u4)
  • Clock Speed: 16 MHz
  • Supported Bluetooth Profiles: GAP, GATT, HID, etc.
  • Frequency: 2.4 GHz ISM band
  • Antenna: PCB Antenna / u.FL connector for external antenna

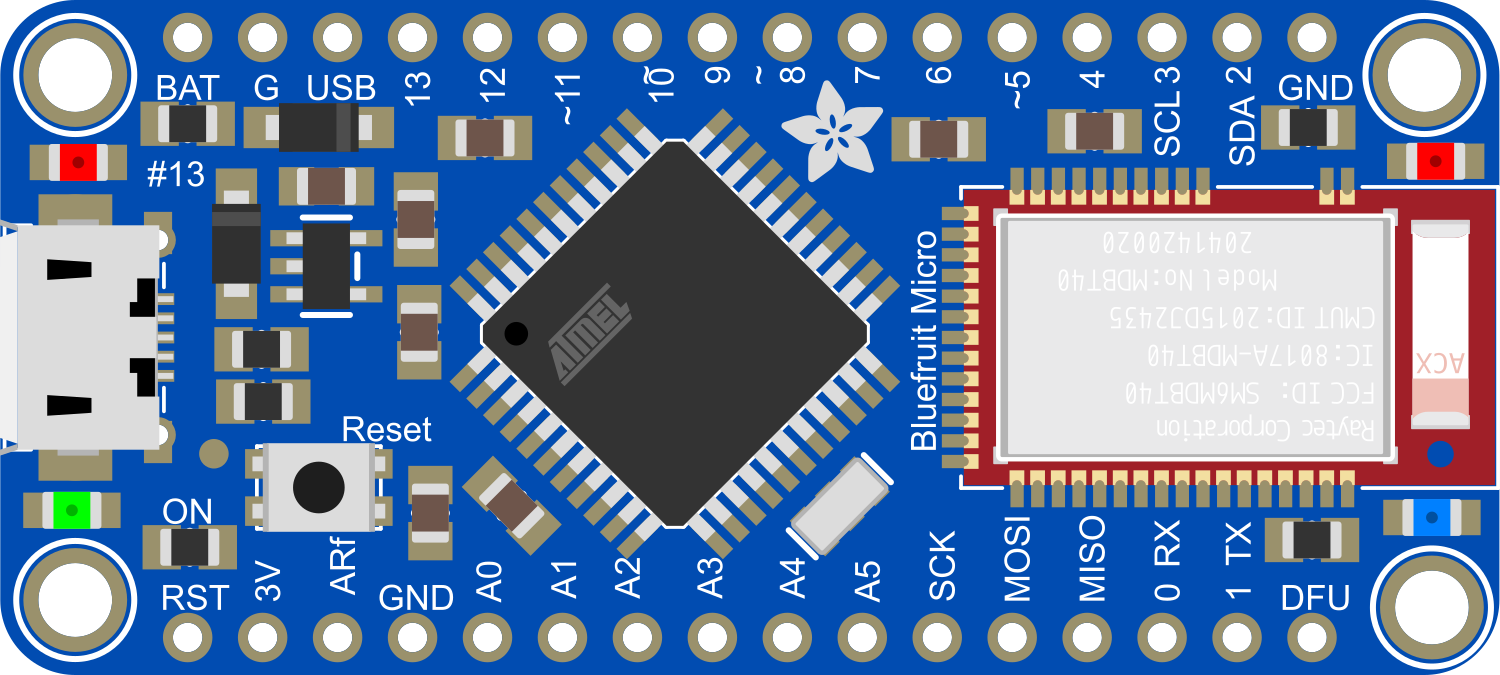
Pin Configuration and Descriptions

Pin Number Name Description
1 VIN Input voltage to the board (4-12V DC)
2-7 D2-D7 Digital pins, can be used as input/output
8 GND Ground pin
9 AREF Analog reference pin for ADC
10-15 D8-D13 Digital pins, can be used as input/output
16 A0-A5 Analog input pins
17 RST Reset pin (active low)
18 3V3 3.3V output from the onboard regulator
19 GND Ground pin
20 RAW Raw input voltage (unregulated)

Usage Instructions

Integrating with a Circuit

To use the Adafruit Bluefruit LE Micro in a circuit:

  1. Connect the VIN pin to a 4-12V DC power source.
  2. Connect the GND pin to the ground of your power supply.
  3. Utilize the digital and analog pins (D2-D13 and A0-A5) as needed for your project.
  4. If necessary, connect the RST pin to a pushbutton for manual resetting.
  5. For BLE communication, pair the device with a BLE-compatible smartphone, tablet, or computer.

Best Practices

  • Ensure that the input voltage does not exceed the recommended limits to prevent damage.
  • Use the onboard 3.3V regulator output (3V3 pin) to power external 3.3V components.
  • When programming, select "Adafruit Bluefruit Micro" from the Arduino IDE's board menu.
  • To reduce power consumption, utilize the BLE module's sleep modes when not actively communicating.

Example Code for Arduino UNO

#include <SPI.h>
#include <Adafruit_BLE_UART.h>

// Create the bluefruit object, using SPI interface
Adafruit_BLE_UART ble(SPI_CS, SPI_IRQ, SPI_RST);

void setup(void) {
  Serial.begin(9600);
  ble.begin();
}

void loop() {
  // Tell the nRF8001 to do whatever it should be working on.
  ble.poll();

  // Check for incoming data from the BLE module
  if ( ble.available() ) {
    while (ble.available()) {
      char c = ble.read();
      Serial.print(c);
    }
    // Add your code here to handle the incoming data
  }
}

Note: The above code is a basic setup for initializing the BLE module and reading incoming data. You will need to install the Adafruit BLE library for Arduino to use this code.

Troubleshooting and FAQs

Common Issues

  • Device not powering on: Check the input voltage and connections to VIN and GND.
  • No BLE communication: Ensure the device is correctly paired and within range.
  • Sketch not uploading: Verify the correct board is selected in the Arduino IDE and the bootloader is functioning.

Solutions and Tips

  • If the device is not recognized by your computer, try pressing the RST button twice quickly to enter bootloader mode.
  • For range issues, consider using an external antenna if the onboard antenna does not suffice.
  • Always disconnect the board from power before making or altering connections to prevent damage.

FAQs

Q: Can I use the Adafruit Bluefruit LE Micro with a 5V system? A: Yes, but ensure that the logic levels are compatible. The board operates at 3.3V.

Q: How do I update the firmware on the BLE module? A: Firmware updates can be done via the DFU protocol. Adafruit provides detailed guides on their website.

Q: What is the maximum range of the BLE communication? A: The range can vary depending on environmental factors but typically is around 10 meters (33 feet) with the onboard antenna.

For further assistance, consult the Adafruit forums or the extensive guides available on the Adafruit Learning System.