How to Use MW LRS-35-5: Examples, Pinouts, and Specs
Introduction
The MW LRS-35-5 is a high-efficiency, enclosed type power supply from Mean Well, a reputable manufacturer of power conversion products. This component is designed to convert AC input voltage into a stable 5V DC output with a maximum power output of 35 watts. It is commonly used in industrial automation, electronics, and telecommunications applications, as well as for hobbyist projects that require a reliable 5V power source.
Explore Projects Built with MW LRS-35-5


Explore Projects Built with MW LRS-35-5
Technical Specifications
General Features
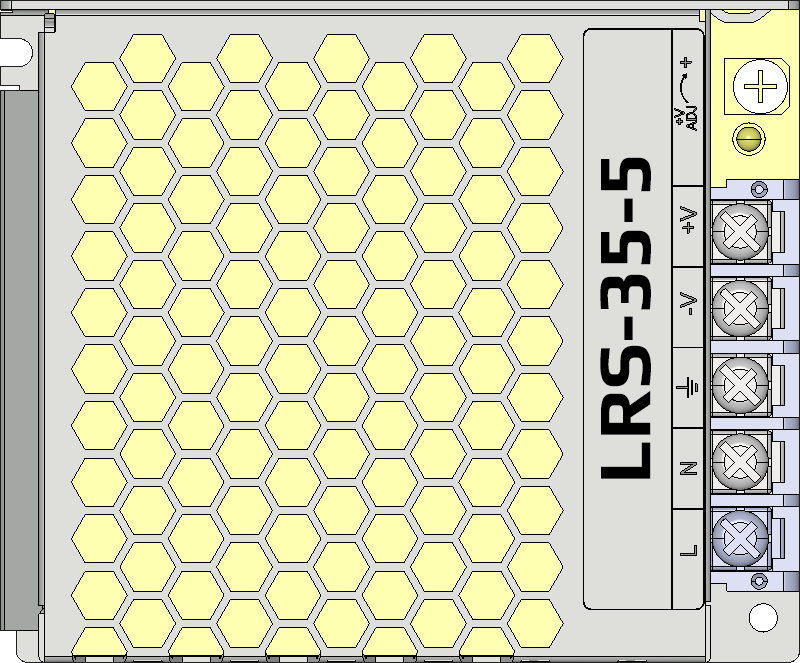
- Model: LRS-35-5
- Manufacturer: Mean Well
- Output Power: 35W
- Output Voltage: 5V DC
- Output Current: 7A
- Input Voltage Range: 85 - 264V AC, 120 - 373V DC
- Efficiency: 85%
- Operating Temperature: -30 to +70°C
- Dimensions: 99 x 82 x 30 mm (L x W x H)
- Certifications: UL, CE, CB, TUV
Pin Configuration and Descriptions
| Pin No. | Name | Description |
|---|---|---|
| 1 | AC/L | AC input line (Live) |
| 2 | AC/N | AC input neutral |
| 3 | FG | Frame ground (Earth) |
| 4 | -V | DC output negative (Common) |
| 5 | +V | DC output positive |
Usage Instructions
Integration into a Circuit
- AC Input Connection: Connect the AC live and neutral wires to pins AC/L and AC/N, respectively. Ensure that the input voltage matches the specifications of the power supply.
- Grounding: Connect the frame ground (FG) to the earth ground of your electrical system to ensure safety and reduce electromagnetic interference.
- DC Output Connection: Connect your load to the +V and -V output pins. Ensure that the total current draw does not exceed 7A.
Important Considerations and Best Practices
- Ventilation: Keep the power supply in a well-ventilated area to prevent overheating.
- Load Capacity: Do not exceed the rated output power and current of 35W and 7A, respectively.
- Protection: Use a fuse or circuit breaker on the AC input for additional safety.
- Isolation: Ensure proper isolation between the AC input and the DC output to prevent electrical shock.
- Mounting: Secure the power supply to a surface using the mounting holes to prevent movement and potential damage.
Troubleshooting and FAQs
Common Issues
- Power Supply Does Not Start: Check the AC input connections and voltage. Ensure the power switch (if applicable) is turned on.
- Output Voltage Fluctuations: Verify that the load does not exceed the maximum rated current. Check for loose connections.
- Overheating: Ensure adequate ventilation and that the ambient temperature is within the specified range.
Solutions and Tips
- No Output: Verify that the AC input is within the specified range and connections are secure. Check for any blown fuses.
- Inaccurate Output Voltage: Adjust the voltage potentiometer (if available) to calibrate the output voltage.
- Noise in the Circuit: Use proper filtering on the DC output to minimize electrical noise.
FAQs
Q: Can the MW LRS-35-5 be used with a battery backup system? A: Yes, as long as the battery system's charging circuit can handle the input voltage range and the output does not exceed the power supply's ratings.
Q: Is it possible to adjust the output voltage? A: Some models may have a voltage adjustment potentiometer. Refer to the specific model datasheet for details.
Q: How can I ensure the longevity of the power supply? A: Avoid overloading, provide adequate ventilation, and ensure proper mounting and grounding.
Example Arduino UNO Connection
The MW LRS-35-5 can be used to power an Arduino UNO by providing the necessary 5V to the board's 5V pin. Below is an example code snippet that demonstrates how to set up a simple LED blink using the Arduino powered by the MW LRS-35-5.
// Define the LED pin
const int LED_PIN = 13;

void setup() {
  // Initialize the digital pin as an output.
  pinMode(LED_PIN, OUTPUT);
}

void loop() {
  digitalWrite(LED_PIN, HIGH);   // Turn the LED on
  delay(1000);                   // Wait for a second
  digitalWrite(LED_PIN, LOW);    // Turn the LED off
  delay(1000);                   // Wait for a second
}
Note: When connecting the MW LRS-35-5 to the Arduino UNO, ensure that the output voltage is precisely 5V to avoid damaging the board. Do not connect the power supply directly to the Arduino's VIN pin, as this pin requires a higher voltage. Always connect to the 5V pin and ground.
This documentation provides a comprehensive overview of the MW LRS-35-5 power supply, ensuring users can safely and effectively integrate this component into their projects.