How to Use 3000V high-voltage mosquito and cockroach extermination boost module high current boost coil XKT203-33: Examples, Pinouts, and Specs
Documentation for 3000V High-Voltage Mosquito and Cockroach Extermination Boost Module (XKT203-33)
1. Introduction
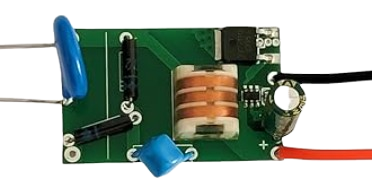
The XKT203-33 is a high-voltage boost module designed to generate up to 3000 volts using a high-current boost coil. This module is specifically engineered for pest control applications, such as mosquito and cockroach extermination. It is compact, efficient, and capable of delivering high-voltage output with minimal power input, making it ideal for battery-powered or low-power devices.
Common Applications:
- Electronic mosquito zappers: Used in devices to attract and eliminate mosquitoes.
- Cockroach exterminators: Integrated into pest control systems for cockroach elimination.
- DIY high-voltage projects: Suitable for hobbyists and engineers working on high-voltage applications.
- Educational purposes: Demonstrating high-voltage generation in physics or electronics experiments.
2. Technical Specifications
The following table outlines the key technical details of the XKT203-33 module:
| Parameter | Specification |
|---|---|
| Input Voltage (V_in) | 3.7V to 7.4V DC |
| Output Voltage (V_out) | Up to 3000V DC |
| Input Current | 1A to 2A (depending on load) |
| Output Current | High-voltage, low-current output |
| Module Dimensions | 25mm x 15mm x 10mm |
| Operating Temperature | -20°C to 60°C |
| Weight | ~10g |
Pin Configuration and Descriptions
| Pin Name | Description |
|---|---|
VCC |
Positive input voltage terminal (3.7V to 7.4V DC). |
GND |
Ground terminal for the input voltage. |
HV+ |
High-voltage positive output terminal (up to 3000V). |
HV- |
High-voltage negative output terminal (ground reference for high-voltage side). |
3. Usage Instructions
How to Use the XKT203-33 in a Circuit
Power Supply:
- Connect a DC power source (e.g., a 3.7V Li-ion battery or a 5V DC adapter) to the
VCCandGNDpins. Ensure the input voltage is within the specified range (3.7V to 7.4V). - Use a power source capable of supplying at least 1A of current for optimal performance.
- Connect a DC power source (e.g., a 3.7V Li-ion battery or a 5V DC adapter) to the
High-Voltage Output:
- Connect the
HV+andHV-terminals to the load (e.g., the metal grid of a mosquito zapper). Ensure proper insulation and spacing to prevent arcing or accidental contact.
- Connect the
Safety Precautions:
- The output voltage can reach up to 3000V, which is dangerous. Handle the module with care and avoid direct contact with the high-voltage terminals.
- Use insulated wires and ensure the circuit is enclosed in a non-conductive housing.
Testing the Module:
- After connecting the module, power it on and verify the high-voltage output using a high-voltage probe or by observing the operation of the connected load (e.g., a spark or zap sound in a mosquito zapper).
Important Considerations and Best Practices
- Heat Dissipation: The module may heat up during operation. Ensure proper ventilation or heat sinking if used for extended periods.
- Load Resistance: Avoid shorting the high-voltage output terminals, as this can damage the module.
- Insulation: Use high-voltage-rated wires and components to prevent arcing or accidental discharge.
- Polarity: Ensure correct polarity when connecting the input voltage. Reversing the polarity may damage the module.
4. Example Circuit with Arduino UNO
The XKT203-33 can be controlled using an Arduino UNO to enable or disable the high-voltage output. Below is an example circuit and code:
Circuit Diagram
- Connect the
VCCandGNDpins of the module to a 5V DC power source. - Use an NPN transistor (e.g., 2N2222) to control the module's power supply via a digital pin on the Arduino.
- Add a 1kΩ resistor between the Arduino digital pin and the transistor's base.
Arduino Code
// XKT203-33 High-Voltage Module Control with Arduino UNO
// This code toggles the high-voltage module ON and OFF every 5 seconds.

const int controlPin = 7; // Digital pin connected to the transistor base

void setup() {
  pinMode(controlPin, OUTPUT); // Set the control pin as an output
  digitalWrite(controlPin, LOW); // Start with the module turned OFF
}

void loop() {
  digitalWrite(controlPin, HIGH); // Turn ON the high-voltage module
  delay(5000); // Keep it ON for 5 seconds
  digitalWrite(controlPin, LOW); // Turn OFF the high-voltage module
  delay(5000); // Keep it OFF for 5 seconds
}
Note: Ensure the high-voltage module is properly insulated and enclosed when testing with Arduino.
5. Troubleshooting and FAQs
Common Issues and Solutions
| Issue | Possible Cause | Solution |
|---|---|---|
| No high-voltage output | Insufficient input voltage or current | Ensure the input voltage is between 3.7V and 7.4V, and the power source can supply at least 1A. |
| Module overheating | Prolonged operation or insufficient cooling | Provide proper ventilation or use a heat sink. |
| Arcing or sparks near the module | Poor insulation or shorted output terminals | Use high-voltage-rated wires and ensure proper spacing between terminals. |
| Arduino not controlling the module | Incorrect wiring or code issues | Verify the transistor connections and ensure the Arduino code is uploaded correctly. |
Frequently Asked Questions (FAQs)
Can I use a 12V power supply with this module?
No, the maximum input voltage is 7.4V. Using a higher voltage may damage the module.Is the output voltage adjustable?
No, the output voltage is fixed and depends on the input voltage and load.Can this module be used for other high-voltage applications?
Yes, it can be used for other applications requiring high-voltage output, but ensure the load is compatible with the module's specifications.How do I safely test the high-voltage output?
Use a high-voltage probe with a multimeter or observe the operation of the connected load (e.g., a spark or zap sound).
6. Safety Warnings
- The XKT203-33 generates dangerously high voltages. Avoid direct contact with the high-voltage terminals.
- Always use insulated tools and wear protective gear when handling the module.
- Keep the module away from flammable materials and liquids.
- Ensure the circuit is enclosed in a non-conductive housing to prevent accidental contact.
This documentation provides a comprehensive guide to using the XKT203-33 high-voltage boost module. By following the instructions and safety precautions, you can effectively integrate this module into your pest control or high-voltage projects.
Explore Projects Built with 3000V high-voltage mosquito and cockroach extermination boost module high current boost coil XKT203-33


Explore Projects Built with 3000V high-voltage mosquito and cockroach extermination boost module high current boost coil XKT203-33