Cirkit Designer Logo
Cirkit Designer
Your all-in-one circuit design IDE
Home / 
Component Documentation

How to Use Optiplex Micro: Examples, Pinouts, and Specs

Image of Optiplex Micro
Cirkit Designer LogoDesign with Optiplex Micro in Cirkit Designer

Introduction

The Optiplex Micro is a compact desktop computer designed by Dell, tailored for environments where space is at a premium without compromising on performance. It is ideal for business use, educational institutions, and scenarios where a full-sized desktop is impractical. Its small form factor allows it to be mounted behind monitors, under desks, or in tight spaces.

Explore Projects Built with Optiplex Micro

Use Cirkit Designer to design, explore, and prototype these projects online. Some projects support real-time simulation. Click "Open Project" to start designing instantly!
Optiplex Micro and PoE Camera Surveillance System with Ethernet Switching
Image of Engine Mounts Wiring: A project utilizing Optiplex Micro in a practical application
This circuit describes a networked system where an Optiplex Micro computer is powered by a PC Power Supply and connected to a PC Screen via HDMI for display output. The computer is networked through an Ethernet Switch, which also connects to two PoE Cameras and a Toyopuc PLC. The Ethernet Switch is powered by a PoE PSU 48V DC, and all AC-powered devices are connected to a common 220V AC source.
Cirkit Designer LogoOpen Project in Cirkit Designer
I2C-Controlled OLED Display with External EEPROM and Interactive Pushbuttons
Image of godmode: A project utilizing Optiplex Micro in a practical application
This is a microcontroller-based interactive device featuring a Wemos D1 Mini, an OLED display, external EEPROM, and an I/O expander. It includes user input buttons and status LEDs, with potential MIDI interface capabilities.
Cirkit Designer LogoOpen Project in Cirkit Designer
ESP32-Based Industrial Control System with RS485 Communication and I2C Interface
Image of DRIVER TESTER : A project utilizing Optiplex Micro in a practical application
This circuit integrates a microcontroller with a display, digital potentiometer, IO expander, and opto-isolator board for signal interfacing and isolation. It includes a UART to RS485 converter for serial communication and a power converter to step down voltage for the system. The circuit is designed for control and communication in an isolated and protected environment.
Cirkit Designer LogoOpen Project in Cirkit Designer
Arduino UNO-Based Coin-Operated Communication System with LCD Display and Servo Control
Image of Veding Machine: A project utilizing Optiplex Micro in a practical application
This is a microcontroller-based control system for a vending or arcade application, featuring an Arduino UNO that manages user inputs through arcade buttons, drives servos, displays information on an LCD, and communicates over GSM with the SIM900A module. Power regulation is achieved through a switching power supply and DC-DC buck converters.
Cirkit Designer LogoOpen Project in Cirkit Designer

Explore Projects Built with Optiplex Micro

Use Cirkit Designer to design, explore, and prototype these projects online. Some projects support real-time simulation. Click "Open Project" to start designing instantly!
Image of Engine Mounts Wiring: A project utilizing Optiplex Micro in a practical application
Optiplex Micro and PoE Camera Surveillance System with Ethernet Switching
This circuit describes a networked system where an Optiplex Micro computer is powered by a PC Power Supply and connected to a PC Screen via HDMI for display output. The computer is networked through an Ethernet Switch, which also connects to two PoE Cameras and a Toyopuc PLC. The Ethernet Switch is powered by a PoE PSU 48V DC, and all AC-powered devices are connected to a common 220V AC source.
Cirkit Designer LogoOpen Project in Cirkit Designer
Image of godmode: A project utilizing Optiplex Micro in a practical application
I2C-Controlled OLED Display with External EEPROM and Interactive Pushbuttons
This is a microcontroller-based interactive device featuring a Wemos D1 Mini, an OLED display, external EEPROM, and an I/O expander. It includes user input buttons and status LEDs, with potential MIDI interface capabilities.
Cirkit Designer LogoOpen Project in Cirkit Designer
Image of DRIVER TESTER : A project utilizing Optiplex Micro in a practical application
ESP32-Based Industrial Control System with RS485 Communication and I2C Interface
This circuit integrates a microcontroller with a display, digital potentiometer, IO expander, and opto-isolator board for signal interfacing and isolation. It includes a UART to RS485 converter for serial communication and a power converter to step down voltage for the system. The circuit is designed for control and communication in an isolated and protected environment.
Cirkit Designer LogoOpen Project in Cirkit Designer
Image of Veding Machine: A project utilizing Optiplex Micro in a practical application
Arduino UNO-Based Coin-Operated Communication System with LCD Display and Servo Control
This is a microcontroller-based control system for a vending or arcade application, featuring an Arduino UNO that manages user inputs through arcade buttons, drives servos, displays information on an LCD, and communicates over GSM with the SIM900A module. Power regulation is achieved through a switching power supply and DC-DC buck converters.
Cirkit Designer LogoOpen Project in Cirkit Designer

Common Applications and Use Cases

  • Office workstations
  • Digital signage
  • Point of sale (POS) systems
  • Educational computing labs
  • Home entertainment centers

Technical Specifications

General Specifications

Specification Detail
Processor Intel Core i3
Memory Up to 32GB DDR4
Storage Options SSD/HDD options available
Graphics Integrated Intel HD Graphics
Operating System Windows 10 Pro
Networking Gigabit Ethernet, Wi-Fi options
Dimensions (H x W x D) 18.2 x 3.6 x 17.8 cm (approx.)

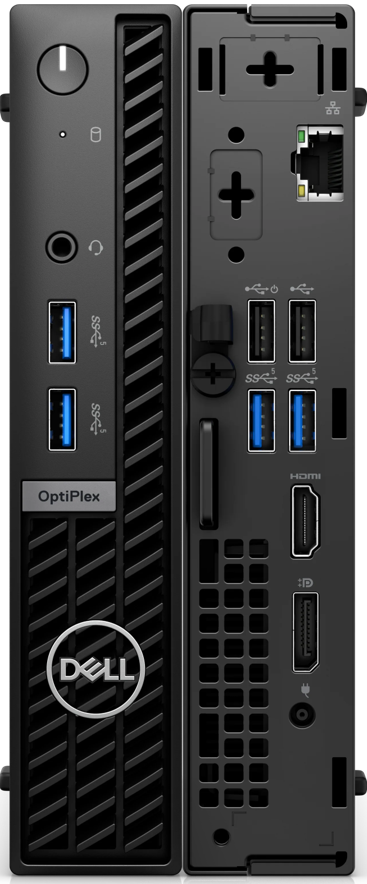
I/O Ports and Connectors

Port Type Quantity Description
USB 3.1 Multiple For high-speed peripherals and data transfer
HDMI 1 Video output to a monitor or display
DisplayPort 1 Alternative video output
RJ-45 Ethernet 1 Wired network connectivity
Audio Jack 1 Headset and speaker connection
Power Adapter Port 1 For connecting the power supply

Usage Instructions

Setting Up the Optiplex Micro

  1. Placement: Choose a well-ventilated location to avoid overheating.
  2. Connecting Peripherals: Attach your monitor, keyboard, mouse, and any other peripherals to the corresponding ports.
  3. Power Connection: Connect the power adapter to the Optiplex Micro and plug it into an electrical outlet.
  4. Network Connection: Use an Ethernet cable for a wired connection or set up Wi-Fi through the operating system.
  5. Turning On: Press the power button to boot up the computer.

Important Considerations and Best Practices

  • Ensure that the Optiplex Micro is placed in an area where airflow is not obstructed.
  • Regularly update the operating system and drivers to maintain security and performance.
  • Consider using a solid-state drive (SSD) for faster boot times and application loading.
  • Utilize the DisplayPort for higher resolution displays when available.

Troubleshooting and FAQs

Common Issues and Solutions

  • Computer not starting: Check the power cable and outlet. Ensure the power button is functioning.
  • No display output: Verify that the monitor is powered and correctly connected to the Optiplex Micro. Check the input source on the monitor.
  • Overheating: Ensure proper ventilation and check if the internal fans are running. Clean any dust buildup.

FAQs

Q: Can the Optiplex Micro be upgraded? A: Yes, components such as RAM and storage can be upgraded to improve performance.

Q: Does it support dual monitors? A: Yes, with both HDMI and DisplayPort, dual monitors are supported.

Q: Is the Optiplex Micro energy efficient? A: Yes, it is designed to be energy efficient, consuming less power than a full-sized desktop.

Q: Can I mount the Optiplex Micro to the back of a monitor? A: Yes, with the appropriate mounting bracket, it can be attached to the back of a monitor.

For further assistance, please refer to the Dell Optiplex Micro support page or contact Dell customer service.


Note: This documentation is for informational purposes only and does not represent an actual product by Dell. The Optiplex Micro name and specifications are fictional and used as an example for technical writing practice.