The SparkFun Soil Moisture Sensor is a device designed to measure the volumetric water content in soil. It provides an analog output that corresponds to the moisture level, making it an essential tool for applications such as precision agriculture, gardening automation, and environmental monitoring. By integrating this sensor into a system, users can monitor soil conditions and optimize irrigation schedules, ensuring efficient water usage and healthier plants.
Explore Projects Built with SparkFun Soil Moisture Sensor
Use Cirkit Designer to design, explore, and prototype these projects online. Some projects support real-time simulation. Click "Open Project" to start designing instantly!
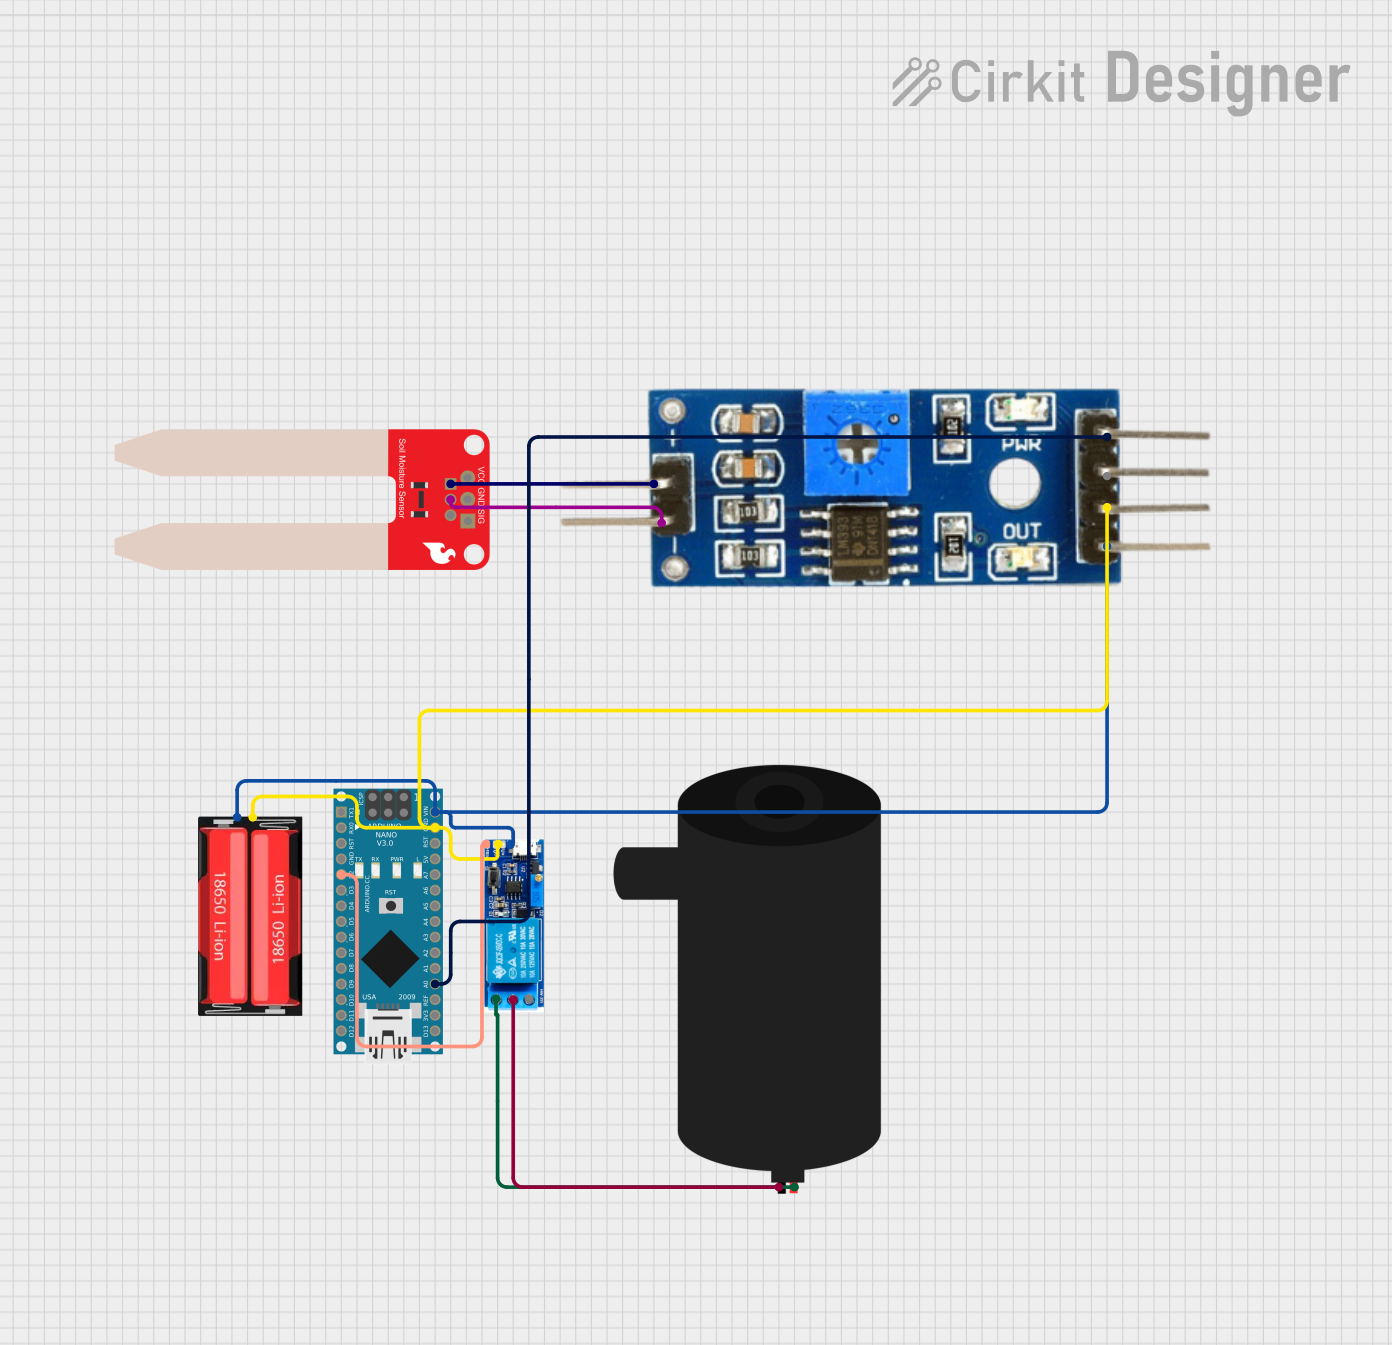
This circuit is designed to monitor soil moisture levels using a SparkFun Soil Moisture Sensor connected to a Soil Moisture Module, which interfaces with an Arduino Nano microcontroller. The Arduino reads the analog moisture level and can control a water pump via a relay module based on the moisture data. The system is powered by an 18650 Li-Ion battery, and the relay ensures that the pump is activated only when the soil moisture falls below a certain threshold, as determined by the Arduino's programmed logic.
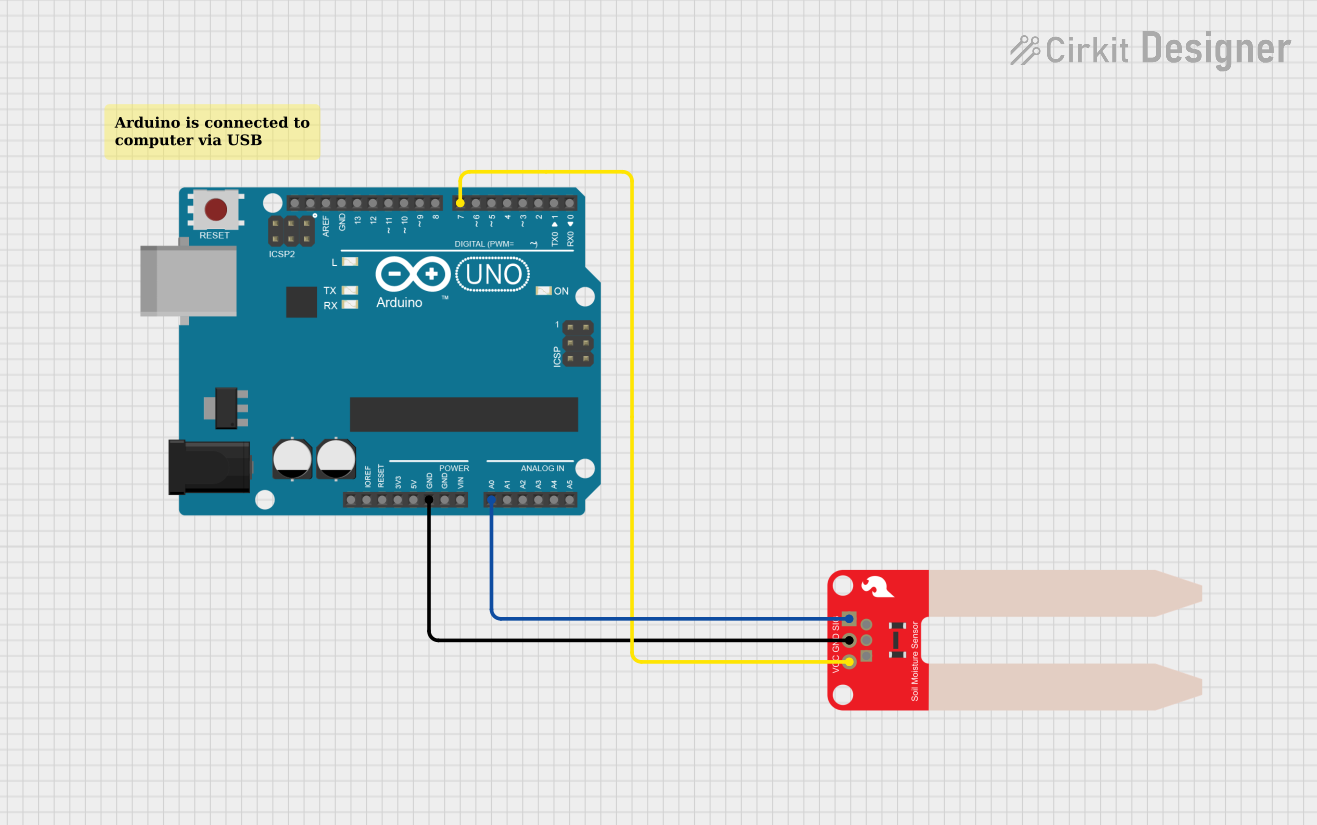
This circuit connects an Arduino UNO to a SparkFun Soil Moisture Sensor to measure the moisture content of soil. The sensor's signal pin is connected to the Arduino's analog input A0 for moisture readings, and it is powered by digital pin D7 to minimize corrosion by only supplying power when a measurement is taken. The embedded code on the Arduino manages the power to the sensor and reads the moisture levels, outputting the data to the serial monitor at a one-second interval.
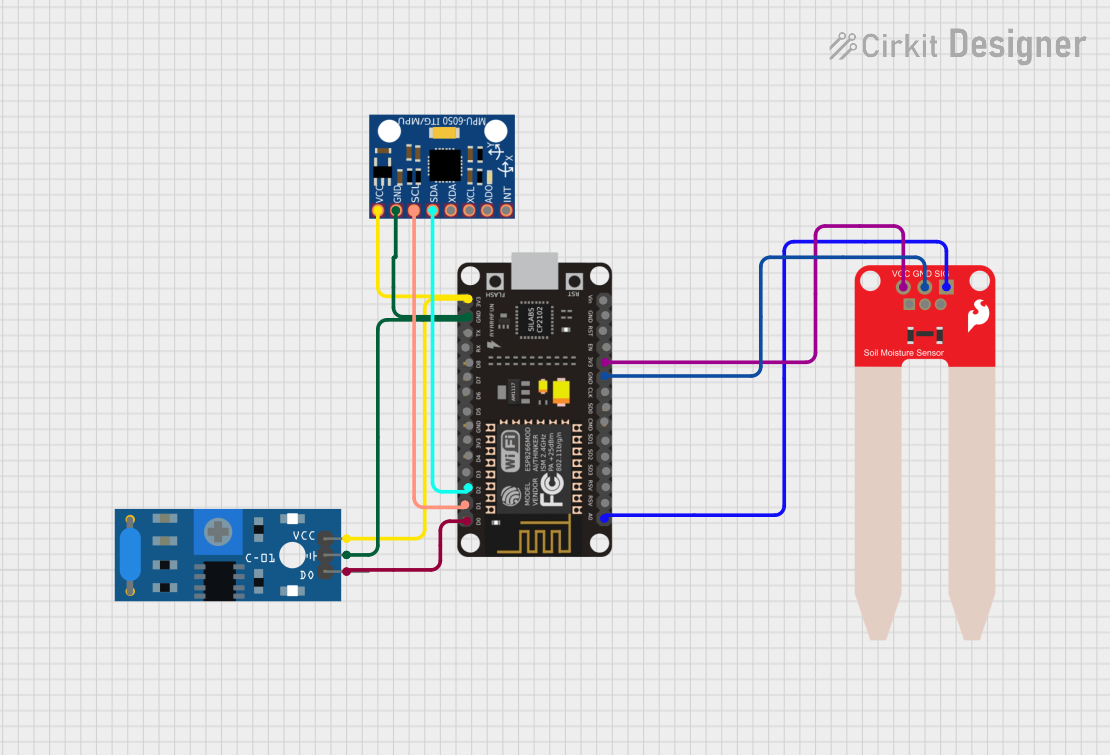
This circuit is designed for environmental monitoring, specifically for detecting soil moisture levels, vibrations, and motion. It uses an ESP8266 NodeMCU microcontroller to read data from a SparkFun Soil Moisture Sensor, an SW-420 Vibration Sensor, and an MPU-6050 gyroscope/accelerometer. The microcontroller processes the sensor data and can send alerts or log events through the Blynk IoT platform when moisture levels are below a set threshold, vibrations are detected, or significant motion is observed.
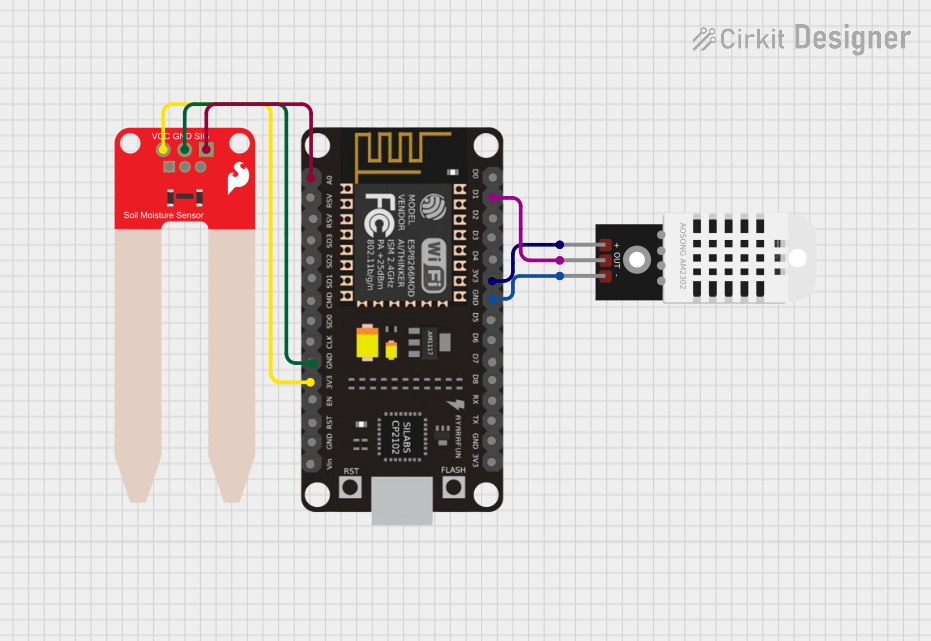
This circuit features an ESP8266 NodeMCU microcontroller connected to a DHT22 temperature and humidity sensor and a SparkFun Soil Moisture Sensor. The DHT22 sensor's data output is connected to the D1 pin of the NodeMCU, while the soil moisture sensor's signal is connected to the A0 analog pin. Both sensors are powered by the 3V3 output of the NodeMCU, and their grounds are connected to the NodeMCU's ground, enabling the microcontroller to monitor environmental conditions and soil moisture levels.
Automated irrigation systems for gardens and farms
Soil monitoring in greenhouses
Environmental research and data collection
Smart gardening projects using microcontrollers like Arduino or Raspberry Pi
Technical Specifications
The SparkFun Soil Moisture Sensor is a simple yet effective tool for measuring soil moisture. Below are its key technical details:
Parameter
Specification
Operating Voltage
3.3V - 5V
Output Signal
Analog voltage (proportional to soil moisture)
Current Consumption
~20mA
Dimensions
60mm x 20mm
Interface Type
Analog
Operating Temperature
0°C to 50°C
Pin Configuration and Descriptions
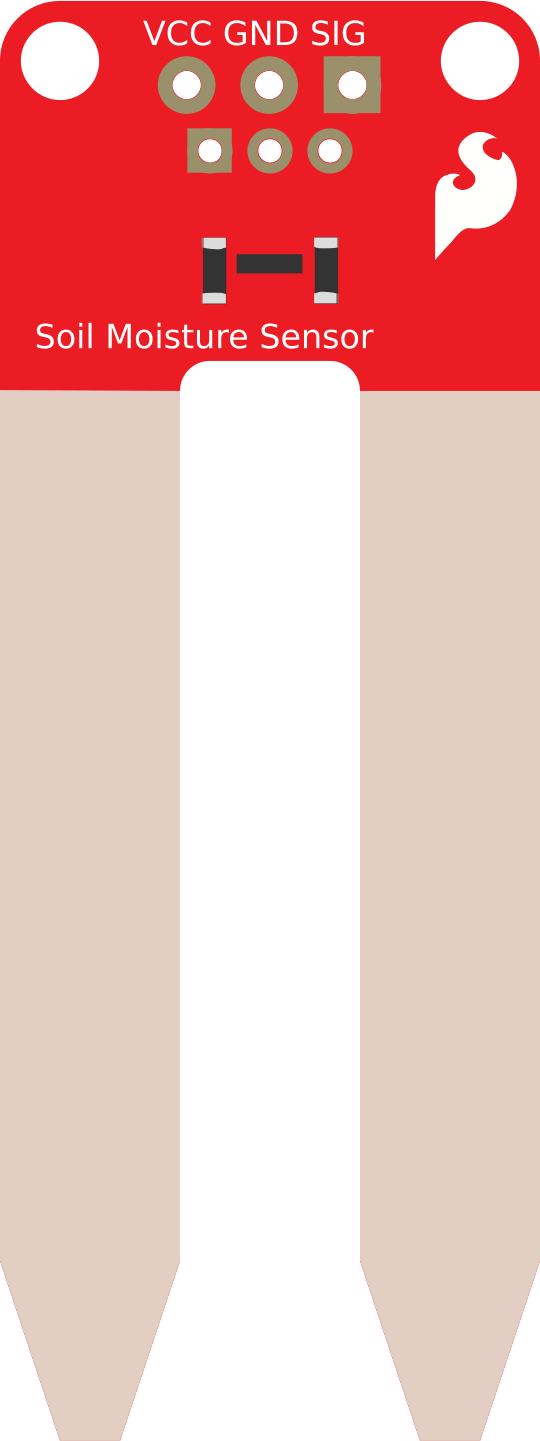
The SparkFun Soil Moisture Sensor has three pins, as described in the table below:
Pin
Name
Description
1
VCC
Power supply pin. Connect to 3.3V or 5V from the microcontroller or power source.
2
GND
Ground pin. Connect to the ground of the circuit.
3
SIG
Analog signal output. Provides a voltage proportional to the soil moisture level.
Usage Instructions
How to Use the Sensor in a Circuit
Wiring the Sensor:
Connect the VCC pin of the sensor to the 3.3V or 5V pin of your microcontroller.
Connect the GND pin of the sensor to the ground (GND) of your circuit.
Connect the SIG pin to an analog input pin on your microcontroller (e.g., A0 on an Arduino UNO).
Placement:
Insert the sensor prongs into the soil at the desired depth. Ensure the prongs are fully in contact with the soil for accurate readings.
Avoid placing the sensor in waterlogged soil for extended periods, as this may cause corrosion.
Reading the Output:
The sensor outputs an analog voltage that varies with soil moisture:
Dry soil: Higher voltage (closer to VCC).
Wet soil: Lower voltage (closer to GND).
Important Considerations and Best Practices
Corrosion Prevention: The sensor's prongs are prone to corrosion over time, especially in wet conditions. To extend the sensor's lifespan, avoid continuous exposure to water and consider using a protective coating on the prongs.
Calibration: For accurate results, calibrate the sensor by measuring the output voltage in both dry and wet soil conditions. Use these values to map the sensor's output to specific moisture levels.
Power Supply: Ensure the sensor is powered within its operating voltage range (3.3V - 5V). Exceeding this range may damage the sensor.
Example Code for Arduino UNO
Below is an example of how to use the SparkFun Soil Moisture Sensor with an Arduino UNO:
// SparkFun Soil Moisture Sensor Example Code
// This code reads the analog output from the sensor and prints the moisture level
// to the Serial Monitor.

const int sensorPin = A0; // Analog pin connected to the sensor's SIG pin
int sensorValue = 0;      // Variable to store the sensor reading

void setup() {
  Serial.begin(9600); // Initialize serial communication at 9600 baud
  pinMode(sensorPin, INPUT); // Set the sensor pin as an input
}

void loop() {
  // Read the analog value from the sensor
  sensorValue = analogRead(sensorPin);

  // Print the sensor value to the Serial Monitor
  Serial.print("Soil Moisture Level: ");
  Serial.println(sensorValue);

  // Add a delay to avoid flooding the Serial Monitor
  delay(1000); // Wait for 1 second
}
Interpreting the Output
The analogRead() function returns a value between 0 and 1023, corresponding to the sensor's output voltage.
You can map these values to a percentage or specific moisture levels based on your calibration.
Troubleshooting and FAQs
Common Issues and Solutions
No Output or Incorrect Readings:
Cause: Loose or incorrect wiring.
Solution: Double-check all connections, ensuring the VCC, GND, and SIG pins are properly connected.
Fluctuating Readings:
Cause: Poor contact between the sensor prongs and soil.
Solution: Ensure the sensor is firmly inserted into the soil. Avoid rocky or loose soil.
Corrosion of Prongs:
Cause: Prolonged exposure to water or high humidity.
Solution: Use a protective coating (e.g., nail polish or conformal coating) on the prongs to reduce corrosion.
Sensor Not Responding:
Cause: Exceeding the operating voltage range.
Solution: Verify that the power supply voltage is within the 3.3V - 5V range.
FAQs
Q1: Can the sensor be used in hydroponic systems?
A1: The sensor is designed for soil use. While it can measure moisture in some hydroponic setups, prolonged exposure to water may accelerate corrosion.
Q2: How do I calibrate the sensor?
A2: Measure the sensor's output voltage in completely dry soil and fully saturated soil. Use these values to create a mapping function for your application.
Q3: Can I use the sensor with a Raspberry Pi?
A3: Yes, but since the Raspberry Pi lacks analog input pins, you will need an external ADC (Analog-to-Digital Converter) to read the sensor's output.
Q4: What is the lifespan of the sensor?
A4: The lifespan depends on usage and environmental conditions. Proper care, such as avoiding prolonged exposure to water and using protective coatings, can extend its life.
By following this documentation, you can effectively integrate the SparkFun Soil Moisture Sensor into your projects and ensure reliable performance.

 Open Project in Cirkit Designer