Cirkit Designer Logo
Cirkit Designer
Your all-in-one circuit design IDE
Home / 
Component Documentation

How to Use Waveshare e-Paper Driver HAT: Examples, Pinouts, and Specs

Image of Waveshare e-Paper Driver HAT
Cirkit Designer LogoDesign with Waveshare e-Paper Driver HAT in Cirkit Designer

Introduction

The Waveshare e-Paper Driver HAT is a versatile hardware attachment designed for Raspberry Pi. It facilitates the control and display of e-Paper screens, supporting various screen sizes. This HAT provides an easy-to-use interface for seamless integration with your projects, making it ideal for applications such as electronic signage, e-books, and low-power displays.

Explore Projects Built with Waveshare e-Paper Driver HAT

Use Cirkit Designer to design, explore, and prototype these projects online. Some projects support real-time simulation. Click "Open Project" to start designing instantly!
Raspberry Pi 4B-Based Multi-Sensor Interface Hub with GPS and GSM
Image of Rocket: A project utilizing Waveshare e-Paper Driver HAT in a practical application
This circuit features a Raspberry Pi 4B interfaced with an IMX296 color global shutter camera, a Neo 6M GPS module, an Adafruit BMP388 barometric pressure sensor, an MPU-6050 accelerometer/gyroscope, and a Sim800l GSM module for cellular connectivity. Power management is handled by an MT3608 boost converter, which steps up the voltage from a Lipo battery, with a resettable fuse PTC and a 1N4007 diode for protection. The Adafruit Perma-Proto HAT is used for organizing connections and interfacing the sensors and modules with the Raspberry Pi via I2C and GPIO pins.
Cirkit Designer LogoOpen Project in Cirkit Designer
Battery-Powered Raspberry Pi and ESP32-CAM Smart Display with 7-inch WaveShare Touchscreen
Image of diagram: A project utilizing Waveshare e-Paper Driver HAT in a practical application
This circuit integrates a Raspberry Pi 4b, a 7-inch WaveShare display, an ESP32-CAM, and a Li-ion battery. The Raspberry Pi is powered by the Li-ion battery and interfaces with the ESP32-CAM via GPIO pins for data communication, while the WaveShare display is also powered by the same battery to provide visual output.
Cirkit Designer LogoOpen Project in Cirkit Designer
Raspberry Pi 5 Motion-Activated Dual DC Motor System with PIR Sensors
Image of Bhuvan: A project utilizing Waveshare e-Paper Driver HAT in a practical application
This circuit uses a Raspberry Pi 5 to control two DC motors via an L298N motor driver, based on input from two PIR motion sensors. The Raspberry Pi also interfaces with a Huskylens for additional sensor input and a 7-inch WaveShare display for output. Power is supplied by a 12V battery for the motor driver and a 5V battery for the display.
Cirkit Designer LogoOpen Project in Cirkit Designer
Raspberry Pi Zero W Smart Irrigation System with OLED Display and Sensor Integration
Image of IPR 110: A project utilizing Waveshare e-Paper Driver HAT in a practical application
This circuit is an automated environmental monitoring and control system. It uses a Raspberry Pi Zero W to read data from a rain sensor, soil moisture module, and DHT11 temperature and humidity sensor, displaying the information on an OLED display. The Raspberry Pi also controls a 12V geared motor via an L298N motor driver, likely for automated irrigation or other mechanical tasks based on sensor inputs.
Cirkit Designer LogoOpen Project in Cirkit Designer

Explore Projects Built with Waveshare e-Paper Driver HAT

Use Cirkit Designer to design, explore, and prototype these projects online. Some projects support real-time simulation. Click "Open Project" to start designing instantly!
Image of Rocket: A project utilizing Waveshare e-Paper Driver HAT in a practical application
Raspberry Pi 4B-Based Multi-Sensor Interface Hub with GPS and GSM
This circuit features a Raspberry Pi 4B interfaced with an IMX296 color global shutter camera, a Neo 6M GPS module, an Adafruit BMP388 barometric pressure sensor, an MPU-6050 accelerometer/gyroscope, and a Sim800l GSM module for cellular connectivity. Power management is handled by an MT3608 boost converter, which steps up the voltage from a Lipo battery, with a resettable fuse PTC and a 1N4007 diode for protection. The Adafruit Perma-Proto HAT is used for organizing connections and interfacing the sensors and modules with the Raspberry Pi via I2C and GPIO pins.
Cirkit Designer LogoOpen Project in Cirkit Designer
Image of diagram: A project utilizing Waveshare e-Paper Driver HAT in a practical application
Battery-Powered Raspberry Pi and ESP32-CAM Smart Display with 7-inch WaveShare Touchscreen
This circuit integrates a Raspberry Pi 4b, a 7-inch WaveShare display, an ESP32-CAM, and a Li-ion battery. The Raspberry Pi is powered by the Li-ion battery and interfaces with the ESP32-CAM via GPIO pins for data communication, while the WaveShare display is also powered by the same battery to provide visual output.
Cirkit Designer LogoOpen Project in Cirkit Designer
Image of Bhuvan: A project utilizing Waveshare e-Paper Driver HAT in a practical application
Raspberry Pi 5 Motion-Activated Dual DC Motor System with PIR Sensors
This circuit uses a Raspberry Pi 5 to control two DC motors via an L298N motor driver, based on input from two PIR motion sensors. The Raspberry Pi also interfaces with a Huskylens for additional sensor input and a 7-inch WaveShare display for output. Power is supplied by a 12V battery for the motor driver and a 5V battery for the display.
Cirkit Designer LogoOpen Project in Cirkit Designer
Image of IPR 110: A project utilizing Waveshare e-Paper Driver HAT in a practical application
Raspberry Pi Zero W Smart Irrigation System with OLED Display and Sensor Integration
This circuit is an automated environmental monitoring and control system. It uses a Raspberry Pi Zero W to read data from a rain sensor, soil moisture module, and DHT11 temperature and humidity sensor, displaying the information on an OLED display. The Raspberry Pi also controls a 12V geared motor via an L298N motor driver, likely for automated irrigation or other mechanical tasks based on sensor inputs.
Cirkit Designer LogoOpen Project in Cirkit Designer

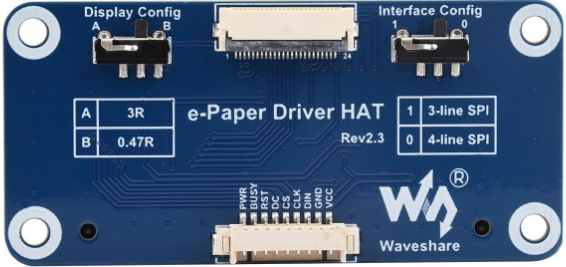
Technical Specifications

Key Technical Details

Specification Value
Manufacturer Waveshare
Part ID e-Paper Driver HAT
Operating Voltage 3.3V/5V
Interface SPI
Supported e-Paper Sizes 1.54", 2.13", 2.7", 2.9", 4.2", 5.83", 7.5"
Dimensions 65mm x 30mm
Weight 15g

Pin Configuration and Descriptions

Pin Number Pin Name Description
1 3.3V Power supply (3.3V)
2 5V Power supply (5V)
3 GND Ground
4 CS Chip Select (SPI)
5 SCK Serial Clock (SPI)
6 MOSI Master Out Slave In (SPI)
7 MISO Master In Slave Out (SPI)
8 DC Data/Command control
9 RST Reset
10 BUSY Busy signal

Usage Instructions

How to Use the Component in a Circuit

  1. Connect the e-Paper Driver HAT to Raspberry Pi:

    • Align the HAT with the GPIO pins on the Raspberry Pi.
    • Gently press down to ensure a secure connection.
  2. Connect the e-Paper Display:

    • Attach the e-Paper display to the corresponding connector on the HAT.
    • Ensure the connection is firm to avoid any loose contacts.
  3. Power Up:

    • Power up the Raspberry Pi. The HAT will draw power from the Raspberry Pi's GPIO pins.
  4. Install Required Libraries:

    • Install the necessary libraries and drivers for the e-Paper display. This can typically be done using the following commands:
      sudo apt-get update
      sudo apt-get install python3-pip
      sudo pip3 install RPi.GPIO spidev
      
  5. Run Example Code:

    • Use the provided example code to test the display. Below is a sample code snippet for displaying text on the e-Paper screen using Python:

      import spidev
      import RPi.GPIO as GPIO
      from time import sleep
      
      # Pin configuration
      RST_PIN = 17
      DC_PIN = 25
      CS_PIN = 8
      BUSY_PIN = 24
      
      # Initialize GPIO
      GPIO.setmode(GPIO.BCM)
      GPIO.setup(RST_PIN, GPIO.OUT)
      GPIO.setup(DC_PIN, GPIO.OUT)
      GPIO.setup(CS_PIN, GPIO.OUT)
      GPIO.setup(BUSY_PIN, GPIO.IN)
      
      # Initialize SPI
      spi = spidev.SpiDev(0, 0)
      spi.max_speed_hz = 2000000
      
      def reset():
          GPIO.output(RST_PIN, GPIO.HIGH)
          sleep(0.2)
          GPIO.output(RST_PIN, GPIO.LOW)
          sleep(0.2)
          GPIO.output(RST_PIN, GPIO.HIGH)
          sleep(0.2)
      
      def send_command(command):
          GPIO.output(DC_PIN, GPIO.LOW)
          GPIO.output(CS_PIN, GPIO.LOW)
          spi.writebytes([command])
          GPIO.output(CS_PIN, GPIO.HIGH)
      
      def send_data(data):
          GPIO.output(DC_PIN, GPIO.HIGH)
          GPIO.output(CS_PIN, GPIO.LOW)
          spi.writebytes([data])
          GPIO.output(CS_PIN, GPIO.HIGH)
      
      def init_display():
          reset()
          send_command(0x01)  # Power setting
          send_data(0x03)
          send_data(0x00)
          send_data(0x2b)
          send_data(0x2b)
          send_command(0x06)  # Booster soft start
          send_data(0x17)
          send_data(0x17)
          send_data(0x17)
          send_command(0x04)  # Power on
          sleep(0.1)
          send_command(0x00)  # Panel setting
          send_data(0xbf)
          send_data(0x0d)
          send_command(0x30)  # PLL control
          send_data(0x3a)
          send_command(0x61)  # Resolution setting
          send_data(0x01)
          send_data(0x90)
          send_data(0x01)
          send_data(0x2c)
          send_command(0x82)  # VCOM DC setting
          send_data(0x12)
          send_command(0x50)  # VCOM and data interval setting
          send_data(0x97)
      
      def display_text():
          init_display()
          # Add code to display text here
          # This is a placeholder for actual display logic
      
      if __name__ == "__main__":
          display_text()
      

Important Considerations and Best Practices

  • Power Supply: Ensure that the Raspberry Pi is powered adequately to support the e-Paper Driver HAT and the connected e-Paper display.
  • Static Discharge: Handle the e-Paper display and HAT with care to avoid static discharge, which can damage the components.
  • Firmware Updates: Check for any firmware updates for the HAT to ensure compatibility with newer e-Paper displays.
  • Library Compatibility: Ensure that the libraries and drivers used are compatible with the specific e-Paper display model.

Troubleshooting and FAQs

Common Issues Users Might Face

  1. Display Not Turning On:

    • Solution: Check the power connections and ensure the HAT is securely connected to the Raspberry Pi. Verify that the e-Paper display is properly attached to the HAT.
  2. Partial or Distorted Display:

    • Solution: Ensure that the SPI connections are correct and that the display initialization code is properly executed. Check for any loose connections.
  3. No Response from Display:

    • Solution: Verify that the correct GPIO pins are used for the RST, DC, and BUSY signals. Ensure that the SPI interface is enabled on the Raspberry Pi.

Solutions and Tips for Troubleshooting

  • Check Connections: Always double-check the connections between the Raspberry Pi, HAT, and e-Paper display.
  • Use Example Code: Start with example code provided by Waveshare to ensure that the hardware is functioning correctly before implementing custom code.
  • Consult Documentation: Refer to the official Waveshare documentation and forums for additional support and troubleshooting tips.

By following this documentation, users can effectively integrate and utilize the Waveshare e-Paper Driver HAT in their projects, ensuring a smooth and efficient experience.