How to Use DF Robot MAX98357A: Examples, Pinouts, and Specs
Introduction
The DF Robot MAX98357A is a digital audio amplifier that utilizes the I2S (Inter-IC Sound) interface for audio input. It is designed to deliver high-quality sound output with low power consumption, making it an excellent choice for driving small to medium-sized speakers in a variety of electronic projects. This amplifier is particularly well-suited for applications such as smart speakers, audio playback systems, and DIY audio projects where compact size and efficient performance are essential.
Explore Projects Built with DF Robot MAX98357A


Explore Projects Built with DF Robot MAX98357A
Technical Specifications
The following table outlines the key technical details of the DF Robot MAX98357A:
| Parameter | Value |
|---|---|
| Operating Voltage | 3.3V to 5.5V |
| Output Power | 3.2W at 4Ω load, 10% THD+N |
| Input Interface | I2S (Inter-IC Sound) |
| Output Type | Mono, Class D |
| Efficiency | Up to 90% |
| Signal-to-Noise Ratio | 98 dB |
| Total Harmonic Distortion | 0.04% |
| Shutdown Current | 0.2 µA |
| Supported Sampling Rates | 8 kHz to 96 kHz |
| Dimensions | 20mm x 15mm |
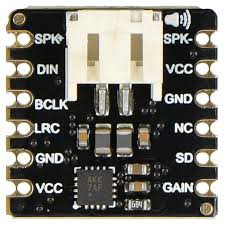
Pin Configuration and Descriptions
The DF Robot MAX98357A has a simple pinout, as shown in the table below:
| Pin Name | Type | Description |
|---|---|---|
| VIN | Power | Power supply input (3.3V to 5.5V). |
| GND | Ground | Ground connection. |
| BCLK | Input | Bit clock for I2S interface. |
| LRCLK | Input | Left-right clock for I2S interface. |
| DIN | Input | Data input for I2S audio signal. |
| SD | Input | Shutdown pin (active low). |
| GAIN | Input | Gain control pin (connect to GND for 9dB, leave |
| floating for 12dB, or connect to VIN for 15dB). | ||
| OUT+ | Output | Positive speaker output. |
| OUT- | Output | Negative speaker output. |
Usage Instructions
How to Use the Component in a Circuit
- Power Supply: Connect the VIN pin to a 3.3V or 5V power source and the GND pin to ground.
- I2S Interface: Connect the BCLK, LRCLK, and DIN pins to the corresponding I2S output pins of your microcontroller or audio source.
- Speaker Connection: Connect the OUT+ and OUT- pins to the terminals of a speaker (4Ω or 8Ω recommended).
- Gain Control: Set the GAIN pin to adjust the amplifier's gain:
- Connect to GND for 9dB.
- Leave floating for 12dB.
- Connect to VIN for 15dB.
- Shutdown Control: To enable the amplifier, ensure the SD pin is pulled high. Pull it low to put the amplifier into shutdown mode.
Important Considerations and Best Practices
- Use a decoupling capacitor (e.g., 10µF) near the VIN pin to stabilize the power supply.
- Ensure proper grounding to minimize noise and interference in the audio output.
- Avoid exceeding the recommended voltage range to prevent damage to the amplifier.
- Use a heat sink or ensure adequate ventilation if operating at high power levels for extended periods.
Example: Connecting to an Arduino UNO
The DF Robot MAX98357A can be easily interfaced with an Arduino UNO using the I2S library. Below is an example code snippet to play audio data:
#include <I2S.h> // Include the I2S library for audio communication

void setup() {
  // Initialize the I2S interface in transmit mode
  if (!I2S.begin(I2S_PHILIPS_MODE, 44100, 16)) {
    // Check if I2S initialization failed
    while (1) {
      // Stay in an infinite loop if initialization fails
    }
  }
}

void loop() {
  // Example: Send a simple sine wave audio signal
  for (int i = 0; i < 360; i++) {
    // Generate a sine wave value
    int sample = 32767 * sin(i * PI / 180);
    I2S.write(sample); // Send the sample to the amplifier
  }
}
Note: Replace the sine wave generation with actual audio data for real-world applications.
Troubleshooting and FAQs
Common Issues and Solutions
No Sound Output:
- Verify that the I2S connections (BCLK, LRCLK, DIN) are correctly wired to the microcontroller.
- Ensure the SD pin is pulled high to enable the amplifier.
- Check the speaker connections (OUT+ and OUT-) for proper wiring.
Distorted Audio:
- Ensure the power supply voltage is stable and within the recommended range.
- Verify that the gain setting (GAIN pin) is appropriate for your application.
- Use a speaker with the correct impedance (4Ω or 8Ω).
Amplifier Overheating:
- Reduce the output power or use a heat sink to dissipate heat.
- Ensure proper ventilation around the amplifier.
I2S Communication Issues:
- Confirm that the microcontroller supports I2S and is configured correctly.
- Check the sampling rate and bit depth settings to ensure compatibility with the amplifier.
FAQs
Q1: Can the MAX98357A drive stereo speakers?
A1: No, the MAX98357A is a mono amplifier. For stereo output, you will need two amplifiers, one for each channel.
Q2: What is the maximum speaker impedance supported?
A2: The amplifier is optimized for 4Ω and 8Ω speakers. Higher impedances may result in reduced output power.
Q3: Can I use the MAX98357A with a Raspberry Pi?
A3: Yes, the MAX98357A can be connected to the Raspberry Pi's I2S interface for audio output.
Q4: Is the amplifier suitable for battery-powered projects?
A4: Yes, the low power consumption and high efficiency make it ideal for battery-powered applications.