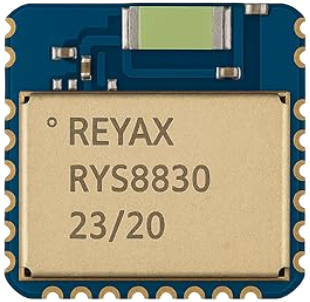
How to Use Reyax RYS8830: Examples, Pinouts, and Specs
Introduction
The Reyax RYS8830 is a low-power, long-range LoRaWAN module designed for Internet of Things (IoT) applications. It enables wireless communication over long distances with minimal power consumption, making it ideal for battery-operated devices in remote areas. The module supports LoRaWAN protocol, ensuring secure and reliable data transmission. Its compact size and versatile features make it suitable for a wide range of applications, including smart agriculture, industrial automation, environmental monitoring, and asset tracking.
Explore Projects Built with Reyax RYS8830


Explore Projects Built with Reyax RYS8830
Technical Specifications
Below are the key technical details of the Reyax RYS8830 module:
- Frequency Range: 868 MHz / 915 MHz (region-specific)
- Communication Protocol: LoRaWAN
- Supply Voltage: 2.8V to 3.6V (typical 3.3V)
- Current Consumption:
- Sleep Mode: < 1 µA
- Transmit Mode: ~120 mA (at 20 dBm)
- Receive Mode: ~10 mA
- Output Power: Up to +20 dBm
- Sensitivity: -137 dBm (SF12, BW125 kHz)
- Operating Temperature: -40°C to +85°C
- Dimensions: 17.8 mm x 13.0 mm x 2.3 mm
- Interface: UART (3.3V logic level)
- Antenna Interface: IPEX connector or solder pad
Pin Configuration and Descriptions
The Reyax RYS8830 module has 12 pins. Below is the pinout and description:
| Pin Number | Pin Name | Description |
|---|---|---|
| 1 | VCC | Power supply input (2.8V to 3.6V) |
| 2 | GND | Ground |
| 3 | TXD | UART Transmit (3.3V logic level) |
| 4 | RXD | UART Receive (3.3V logic level) |
| 5 | RESET | Module reset (active low) |
| 6 | BOOT | Boot mode selection (leave unconnected) |
| 7 | ANT | Antenna connection (IPEX or solder pad) |
| 8 | NC | Not connected |
| 9 | NC | Not connected |
| 10 | NC | Not connected |
| 11 | NC | Not connected |
| 12 | NC | Not connected |
Note: Pins marked as "NC" should not be connected to any circuit.
Usage Instructions
How to Use the Reyax RYS8830 in a Circuit
- Power Supply: Connect the VCC pin to a 3.3V regulated power source and the GND pin to the ground of your circuit.
- UART Communication: Use the TXD and RXD pins to interface with a microcontroller or computer via UART. Ensure the logic level is 3.3V.
- Antenna Connection: Attach an appropriate LoRa antenna to the ANT pin using the IPEX connector or solder pad.
- Reset: To reset the module, pull the RESET pin low momentarily.
- Boot Mode: Leave the BOOT pin unconnected for normal operation.
Important Considerations and Best Practices
- Use a high-quality 3.3V power supply to ensure stable operation.
- Place the antenna away from other components to minimize interference and maximize range.
- Ensure proper grounding to reduce noise and improve signal quality.
- Use a level shifter if interfacing with a 5V microcontroller to avoid damaging the module.
- Follow regional regulations for LoRa frequency usage (e.g., 868 MHz in Europe, 915 MHz in the US).
Example: Connecting to an Arduino UNO
To connect the Reyax RYS8830 to an Arduino UNO, use a 3.3V-to-5V level shifter for the UART pins. Below is an example Arduino sketch to send and receive data:
#include <SoftwareSerial.h>

// Define RX and TX pins for SoftwareSerial
SoftwareSerial loraSerial(10, 11); // RX = Pin 10, TX = Pin 11

void setup() {
  // Initialize serial communication with the module
  loraSerial.begin(9600); // Default baud rate for RYS8830
  Serial.begin(9600);     // Serial monitor for debugging

  // Send initialization command to the module
  loraSerial.println("AT+JOIN"); // Join LoRaWAN network
  delay(2000); // Wait for the module to respond
}

void loop() {
  // Check if data is available from the module
  if (loraSerial.available()) {
    String data = loraSerial.readString();
    Serial.println("Received from RYS8830: " + data);
  }

  // Send data to the module
  if (Serial.available()) {
    String input = Serial.readString();
    loraSerial.println(input);
    Serial.println("Sent to RYS8830: " + input);
  }
}
Note: Replace "AT+JOIN" with the appropriate command for your LoRaWAN network configuration.
Troubleshooting and FAQs
Common Issues and Solutions
Module Not Responding to Commands
- Ensure the module is powered correctly (3.3V supply).
- Verify the UART connections (TXD to RX, RXD to TX).
- Check the baud rate (default is 9600 bps).
Poor Signal Quality or Range
- Ensure the antenna is properly connected and positioned.
- Avoid placing the module near metal objects or other RF sources.
- Verify that the frequency matches your region's LoRaWAN regulations.
High Power Consumption
- Ensure the module enters sleep mode when not transmitting.
- Check for any unnecessary UART activity that may prevent sleep mode.
Cannot Join LoRaWAN Network
- Verify the network credentials (e.g., DevEUI, AppEUI, AppKey).
- Ensure the gateway is within range and operational.
- Check for regional frequency mismatches.
FAQs
Q: Can the RYS8830 operate at 5V?
A: No, the RYS8830 operates at 3.3V. Use a level shifter if interfacing with 5V systems.
Q: What is the maximum communication range?
A: The range depends on environmental factors but can reach up to 10 km in open areas.
Q: Does the module support other protocols besides LoRaWAN?
A: No, the RYS8830 is specifically designed for LoRaWAN communication.
Q: How do I update the firmware?
A: Firmware updates can be performed via the UART interface. Refer to the manufacturer's documentation for detailed instructions.