How to Use 2.8 Inch TFT Touch Display: Examples, Pinouts, and Specs
Introduction
The 2.8 Inch TFT Touch Display (Manufacturer Part ID: ILI9341 2.8" TFT) is a thin-film transistor (TFT) display module with touch capability. It features a 2.8-inch screen that delivers vibrant colors, excellent contrast, and wide viewing angles. The touch functionality allows for interactive user interfaces, making it ideal for applications such as embedded systems, handheld devices, and graphical user interface (GUI) displays.
This display is commonly used in projects requiring a compact, visually appealing, and interactive display solution. It is compatible with microcontrollers like Arduino, Raspberry Pi, and STM32, making it a versatile choice for hobbyists and professionals alike.
Explore Projects Built with 2.8 Inch TFT Touch Display


Explore Projects Built with 2.8 Inch TFT Touch Display
Technical Specifications
Below are the key technical details of the ILI9341 2.8" TFT Touch Display:
General Specifications
| Parameter | Value |
|---|---|
| Display Type | TFT (Thin-Film Transistor) |
| Screen Size | 2.8 inches |
| Resolution | 240 x 320 pixels |
| Controller IC | ILI9341 |
| Touch Type | Resistive or Capacitive (varies by model) |
| Interface | SPI (Serial Peripheral Interface) |
| Operating Voltage | 3.3V (logic level) |
| Backlight Voltage | 3.3V to 5V |
| Current Consumption | ~50mA (typical) |
| Viewing Angle | Wide |
| Color Depth | 65K (16-bit RGB) |
Pin Configuration
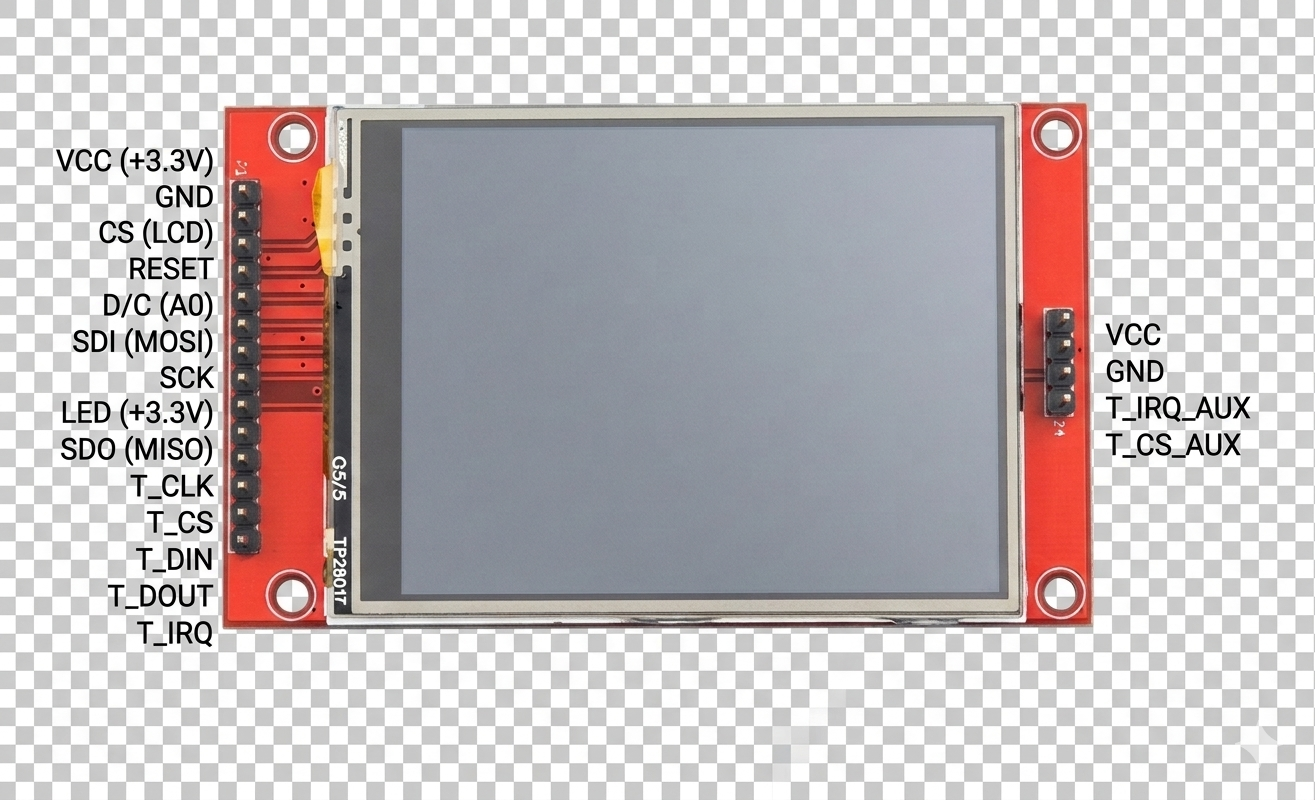
The display module typically has a 14-pin interface. Below is the pinout description:
| Pin Number | Pin Name | Description |
|---|---|---|
| 1 | GND | Ground connection |
| 2 | VCC | Power supply (3.3V or 5V, depending on the model) |
| 3 | CS | Chip Select (active low) |
| 4 | RESET | Reset pin (active low) |
| 5 | DC/RS | Data/Command selection (High for data, Low for command) |
| 6 | SDI/MOSI | SPI Master Out Slave In (data input to the display) |
| 7 | SCK | SPI Clock |
| 8 | LED | Backlight control (connect to 3.3V or 5V through a resistor if needed) |
| 9 | SDO/MISO | SPI Master In Slave Out (data output from the display, optional) |
| 10 | T_CLK | Touch controller SPI clock (if touch is present) |
| 11 | T_CS | Touch controller chip select (if touch is present) |
| 12 | T_DIN | Touch controller SPI data input |
| 13 | T_DO | Touch controller SPI data output |
| 14 | T_IRQ | Touch interrupt signal (active low, optional) |
Note: Some models may have slight variations in pin configuration. Always refer to the specific datasheet for your module.
Usage Instructions
Connecting the Display to an Arduino UNO
To use the ILI9341 2.8" TFT Touch Display with an Arduino UNO, follow these steps:
Wiring the Display: Connect the display pins to the Arduino UNO as shown below:
Display Pin Arduino Pin GND GND VCC 5V CS Pin 10 RESET Pin 9 DC/RS Pin 8 SDI/MOSI Pin 11 SCK Pin 13 LED 5V (via 220Ω resistor) SDO/MISO Pin 12 (optional) For touch functionality, connect the touch controller pins (T_CLK, T_CS, T_DIN, T_DO, T_IRQ) to available Arduino pins.
Install Required Libraries:
- Install the Adafruit_GFX and Adafruit_ILI9341 libraries from the Arduino Library Manager.
- If using the touch functionality, install the Adafruit_STMPE610 library (for resistive touch) or the appropriate library for capacitive touch.
Upload Example Code: Use the following example code to display text and graphics on the screen:
// Include necessary libraries
#include <Adafruit_GFX.h>       // Graphics library
#include <Adafruit_ILI9341.h>  // ILI9341 driver library

// Define pin connections
#define TFT_CS   10  // Chip Select
#define TFT_DC    8  // Data/Command
#define TFT_RST   9  // Reset

// Initialize the display
Adafruit_ILI9341 tft = Adafruit_ILI9341(TFT_CS, TFT_DC, TFT_RST);

void setup() {
  // Initialize the display
  tft.begin();

  // Set rotation (0-3)
  tft.setRotation(1);

  // Fill the screen with a color
  tft.fillScreen(ILI9341_BLACK);

  // Display text
  tft.setTextColor(ILI9341_WHITE);
  tft.setTextSize(2);
  tft.setCursor(10, 10);
  tft.println("Hello, TFT!");
}

void loop() {
  // Add your code here
}
Test the Touch Functionality: If your display has touch capability, use the appropriate library to read touch inputs. Refer to the library examples for guidance.
Important Considerations
- Voltage Levels: Ensure the logic voltage levels match your microcontroller (3.3V or 5V). Use level shifters if necessary.
- Backlight Control: Use a resistor to limit current to the backlight LED if connecting directly to 5V.
- SPI Speed: Adjust the SPI clock speed in your code if you encounter communication issues.
Troubleshooting and FAQs
Common Issues
Blank Screen:
- Verify all connections and ensure the display is powered correctly.
- Check the
CS,DC, andRESETpin connections. - Ensure the correct libraries are installed and initialized in your code.
Touch Not Working:
- Confirm that the touch controller pins are connected properly.
- Use the correct library for your touch controller (e.g., STMPE610 for resistive touch).
- Check for loose or faulty connections.
Distorted or Noisy Display:
- Reduce the SPI clock speed in your code.
- Ensure proper grounding between the display and the microcontroller.
Backlight Not Turning On:
- Verify the
LEDpin connection and ensure a resistor is used if required. - Check the power supply voltage.
- Verify the
FAQs
Q: Can I use this display with a 5V microcontroller?
A: Yes, but you may need level shifters for the logic pins to avoid damaging the display.
Q: How do I change the screen orientation?
A: Use the setRotation() function in your code. Valid values are 0, 1, 2, and 3.
Q: Is this display compatible with Raspberry Pi?
A: Yes, it can be used with Raspberry Pi via SPI. You may need to configure the SPI interface and use libraries like fbtft or Pillow.
Q: Can I use this display without the touch functionality?
A: Yes, the display can function as a standard TFT screen without using the touch controller pins.
By following this documentation, you should be able to successfully integrate and use the 2.8 Inch TFT Touch Display in your projects.