How to Use Teensy 4.1: Examples, Pinouts, and Specs
Introduction
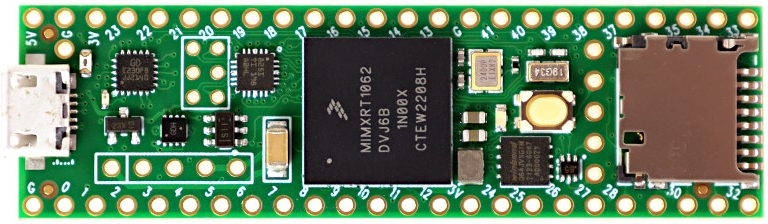
The Teensy 4.1, manufactured by SparkFun, is a high-performance microcontroller board powered by the NXP iMX RT1062 chip. It features a 600 MHz ARM Cortex-M7 processor, 1 MB of RAM, and 8 MB of flash memory, making it one of the most powerful microcontroller boards available for hobbyists and professionals alike. Its compact size and extensive I/O capabilities make it ideal for demanding applications such as audio processing, robotics, machine learning, and real-time data acquisition.
Explore Projects Built with Teensy 4.1

Explore Projects Built with Teensy 4.1
Common Applications and Use Cases
- High-speed data processing and logging
- Audio synthesis and digital signal processing (DSP)
- Robotics and motor control
- Machine learning and AI-based projects
- IoT devices requiring high computational power
- Real-time sensor data acquisition and analysis
Technical Specifications
The Teensy 4.1 is packed with advanced features and capabilities. Below are its key technical specifications:
General Specifications
| Feature | Specification |
|---|---|
| Processor | 600 MHz ARM Cortex-M7 (NXP iMX RT1062) |
| RAM | 1 MB |
| Flash Memory | 8 MB |
| External Memory Support | SD card slot, QSPI flash expansion |
| Operating Voltage | 3.3 V (logic level) |
| Input Voltage Range | 3.6 V to 5.5 V |
| USB Interface | USB 2.0 (480 Mbps) |
| Dimensions | 2.4 x 0.7 inches (61 x 18 mm) |
Pin Configuration and Descriptions
The Teensy 4.1 has 55 digital I/O pins, including 8 analog inputs, multiple communication interfaces, and advanced peripherals. Below is a summary of its pin configuration:
Power and Ground Pins
| Pin Name | Description |
|---|---|
| VIN | Input voltage (3.6 V to 5.5 V) |
| 3.3V | Regulated 3.3 V output |
| GND | Ground |
Digital and Analog Pins
| Pin Name | Description |
|---|---|
| D0-D33 | Digital I/O pins (3.3 V logic) |
| A0-A7 | Analog input pins (12-bit ADC) |
Communication Interfaces
| Pin Name | Description |
|---|---|
| TX1/RX1 | UART Serial 1 (TX, RX) |
| TX2/RX2 | UART Serial 2 (TX, RX) |
| SCL/SDA | I2C interface (clock, data) |
| MOSI/MISO | SPI interface (data in/out) |
| SCK | SPI clock |
Special Function Pins
| Pin Name | Description |
|---|---|
| SD Card | SD card interface |
| USB Host | USB host functionality |
| QSPI | External flash memory interface |
Usage Instructions
The Teensy 4.1 is versatile and easy to use in a variety of projects. Below are the steps and best practices for using it effectively:
Getting Started
- Install the Arduino IDE: Download and install the Arduino IDE from the official Arduino website.
- Install Teensyduino: Teensyduino is an add-on for the Arduino IDE that enables support for Teensy boards. Download it from the PJRC website and follow the installation instructions.
- Connect the Teensy 4.1: Use a micro-USB cable to connect the Teensy 4.1 to your computer. Ensure the cable supports data transfer.
- Select the Board: In the Arduino IDE, go to
Tools > Boardand selectTeensy 4.1. - Select the Port: Go to
Tools > Portand select the port corresponding to the Teensy 4.1.
Example: Blinking an LED
The following example demonstrates how to blink an LED connected to pin 13:
// Blink an LED connected to pin 13 on the Teensy 4.1
const int ledPin = 13; // Define the pin number for the LED

void setup() {
  pinMode(ledPin, OUTPUT); // Set the LED pin as an output
}

void loop() {
  digitalWrite(ledPin, HIGH); // Turn the LED on
  delay(500);                 // Wait for 500 milliseconds
  digitalWrite(ledPin, LOW);  // Turn the LED off
  delay(500);                 // Wait for 500 milliseconds
}
Important Considerations
- Voltage Levels: The Teensy 4.1 operates at 3.3 V logic levels. Ensure all connected peripherals are compatible with 3.3 V.
- Power Supply: Use a stable power source within the specified input voltage range (3.6 V to 5.5 V).
- Heat Management: For intensive applications, consider adding a heatsink to manage heat dissipation.
Troubleshooting and FAQs
Common Issues and Solutions
The Teensy 4.1 is not recognized by the computer:
- Ensure the USB cable supports data transfer (not just charging).
- Check that the Teensyduino add-on is installed correctly.
- Try pressing the reset button on the Teensy 4.1.
Code does not upload to the board:
- Verify that the correct board and port are selected in the Arduino IDE.
- Ensure no other program is using the same COM port.
Peripherals are not working as expected:
- Double-check the wiring and connections.
- Confirm that the peripherals are compatible with 3.3 V logic levels.
FAQs
Q: Can I use 5 V sensors with the Teensy 4.1?
A: The Teensy 4.1 operates at 3.3 V logic levels. Use a level shifter to interface with 5 V sensors.
Q: How do I expand the memory of the Teensy 4.1?
A: You can use the onboard SD card slot or connect external QSPI flash memory for additional storage.
Q: Is the Teensy 4.1 compatible with Arduino libraries?
A: Yes, most Arduino libraries are compatible with the Teensy 4.1. However, some may require minor modifications.
Q: Can I use the Teensy 4.1 for audio processing?
A: Absolutely! The Teensy 4.1 is well-suited for audio projects and supports the Teensy Audio Library for advanced audio processing.
By following this documentation, you can unlock the full potential of the Teensy 4.1 for your high-performance projects.