How to Use DVP12SE: Examples, Pinouts, and Specs
Introduction
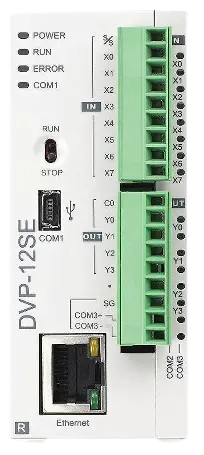
The DVP12SE, manufactured by DELTA, is a compact and versatile digital video processor (PLC) designed for high-quality video signal processing and conversion. It supports a variety of input and output formats, making it an ideal choice for applications in video surveillance, broadcasting, and multimedia systems. Its robust design and advanced features ensure reliable performance in demanding environments.
Explore Projects Built with DVP12SE

Explore Projects Built with DVP12SE
Common Applications and Use Cases
- Video Surveillance Systems: Enhances video quality and supports multiple input/output formats for seamless integration.
- Broadcasting: Provides high-quality video signal processing for live or recorded broadcasts.
- Multimedia Systems: Converts and processes video signals for use in multimedia presentations and installations.
- Industrial Automation: Integrates with PLC systems for video monitoring and control in industrial environments.
Technical Specifications
Key Technical Details
| Parameter | Specification |
|---|---|
| Manufacturer | DELTA |
| Part ID | PLC |
| Input Voltage | 24V DC |
| Power Consumption | 5W |
| Input Formats | HDMI, VGA, Composite |
| Output Formats | HDMI, VGA |
| Video Resolution Support | Up to 1080p |
| Operating Temperature | 0°C to 50°C |
| Dimensions | 100mm x 75mm x 30mm |
| Weight | 200g |
Pin Configuration and Descriptions
The DVP12SE features a set of input/output connectors and control pins for seamless integration. Below is the pin configuration:
Input/Output Connectors
| Connector | Description |
|---|---|
| HDMI IN | HDMI input for high-definition video signals |
| VGA IN | VGA input for analog video signals |
| COMPOSITE IN | Composite video input for standard-definition signals |
| HDMI OUT | HDMI output for processed video signals |
| VGA OUT | VGA output for processed video signals |
Control Pins
| Pin | Name | Description |
|---|---|---|
| 1 | GND | Ground connection |
| 2 | VCC | 24V DC power supply |
| 3 | RS-485 A | RS-485 communication line A |
| 4 | RS-485 B | RS-485 communication line B |
| 5 | RESET | Reset pin to restart the processor |
| 6 | STATUS LED | Indicates operational status (e.g., power, error) |
Usage Instructions
How to Use the DVP12SE in a Circuit
- Power Supply: Connect the VCC pin to a 24V DC power source and the GND pin to ground.
- Video Input: Connect your video source (e.g., camera, computer) to one of the input connectors (HDMI IN, VGA IN, or COMPOSITE IN).
- Video Output: Connect the desired output device (e.g., monitor, projector) to the HDMI OUT or VGA OUT connector.
- Control Communication: Use the RS-485 A and B pins for communication with external control systems, such as a PLC or computer.
- Reset: If needed, use the RESET pin to restart the processor.
Important Considerations and Best Practices
- Ensure the power supply is stable and within the specified voltage range (24V DC).
- Use high-quality cables for video input and output to minimize signal loss.
- Avoid exposing the device to extreme temperatures or humidity to ensure reliable operation.
- When using RS-485 communication, ensure proper termination to avoid signal reflections.
- Regularly clean the connectors to maintain optimal signal quality.
Example: Connecting to an Arduino UNO
The DVP12SE can be integrated with an Arduino UNO for basic control via RS-485 communication. Below is an example code snippet:
#include <SoftwareSerial.h>

// Define RS-485 communication pins
#define RS485_RX 10  // Arduino pin connected to RS-485 A
#define RS485_TX 11  // Arduino pin connected to RS-485 B
#define RS485_DE 9   // Pin to control RS-485 driver enable

SoftwareSerial rs485(RS485_RX, RS485_TX);

void setup() {
  pinMode(RS485_DE, OUTPUT);
  digitalWrite(RS485_DE, LOW); // Set driver to receive mode
  rs485.begin(9600);          // Initialize RS-485 communication at 9600 baud
  Serial.begin(9600);         // Initialize serial monitor
  Serial.println("DVP12SE Communication Initialized");
}

void loop() {
  // Example: Send a command to the DVP12SE
  digitalWrite(RS485_DE, HIGH); // Enable driver for transmission
  rs485.print("COMMAND");       // Replace "COMMAND" with actual command
  digitalWrite(RS485_DE, LOW);  // Disable driver after transmission

  // Example: Read response from DVP12SE
  if (rs485.available()) {
    String response = rs485.readString();
    Serial.println("Response: " + response);
  }

  delay(1000); // Wait 1 second before next command
}
Notes:
- Use an RS-485 module to interface the Arduino UNO with the DVP12SE.
- Replace
"COMMAND"with the appropriate command for the DVP12SE.
Troubleshooting and FAQs
Common Issues and Solutions
No Video Output:
- Cause: Incorrect input or output connections.
- Solution: Verify that the input and output devices are properly connected and powered on.
Device Not Powering On:
- Cause: Insufficient or unstable power supply.
- Solution: Ensure the power supply provides 24V DC and check the connections.
Poor Video Quality:
- Cause: Low-quality cables or interference.
- Solution: Use high-quality, shielded cables and minimize sources of electromagnetic interference.
RS-485 Communication Failure:
- Cause: Incorrect wiring or baud rate mismatch.
- Solution: Verify the RS-485 connections and ensure the baud rate matches the DVP12SE settings.
FAQs
Q: Can the DVP12SE process audio signals?
A: No, the DVP12SE is designed for video signal processing only.Q: What is the maximum cable length for RS-485 communication?
A: RS-485 supports cable lengths up to 1200 meters, but performance may vary based on cable quality and environment.Q: Can I use the DVP12SE outdoors?
A: The DVP12SE is not weatherproof. Use it in a controlled indoor environment.Q: How do I update the firmware?
A: Contact DELTA support for firmware update instructions and tools.