How to Use Adafruit Feather 328P: Examples, Pinouts, and Specs

 Design with Adafruit Feather 328P in Cirkit Designer
Introduction
The Adafruit Feather 328P is a versatile and compact development board that harnesses the power of the ATmega328P microcontroller, the same MCU found in the popular Arduino Uno. This board is part of the Feather ecosystem, a series of development boards by Adafruit that are thin, light, and feature a built-in USB and battery charging. The Feather 328P is particularly well-suited for portable projects, wearables, and low-power applications that require a balance between performance and energy efficiency.
Explore Projects Built with Adafruit Feather 328P

 Open Project in Cirkit Designer
 Open Project in Cirkit Designer
 Open Project in Cirkit Designer
 Open Project in Cirkit Designer
Explore Projects Built with Adafruit Feather 328P

 Open Project in Cirkit Designer
 Open Project in Cirkit Designer
 Open Project in Cirkit Designer
 Open Project in Cirkit Designer
Common Applications and Use Cases
- Wearable electronics
- Portable instruments
- IoT devices
- Battery-powered projects
- Prototyping and educational purposes
Technical Specifications
Key Technical Details
- Microcontroller: ATmega328P
- Operating Voltage: 3.3V
- Input Voltage: 3.7-6V via battery and up to 12V via the USB pin
- Digital I/O Pins: 20
- PWM Channels: 6
- Analog Input Channels: 6
- DC Current per I/O Pin: 20 mA
- Clock Speed: 8 MHz
- Flash Memory: 32 KB (ATmega328P) of which 0.5 KB used by bootloader
- SRAM: 2 KB (ATmega328P)
- EEPROM: 1 KB (ATmega328P)
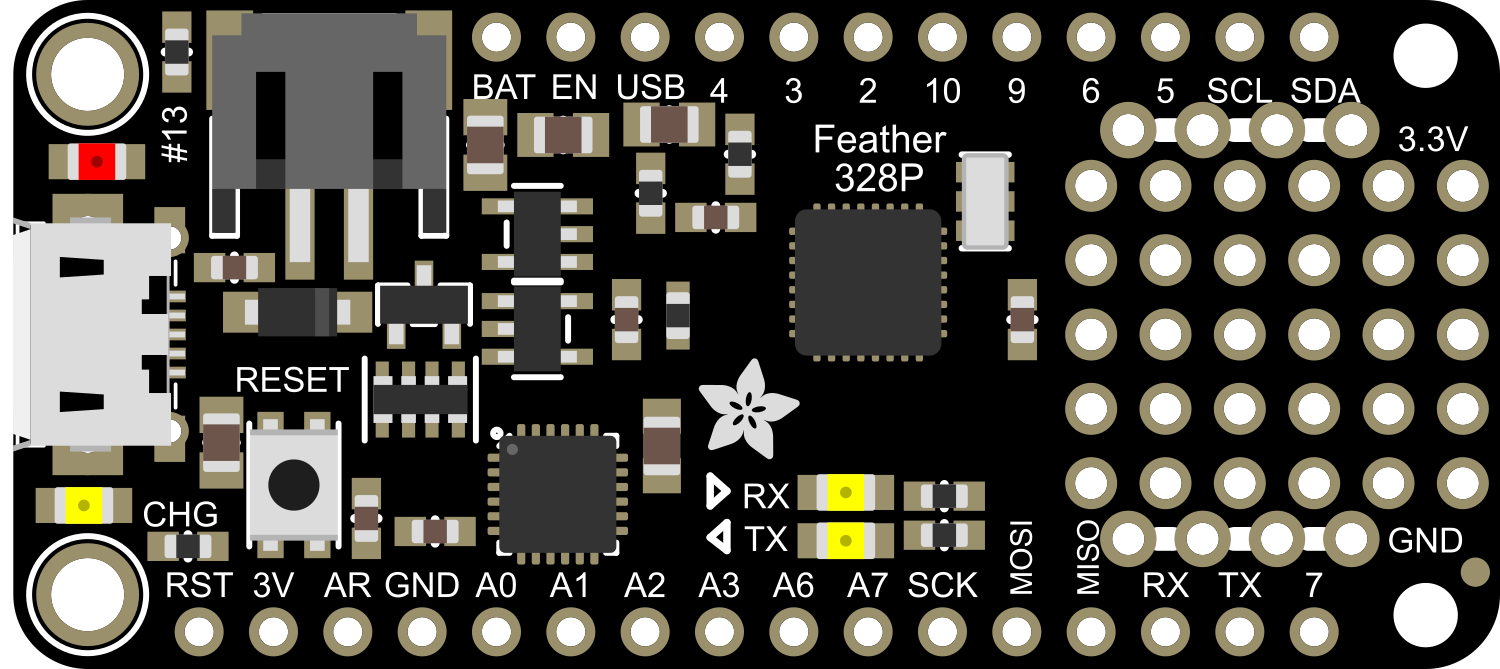
Pin Configuration and Descriptions
| Pin Number | Function | Description |
|---|---|---|
| 1 | GND | Ground |
| 2 | BAT | Battery + (for battery input) |
| 3 | EN | Enable pin for regulator |
| 4 | USB | USB + (for USB voltage input) |
| 5-14 | Digital I/O | Digital input/output pins (D0-D9) |
| 15-20 | Analog Input | Analog input pins (A0-A5) |
| 21-22 | I2C | SDA (Data) and SCL (Clock) for I2C communication |
| 23-24 | SPI | MOSI and SCK for SPI communication |
| 25 | RX0 | Receive pin for serial communication |
| 26 | TX0 | Transmit pin for serial communication |
| 27 | RST | Reset pin |
| 28 | 3V3 | 3.3V output from the regulator |
| 29 | AREF | Analog reference voltage |
| 30 | SCK | SPI Clock |
| 31 | MISO | SPI Master In Slave Out |
Usage Instructions
How to Use the Component in a Circuit
Powering the Board:
- You can power the Adafruit Feather 328P via the USB connection, a LiPo battery, or through the BAT pin.
- Ensure that the power source does not exceed the recommended voltage levels.
Programming the Board:
- Connect the board to your computer using a micro-USB cable.
- Select "Arduino Pro or Pro Mini" from the Boards menu in the Arduino IDE, and choose "ATmega328P (3.3V, 8 MHz)" as the processor.
Connecting Peripherals:
- Use the digital and analog pins to connect sensors, actuators, and other peripherals.
- Respect the maximum current rating of 20 mA per I/O pin to prevent damage.
Important Considerations and Best Practices
- Always disconnect the battery or power source before making or altering connections.
- Use a current limiting resistor with LEDs and other sensitive components.
- Avoid exposing the board to static electricity or moisture.
- When using I2C or SPI, ensure that the connected devices are compatible with the board's operating voltage.
Troubleshooting and FAQs
Common Issues
Board not recognized by computer:
- Check the USB cable and port.
- Ensure that the correct drivers are installed.
Incorrect voltage readings:
- Verify that the AREF pin is configured correctly if used.
- Check for proper grounding in the circuit.
Program not running as expected:
- Double-check the code for errors.
- Ensure that the board is correctly selected in the Arduino IDE.
Solutions and Tips for Troubleshooting
- If the board is not recognized, try a different USB cable or port, and reset the board.
- For voltage issues, use a multimeter to check the power supply and the voltage at the pins.
- Review the connections and solder joints for any loose or cold solder points.
FAQs
Q: Can I use the Arduino Uno code with the Feather 328P? A: Yes, most code written for the Arduino Uno will work with the Feather 328P, as they share the same microcontroller.
Q: How do I charge the connected LiPo battery? A: The Feather 328P has a built-in charging circuit. Simply connect the battery and power the board via USB.
Q: What is the maximum battery voltage that can be connected to the BAT pin? A: The maximum battery voltage should not exceed 6V.
Q: Can I use the Feather 328P with 5V components? A: The Feather 328P operates at 3.3V. Use level shifters or check if the 5V components are 3.3V compatible before connecting them directly.
Example Code for Arduino UNO
// Blink example for Adafruit Feather 328P

void setup() {
  pinMode(LED_BUILTIN, OUTPUT); // Initialize the LED pin as an output
}

void loop() {
  digitalWrite(LED_BUILTIN, HIGH); // Turn the LED on
  delay(1000);                     // Wait for a second
  digitalWrite(LED_BUILTIN, LOW);  // Turn the LED off
  delay(1000);                     // Wait for a second
}
Remember to select the correct board and processor before uploading the code to the Adafruit Feather 328P. This example will blink the onboard LED and is a simple test to verify that your setup is working correctly.