Cirkit Designer Logo
Cirkit Designer
Your all-in-one circuit design IDE
Home / 
Component Documentation

How to Use h743slim: Examples, Pinouts, and Specs

Image of h743slim
Cirkit Designer LogoDesign with h743slim in Cirkit Designer

Introduction

The H743Slim, manufactured by Matek, is a compact and high-performance microcontroller board built around the ARM Cortex-M7 processor. Designed for embedded applications, it offers exceptional processing power, a wide range of I/O ports, and support for multiple communication protocols. Its small form factor and robust capabilities make it an excellent choice for IoT devices, robotics, industrial automation, and other performance-critical applications.

Explore Projects Built with h743slim

Use Cirkit Designer to design, explore, and prototype these projects online. Some projects support real-time simulation. Click "Open Project" to start designing instantly!
H743-SLIM V3 Controlled Robotic System with Servo and Brushless Motor Integration
Image of T1 Ranger PNP---Matek h743 Slim V3 Wiring Diagram: A project utilizing h743slim in a practical application
This circuit is designed to control multiple servos and brushless motors using an H743-SLIM V3 microcontroller. The servos are connected to the microcontroller's PWM pins, while the brushless motors are controlled via Electronic Speed Controllers (ESCs) that are also interfaced with the microcontroller. A 12A UBEC provides the necessary power to the microcontroller and other components.
Cirkit Designer LogoOpen Project in Cirkit Designer
Raspberry Pi and H743-SLIM V3 Controlled Servo System with GPS and Telemetry
Image of Avionics Wiring Diagram: A project utilizing h743slim in a practical application
This circuit is designed for a UAV control system, featuring an H743-SLIM V3 flight controller connected to multiple servos for control surfaces, a GPS module for navigation, a telemetry radio for communication, and a digital airspeed sensor for flight data. The system is powered by a LiPo battery and includes a Raspberry Pi for additional processing and control tasks.
Cirkit Designer LogoOpen Project in Cirkit Designer
RTL8720DN-Based Interactive Button-Controlled TFT Display
Image of coba-coba: A project utilizing h743slim in a practical application
This circuit features an RTL8720DN microcontroller interfaced with a China ST7735S 160x128 TFT LCD display and four pushbuttons. The microcontroller reads the states of the pushbuttons and displays their statuses on the TFT LCD, providing a visual feedback system for button presses.
Cirkit Designer LogoOpen Project in Cirkit Designer
Arduino Mega 2560 Based Security System with Fingerprint Authentication and SMS Alerts
Image of Door security system: A project utilizing h743slim in a practical application
This circuit features an Arduino Mega 2560 microcontroller interfaced with a SIM800L GSM module, two fingerprint scanners, an I2C LCD display, an IR sensor, and a piezo buzzer. Power management is handled by a PowerBoost 1000 Basic Pad USB, a TP4056 charging module, and a Li-ion 18650 battery, with an option to use a Mini AC-DC 110V-230V to 5V 700mA module for direct power supply. The primary functionality appears to be a security system with GSM communication capabilities, biometric access control, and visual/audible feedback.
Cirkit Designer LogoOpen Project in Cirkit Designer

Explore Projects Built with h743slim

Use Cirkit Designer to design, explore, and prototype these projects online. Some projects support real-time simulation. Click "Open Project" to start designing instantly!
Image of T1 Ranger PNP---Matek h743 Slim V3 Wiring Diagram: A project utilizing h743slim in a practical application
H743-SLIM V3 Controlled Robotic System with Servo and Brushless Motor Integration
This circuit is designed to control multiple servos and brushless motors using an H743-SLIM V3 microcontroller. The servos are connected to the microcontroller's PWM pins, while the brushless motors are controlled via Electronic Speed Controllers (ESCs) that are also interfaced with the microcontroller. A 12A UBEC provides the necessary power to the microcontroller and other components.
Cirkit Designer LogoOpen Project in Cirkit Designer
Image of Avionics Wiring Diagram: A project utilizing h743slim in a practical application
Raspberry Pi and H743-SLIM V3 Controlled Servo System with GPS and Telemetry
This circuit is designed for a UAV control system, featuring an H743-SLIM V3 flight controller connected to multiple servos for control surfaces, a GPS module for navigation, a telemetry radio for communication, and a digital airspeed sensor for flight data. The system is powered by a LiPo battery and includes a Raspberry Pi for additional processing and control tasks.
Cirkit Designer LogoOpen Project in Cirkit Designer
Image of coba-coba: A project utilizing h743slim in a practical application
RTL8720DN-Based Interactive Button-Controlled TFT Display
This circuit features an RTL8720DN microcontroller interfaced with a China ST7735S 160x128 TFT LCD display and four pushbuttons. The microcontroller reads the states of the pushbuttons and displays their statuses on the TFT LCD, providing a visual feedback system for button presses.
Cirkit Designer LogoOpen Project in Cirkit Designer
Image of Door security system: A project utilizing h743slim in a practical application
Arduino Mega 2560 Based Security System with Fingerprint Authentication and SMS Alerts
This circuit features an Arduino Mega 2560 microcontroller interfaced with a SIM800L GSM module, two fingerprint scanners, an I2C LCD display, an IR sensor, and a piezo buzzer. Power management is handled by a PowerBoost 1000 Basic Pad USB, a TP4056 charging module, and a Li-ion 18650 battery, with an option to use a Mini AC-DC 110V-230V to 5V 700mA module for direct power supply. The primary functionality appears to be a security system with GSM communication capabilities, biometric access control, and visual/audible feedback.
Cirkit Designer LogoOpen Project in Cirkit Designer

Common Applications

  • Internet of Things (IoT) devices
  • Robotics and automation systems
  • Data acquisition and processing
  • Motor control and power management
  • Embedded systems requiring high-speed computation

Technical Specifications

Key Technical Details

Specification Details
Processor ARM Cortex-M7, 32-bit, up to 480 MHz
Flash Memory 1 MB
RAM 512 KB
Operating Voltage 3.3V
Input Voltage Range 5V (via USB) or 7-26V (via external power input)
Communication Protocols UART, I2C, SPI, CAN, USB, PWM
GPIO Pins 40 pins (including analog and digital I/O)
ADC Resolution 12-bit, up to 16 channels
DAC Resolution 12-bit, 2 channels
Dimensions 20 mm x 50 mm
Operating Temperature Range -40°C to +85°C

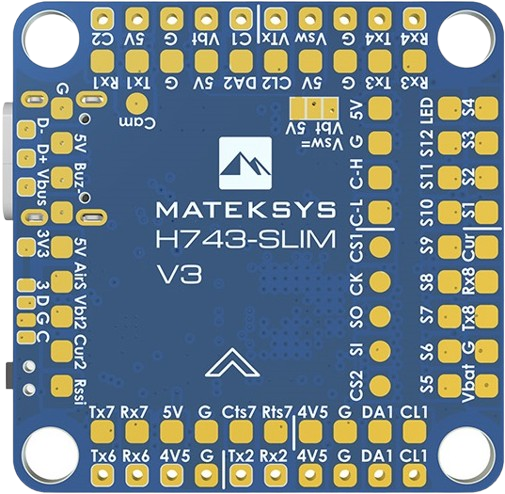
Pin Configuration and Descriptions

The H743Slim features a 40-pin layout, with a mix of digital, analog, and communication pins. Below is the pin configuration:

Pin Number Pin Name Type Description
1 VIN Power Input External power input (7-26V)
2 GND Ground Ground connection
3 3.3V Power Output 3.3V regulated output
4 PA0 Analog/Digital GPIO/ADC input
5 PA1 Analog/Digital GPIO/ADC input
6 PB6 Digital GPIO/PWM output
7 PB7 Digital GPIO/PWM output
8 PC10 Digital GPIO/SPI communication
9 PC11 Digital GPIO/SPI communication
10 PD2 Digital GPIO/UART communication
... ... ... ... (Refer to the full datasheet for all pin details)

Usage Instructions

How to Use the H743Slim in a Circuit

  1. Powering the Board:

    • Use the VIN pin for external power (7-26V) or connect via USB for 5V input.
    • Ensure the power supply is stable and within the specified voltage range.
  2. Connecting Peripherals:

    • Use the GPIO pins for digital and analog inputs/outputs.
    • For communication, connect peripherals to the appropriate UART, I2C, SPI, or CAN pins.
  3. Programming the Board:

    • The H743Slim can be programmed using STM32CubeIDE or Arduino IDE (with STM32 support).
    • Connect the board to your computer via USB and upload your code.
  4. Example Circuit:
    Below is an example of connecting an LED to GPIO pin PB6:

    • Connect the anode of the LED to PB6.
    • Connect the cathode of the LED to a 330-ohm resistor, and then to GND.

Example Code for Arduino IDE

The following code demonstrates how to blink an LED connected to PB6:

// Define the GPIO pin for the LED
#define LED_PIN PB6

void setup() {
  // Set the LED pin as an output
  pinMode(LED_PIN, OUTPUT);
}

void loop() {
  // Turn the LED on
  digitalWrite(LED_PIN, HIGH);
  delay(1000); // Wait for 1 second
  
  // Turn the LED off
  digitalWrite(LED_PIN, LOW);
  delay(1000); // Wait for 1 second
}

Important Considerations

  • Voltage Levels: Ensure all connected peripherals operate at 3.3V logic levels to avoid damage.
  • Heat Management: For high-performance applications, consider adding a heatsink or ensuring proper ventilation.
  • Debugging: Use the onboard SWD interface for debugging and firmware updates.

Troubleshooting and FAQs

Common Issues and Solutions

  1. The board does not power on:

    • Verify the power supply voltage is within the acceptable range (7-26V for VIN or 5V via USB).
    • Check all connections and ensure the power source is functioning.
  2. Unable to upload code:

    • Ensure the correct board and port are selected in the IDE.
    • Check that the USB cable is functional and supports data transfer.
    • If the board is unresponsive, try resetting it by pressing the reset button.
  3. Peripherals not working as expected:

    • Double-check the pin connections and ensure they match the code configuration.
    • Verify that the peripherals are compatible with 3.3V logic levels.
  4. Overheating:

    • Ensure the board is not drawing excessive current.
    • Reduce the workload or add cooling if necessary.

FAQs

Q: Can the H743Slim be powered directly from a LiPo battery?
A: Yes, the board can be powered via the VIN pin, which supports a voltage range of 7-26V. Ensure the battery voltage falls within this range.

Q: Does the H743Slim support wireless communication?
A: The board itself does not have built-in wireless capabilities, but you can connect external modules (e.g., Wi-Fi or Bluetooth) via UART, SPI, or I2C.

Q: Can I use the H743Slim with Arduino libraries?
A: Yes, the H743Slim is compatible with the Arduino IDE when configured with STM32 support. Many Arduino libraries can be used with this board.

Q: What is the maximum current output of the 3.3V pin?
A: The 3.3V pin can supply up to 500 mA, depending on the input power source.

For further assistance, refer to the official Matek H743Slim datasheet or contact Matek support.