Cirkit Designer Logo
Cirkit Designer
Your all-in-one circuit design IDE
Home / 
Component Documentation

How to Use Adafruit BeagleBone Proto Cape: Examples, Pinouts, and Specs

Image of Adafruit BeagleBone Proto Cape
Cirkit Designer LogoDesign with Adafruit BeagleBone Proto Cape in Cirkit Designer

Introduction

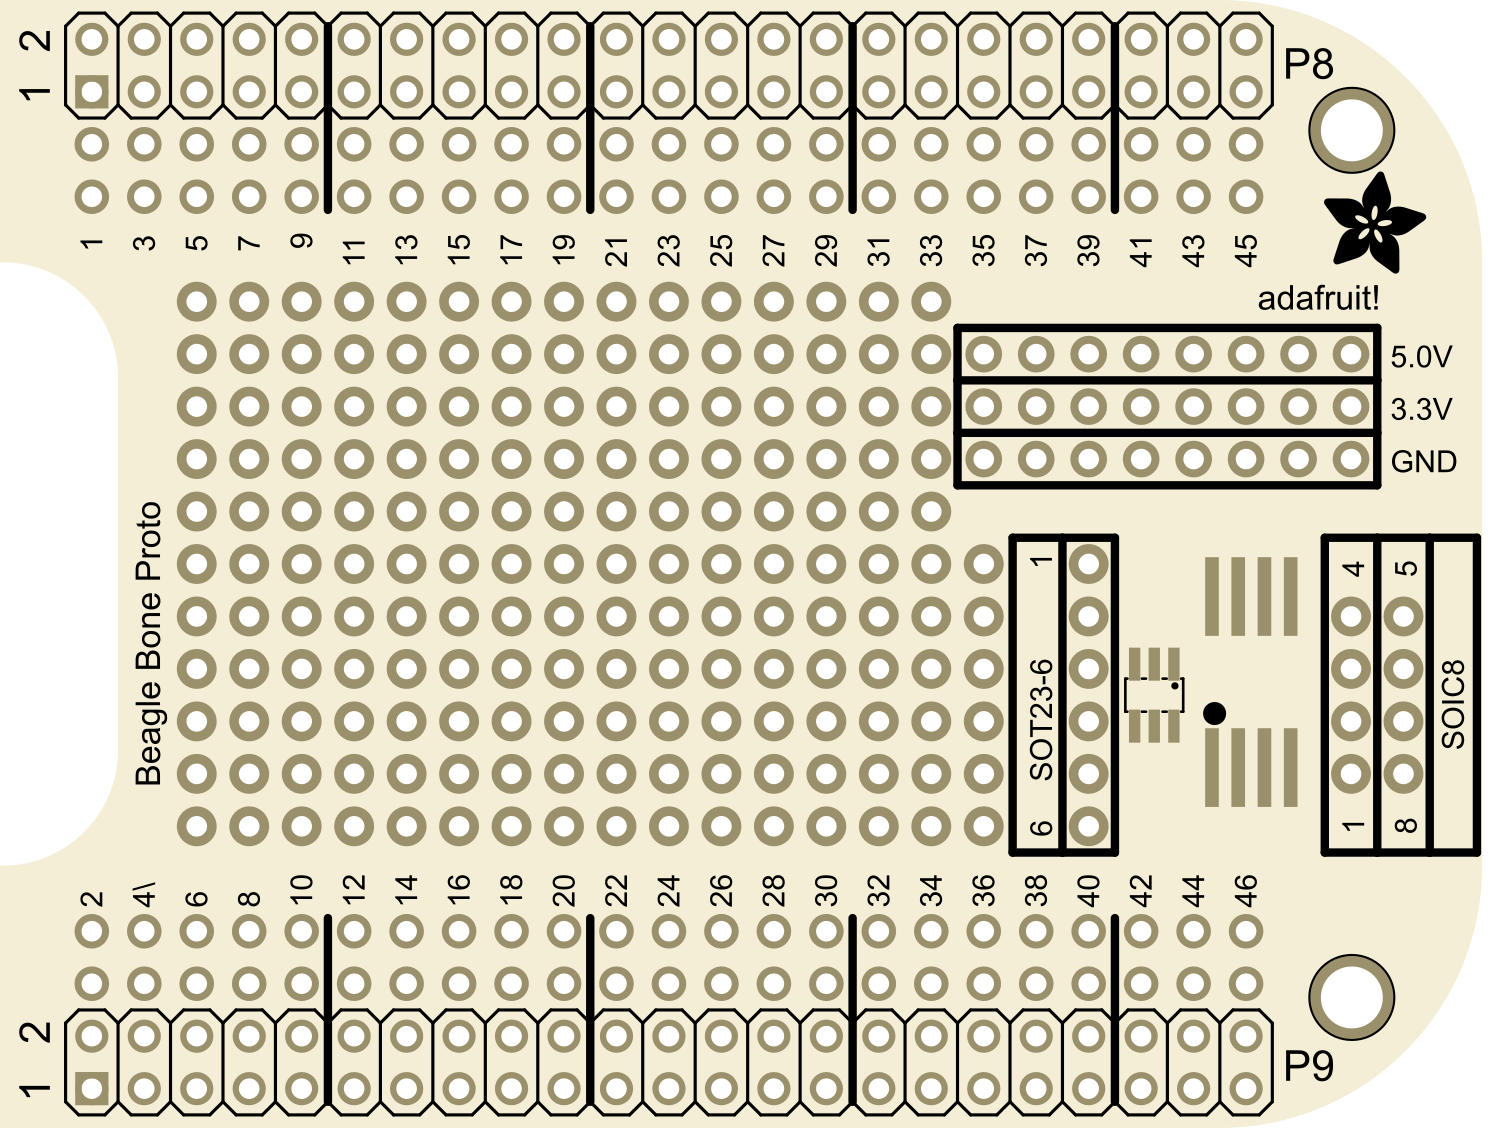
The Adafruit BeagleBone Proto Cape is an essential prototyping add-on designed for the BeagleBone series of single-board computers. This cape offers a convenient way to build custom circuits and interfaces for BeagleBone projects. It features a combination of through-hole and surface mount pads, alongside a mini breadboard area, allowing for a versatile prototyping space. Common applications include robotics, custom interfaces, educational projects, and rapid prototyping for embedded systems.

Explore Projects Built with Adafruit BeagleBone Proto Cape

Use Cirkit Designer to design, explore, and prototype these projects online. Some projects support real-time simulation. Click "Open Project" to start designing instantly!
Raspberry Pi 4B-Based Multi-Sensor Interface Hub with GPS and GSM
Image of Rocket: A project utilizing Adafruit BeagleBone Proto Cape in a practical application
This circuit features a Raspberry Pi 4B interfaced with an IMX296 color global shutter camera, a Neo 6M GPS module, an Adafruit BMP388 barometric pressure sensor, an MPU-6050 accelerometer/gyroscope, and a Sim800l GSM module for cellular connectivity. Power management is handled by an MT3608 boost converter, which steps up the voltage from a Lipo battery, with a resettable fuse PTC and a 1N4007 diode for protection. The Adafruit Perma-Proto HAT is used for organizing connections and interfacing the sensors and modules with the Raspberry Pi via I2C and GPIO pins.
Cirkit Designer LogoOpen Project in Cirkit Designer
Arduino-Based Temperature Monitoring System with RGB LED Feedback and I2C LCD Display
Image of wemos custom shield: A project utilizing Adafruit BeagleBone Proto Cape in a practical application
This circuit features an Adafruit Proto Shield R3 configured with a DS18B20 temperature sensor, a WS2812 RGB LED matrix, and an LCD I2C display. The microcontroller on the Proto Shield reads the temperature from the DS18B20 sensor and displays it on the LCD. It also controls the LED matrix to show random colors and indicates temperature status with onboard LEDs.
Cirkit Designer LogoOpen Project in Cirkit Designer
Battery-Powered Smart Sensor Hub with Adafruit QT Py RP2040
Image of wearable final: A project utilizing Adafruit BeagleBone Proto Cape in a practical application
This circuit features an Adafruit QT Py RP2040 microcontroller interfaced with an APDS9960 proximity sensor, an MPU6050 accelerometer and gyroscope, and an OLED display via I2C communication. It also includes a buzzer controlled by the microcontroller and is powered by a 3.7V LiPo battery with a toggle switch for power control.
Cirkit Designer LogoOpen Project in Cirkit Designer
Battery-Powered Smart Light with Proximity Sensor and OLED Display using Adafruit QT Py RP2040
Image of lab: A project utilizing Adafruit BeagleBone Proto Cape in a practical application
This circuit is a portable, battery-powered system featuring an Adafruit QT Py RP2040 microcontroller that interfaces with an OLED display, a proximity sensor, an accelerometer, and an RGB LED strip. The system is powered by a lithium-ion battery with a step-up boost converter to provide 5V for the LED strip, and it includes a toggle switch for power control. The microcontroller communicates with the sensors and display via I2C.
Cirkit Designer LogoOpen Project in Cirkit Designer

Explore Projects Built with Adafruit BeagleBone Proto Cape

Use Cirkit Designer to design, explore, and prototype these projects online. Some projects support real-time simulation. Click "Open Project" to start designing instantly!
Image of Rocket: A project utilizing Adafruit BeagleBone Proto Cape in a practical application
Raspberry Pi 4B-Based Multi-Sensor Interface Hub with GPS and GSM
This circuit features a Raspberry Pi 4B interfaced with an IMX296 color global shutter camera, a Neo 6M GPS module, an Adafruit BMP388 barometric pressure sensor, an MPU-6050 accelerometer/gyroscope, and a Sim800l GSM module for cellular connectivity. Power management is handled by an MT3608 boost converter, which steps up the voltage from a Lipo battery, with a resettable fuse PTC and a 1N4007 diode for protection. The Adafruit Perma-Proto HAT is used for organizing connections and interfacing the sensors and modules with the Raspberry Pi via I2C and GPIO pins.
Cirkit Designer LogoOpen Project in Cirkit Designer
Image of wemos custom shield: A project utilizing Adafruit BeagleBone Proto Cape in a practical application
Arduino-Based Temperature Monitoring System with RGB LED Feedback and I2C LCD Display
This circuit features an Adafruit Proto Shield R3 configured with a DS18B20 temperature sensor, a WS2812 RGB LED matrix, and an LCD I2C display. The microcontroller on the Proto Shield reads the temperature from the DS18B20 sensor and displays it on the LCD. It also controls the LED matrix to show random colors and indicates temperature status with onboard LEDs.
Cirkit Designer LogoOpen Project in Cirkit Designer
Image of wearable final: A project utilizing Adafruit BeagleBone Proto Cape in a practical application
Battery-Powered Smart Sensor Hub with Adafruit QT Py RP2040
This circuit features an Adafruit QT Py RP2040 microcontroller interfaced with an APDS9960 proximity sensor, an MPU6050 accelerometer and gyroscope, and an OLED display via I2C communication. It also includes a buzzer controlled by the microcontroller and is powered by a 3.7V LiPo battery with a toggle switch for power control.
Cirkit Designer LogoOpen Project in Cirkit Designer
Image of lab: A project utilizing Adafruit BeagleBone Proto Cape in a practical application
Battery-Powered Smart Light with Proximity Sensor and OLED Display using Adafruit QT Py RP2040
This circuit is a portable, battery-powered system featuring an Adafruit QT Py RP2040 microcontroller that interfaces with an OLED display, a proximity sensor, an accelerometer, and an RGB LED strip. The system is powered by a lithium-ion battery with a step-up boost converter to provide 5V for the LED strip, and it includes a toggle switch for power control. The microcontroller communicates with the sensors and display via I2C.
Cirkit Designer LogoOpen Project in Cirkit Designer

Technical Specifications

General Features

  • Compatible with BeagleBone Black, BeagleBone Green, and other BeagleBone variants
  • Provides a large prototyping area
  • Through-hole and surface mount prototyping pads
  • Mini breadboard area for non-permanent prototyping
  • All BeagleBone pins are broken out for easy access

Pin Configuration and Descriptions

Pin Number Description Notes
P1 GND Ground
P2 VDD_5V 5V from BeagleBone
P3 SYS_5V 5V system power
P4 DGND Digital ground
P5-P46 GPIOs and other pins Correspond to BeagleBone pinout

Note: This table is a simplified representation. Refer to the BeagleBone pinout for complete details.

Usage Instructions

Integration with BeagleBone

  1. Power Off the BeagleBone: Before attaching the Proto Cape, ensure that the BeagleBone is powered down to avoid any electrical damage.
  2. Align the Headers: Carefully align the Proto Cape's headers with the BeagleBone's connector pins.
  3. Attach the Proto Cape: Gently press down on the Proto Cape to connect it to the BeagleBone. Ensure that all pins are properly seated.
  4. Power On the BeagleBone: Once the Proto Cape is attached, you can power on the BeagleBone.

Prototyping

  • Through-Hole Components: Insert the leads of through-hole components into the designated holes and solder them in place.
  • Surface Mount Components: Place SMD components on the provided pads and solder them using appropriate SMD soldering techniques.
  • Mini Breadboard: Use the mini breadboard for temporary circuits or when soldering is not desirable.

Best Practices

  • Check Connections: Before powering on, double-check all connections for shorts or incorrect wiring.
  • Use Proper Soldering Techniques: Ensure good solder joints to prevent intermittent connections.
  • Handle with Care: Avoid applying excessive force to the Proto Cape to prevent damage to the board or the BeagleBone.

Troubleshooting and FAQs

Common Issues

  • Cape Not Recognized: Ensure that the Proto Cape is properly seated on the BeagleBone. Check for bent pins or misaligned connectors.
  • Short Circuits: If the BeagleBone behaves unexpectedly, power it down immediately and inspect the Proto Cape for solder bridges or misplaced components.

FAQs

Q: Can I use the Proto Cape with BeagleBone White? A: Yes, the Proto Cape is compatible with the BeagleBone White, but always check the pin compatibility before use.

Q: Is it possible to stack multiple capes on top of the Proto Cape? A: Yes, as long as the other capes are designed to be stackable and there are no pin conflicts.

Q: How much current can the Proto Cape handle? A: The current handling capability is subject to the BeagleBone's power supply limits and the trace width on the Proto Cape. For high-current applications, reinforce the traces with additional wire.

For further assistance, consult the Adafruit support forums or the BeagleBone community resources.

Note: This documentation is provided for informational purposes only and does not guarantee the functionality of the component in any specific application or use case. Always follow proper safety protocols when working with electronic components.