How to Use MPR121 Breakout V12 - Touch sensor: Examples, Pinouts, and Specs
Introduction
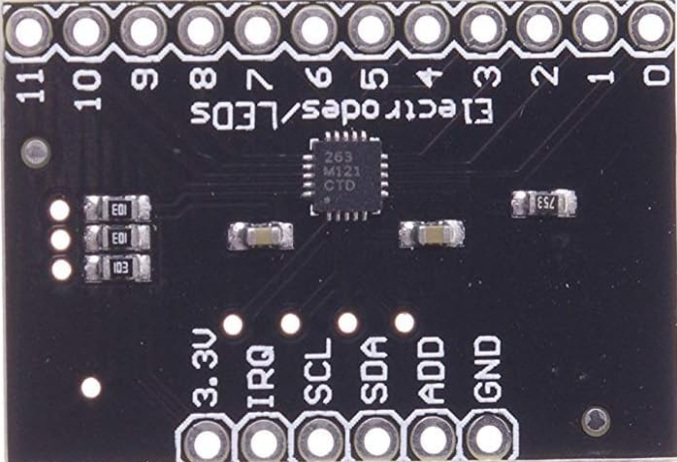
The MPR121 Breakout V12 is a capacitive touch sensor module based on the MPR121 IC, manufactured by various Chinese manufacturers. This breakout board enables touch detection on up to 12 electrodes, making it ideal for creating interactive touch-based interfaces. It is widely used in applications such as touch-sensitive control panels, musical instruments, and interactive art installations. The MPR121 communicates via the I²C protocol, making it easy to integrate with microcontrollers like Arduino, Raspberry Pi, and others.
Explore Projects Built with MPR121 Breakout V12 - Touch sensor


Explore Projects Built with MPR121 Breakout V12 - Touch sensor
Common Applications
- Touch-sensitive buttons for home automation
- Interactive displays and kiosks
- Musical instruments and MIDI controllers
- Wearable technology
- Educational projects and prototyping
Technical Specifications
Key Technical Details
| Parameter | Value |
|---|---|
| Operating Voltage | 1.8V to 3.6V |
| Recommended Voltage | 3.3V |
| Communication Protocol | I²C (up to 400kHz) |
| Number of Touch Inputs | 12 |
| Maximum Electrodes | 13 (when using proximity mode) |
| Current Consumption | 29 µA (typical in normal mode) |
| Operating Temperature | -40°C to +85°C |
| Dimensions | ~25mm x 25mm (varies by board) |
Pin Configuration and Descriptions
The MPR121 Breakout V12 typically has the following pin layout:
| Pin Name | Pin Type | Description |
|---|---|---|
| VCC | Power Input | Connect to 3.3V power supply. |
| GND | Ground | Connect to the ground of the circuit. |
| SDA | Data Line | I²C data line. Connect to the SDA pin of the microcontroller. |
| SCL | Clock Line | I²C clock line. Connect to the SCL pin of the microcontroller. |
| IRQ | Interrupt | Active-low interrupt pin. Indicates a touch event. |
| ADDR | Address Select | Sets the I²C address. Connect to GND for 0x5A, or to VCC for other options. |
| ELE0-ELE11 | Touch Inputs | Electrodes for touch detection. Connect to conductive materials or pads. |
Usage Instructions
How to Use the MPR121 in a Circuit
- Power the Module: Connect the
VCCpin to a 3.3V power source and theGNDpin to ground. - I²C Communication: Connect the
SDAandSCLpins to the corresponding I²C pins on your microcontroller. Use pull-up resistors (typically 4.7kΩ) if not already present on the breakout board. - Set the I²C Address: Use the
ADDRpin to configure the I²C address. For most applications, connect it to GND for the default address (0x5A). - Connect Electrodes: Attach conductive materials (e.g., copper tape, wires, or conductive ink) to the
ELE0toELE11pins for touch detection. - Interrupt Pin (Optional): Connect the
IRQpin to a digital input on your microcontroller to detect touch events without continuous polling.
Arduino Example Code
Below is an example of how to use the MPR121 with an Arduino UNO. This code uses the Adafruit MPR121 library, which simplifies communication with the sensor.
#include <Wire.h>
#include <Adafruit_MPR121.h>

// Create an instance of the MPR121 class
Adafruit_MPR121 cap = Adafruit_MPR121();

// Variable to store the last touched state
uint16_t lastTouched = 0;

void setup() {
  Serial.begin(9600);
  while (!Serial) {
    // Wait for the serial monitor to open
  }

  Serial.println("MPR121 Touch Sensor Test");

  // Initialize the MPR121 sensor
  if (!cap.begin(0x5A)) {
    Serial.println("MPR121 not found. Check wiring or I2C address!");
    while (1);
  }
  Serial.println("MPR121 found!");
}

void loop() {
  // Get the current touch state
  uint16_t touched = cap.touched();

  // Check for changes in touch state
  for (uint8_t i = 0; i < 12; i++) {
    // Check if the current electrode was just touched
    if ((touched & (1 << i)) && !(lastTouched & (1 << i))) {
      Serial.print("Electrode ");
      Serial.print(i);
      Serial.println(" was just touched.");
    }
    // Check if the current electrode was just released
    if (!(touched & (1 << i)) && (lastTouched & (1 << i))) {
      Serial.print("Electrode ");
      Serial.print(i);
      Serial.println(" was just released.");
    }
  }

  // Update the last touched state
  lastTouched = touched;

  delay(100); // Small delay to avoid spamming the serial monitor
}
Important Considerations
- Power Supply: Ensure the module is powered with 3.3V. Using 5V may damage the IC.
- Electrode Design: For optimal performance, use conductive materials with sufficient surface area.
- I²C Pull-Up Resistors: Verify if pull-up resistors are present on the breakout board. If not, add external resistors.
- Noise Reduction: Keep electrode wires short to minimize noise and interference.
Troubleshooting and FAQs
Common Issues
MPR121 Not Detected
- Cause: Incorrect I²C wiring or address configuration.
- Solution: Double-check the
SDAandSCLconnections. Ensure theADDRpin is set correctly.
Touch Events Not Detected
- Cause: Poor electrode connection or insufficient conductive material.
- Solution: Verify the connections to the
ELEpins and use larger conductive surfaces.
Erratic or False Touch Events
- Cause: Electrical noise or long electrode wires.
- Solution: Shorten electrode wires and ensure proper grounding.
IRQ Pin Not Working
- Cause: Interrupt pin not connected or configured.
- Solution: Ensure the
IRQpin is connected to a digital input and properly configured in the code.
FAQs
Can I use the MPR121 with 5V logic?
- No, the MPR121 operates at 3.3V. Use a logic level shifter if your microcontroller uses 5V logic.
What is the maximum length for electrode wires?
- For best performance, keep wires under 12 inches. Longer wires may introduce noise.
Can I use fewer than 12 electrodes?
- Yes, you can use as many electrodes as needed. Unused pins can be left unconnected.
How do I change the I²C address?
- Connect the
ADDRpin to different voltage levels (GND, VCC, or floating) to select one of four possible addresses (0x5A, 0x5B, 0x5C, 0x5D).
- Connect the
This concludes the documentation for the MPR121 Breakout V12 - Touch Sensor.