How to Use Ludus ProtoShield Wireless: Examples, Pinouts, and Specs
Introduction
The Ludus ProtoShield Wireless is a versatile prototyping shield designed to fit Arduino boards. It equips your Arduino with wireless communication capabilities, such as Bluetooth or Wi-Fi, enabling your projects to interact with smartphones, computers, and other wireless devices. This shield is ideal for hobbyists, educators, and professionals looking to explore the world of IoT (Internet of Things) or to add remote connectivity to their projects.
Explore Projects Built with Ludus ProtoShield Wireless


Explore Projects Built with Ludus ProtoShield Wireless
Common Applications and Use Cases
- Remote sensor data logging
- Home automation systems
- Wireless control of robots or drones
- IoT prototypes
- Educational projects and workshops
Technical Specifications
Key Technical Details
- Operating Voltage: 3.3V - 5V (compatible with Arduino Uno)
- Wireless Standards: Bluetooth 2.1 + EDR, Wi-Fi 802.11 b/g/n
- Frequency Range: 2.4 GHz ISM band
- Modulation: GFSK (Bluetooth), DSSS & OFDM (Wi-Fi)
- Data Rates: Up to 3 Mbps (Bluetooth), up to 150 Mbps (Wi-Fi)
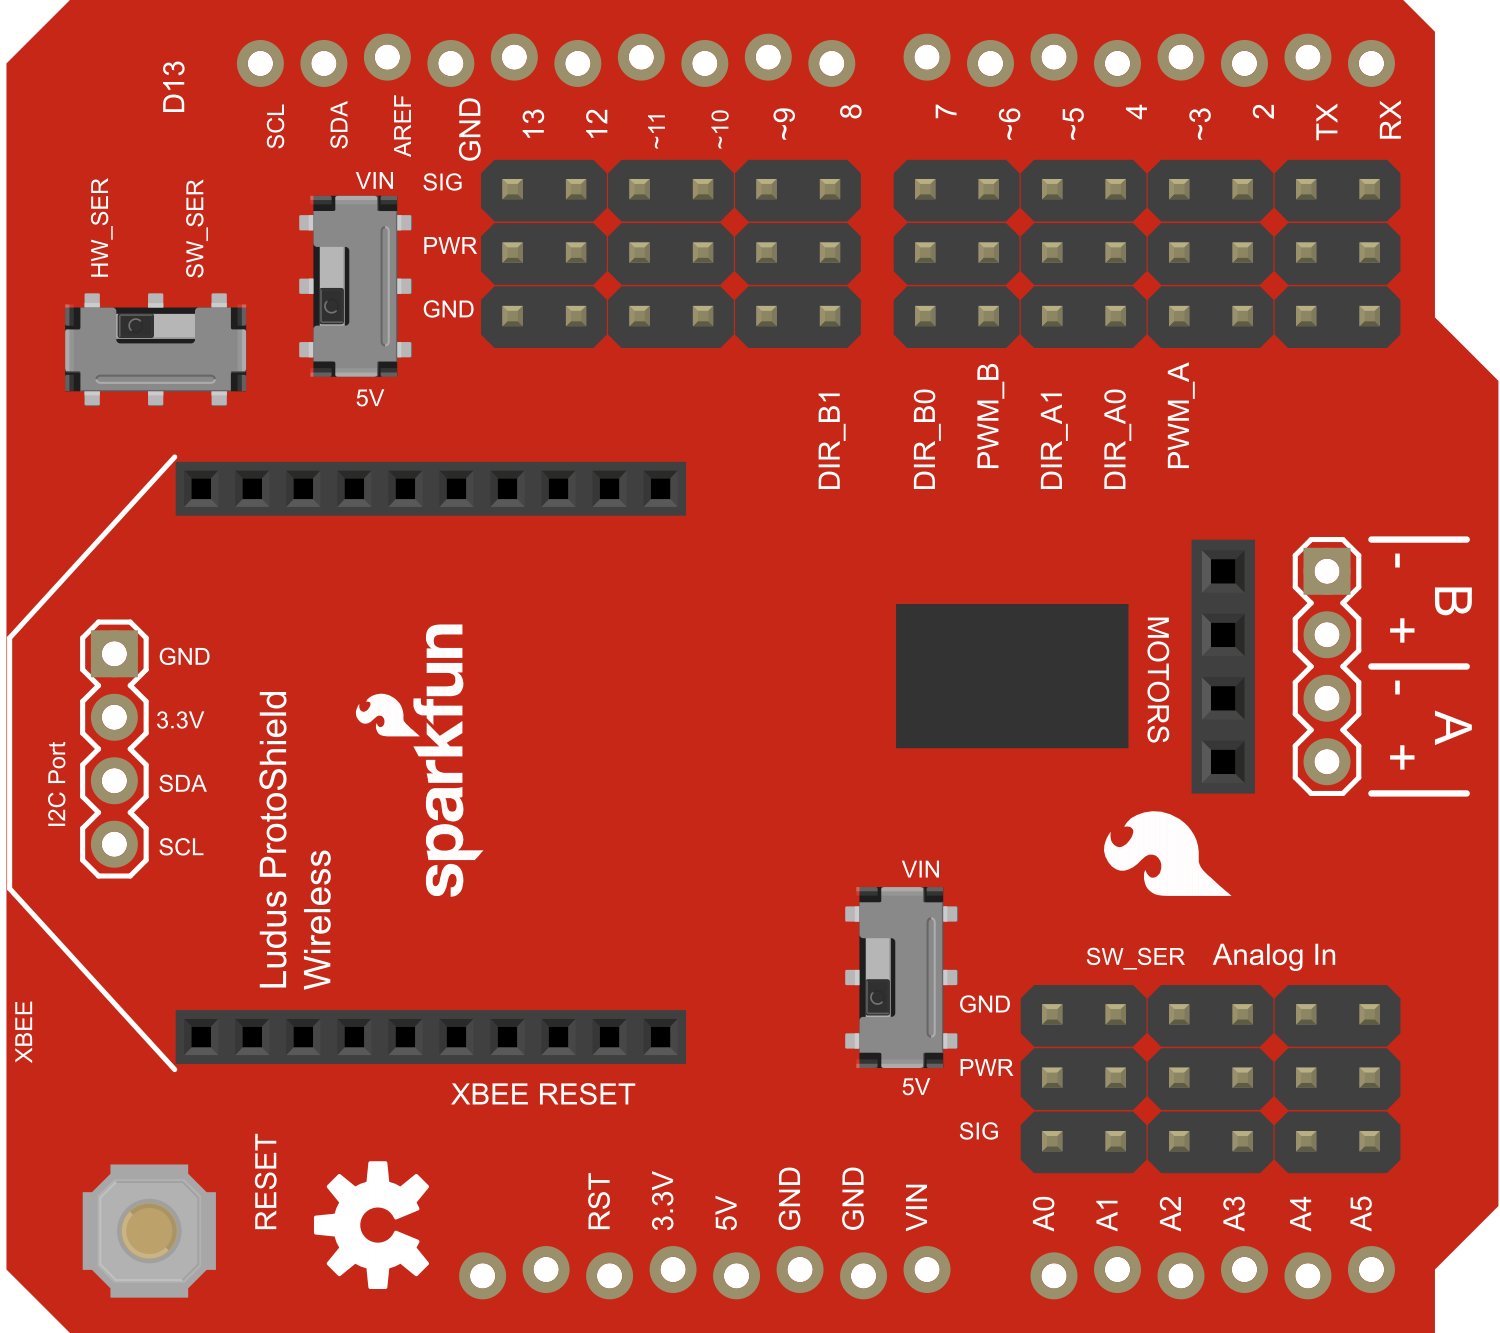
Pin Configuration and Descriptions
| Pin Number | Description | Notes |
|---|---|---|
| D0 | RX for serial communication | |
| D1 | TX for serial communication | |
| D2-D13 | Digital pins, PWM available on D3, D5-D6, D9-D11 | PWM: Pulse Width Modulation |
| A0-A5 | Analog input pins | |
| RST | Reset button | Resets both Arduino and shield |
| 3.3V | 3.3V power output | |
| 5V | 5V power output | |
| GND | Ground connection | |
| VIN | Input voltage for the Arduino | |
| ICSP | In-Circuit Serial Programming headers | For Arduino firmware updates |
Usage Instructions
How to Use the Component in a Circuit
Mounting the Shield: Carefully align the Ludus ProtoShield Wireless pins with the headers on your Arduino board and press down to seat the shield.
Powering the Shield: The shield can be powered through the Arduino board's power supply. Ensure that the input voltage does not exceed the recommended range.
Establishing a Connection: Depending on the wireless module used (Bluetooth or Wi-Fi), pair or connect your device with the shield using the appropriate wireless protocol.
Programming the Arduino: Write your sketch (code) and upload it to the Arduino board with the shield attached. Use the appropriate libraries for Bluetooth or Wi-Fi communication.
Important Considerations and Best Practices
- Antenna Placement: Ensure that the antenna area is not obstructed by metal objects to avoid signal interference.
- Power Requirements: Check the current requirements for the wireless module and ensure the Arduino power supply can handle the load.
- Interference: Be aware of other wireless devices operating in the same frequency range to minimize interference.
- Security: Implement proper security measures for wireless communication to protect your data.
Troubleshooting and FAQs
Common Issues Users Might Face
- Inability to Connect: Ensure the device you are trying to connect to is within range and the shield is properly powered.
- Intermittent Connectivity: Check for sources of wireless interference and try changing the location or orientation of the antenna.
- Data Corruption: Use checksums or other data validation methods to ensure the integrity of the transmitted data.
Solutions and Tips for Troubleshooting
- Reset the Shield: Use the onboard reset button to reboot the shield and Arduino.
- Update Firmware: Ensure the firmware for the wireless module is up to date.
- Check Connections: Verify that all pins are properly connected and there are no loose connections.
FAQs
Q: Can the Ludus ProtoShield Wireless be used with any Arduino board? A: It is designed to be compatible with Arduino Uno and similar boards that share the same form factor.
Q: Does the shield come with a built-in antenna? A: Yes, the shield typically includes a built-in antenna for wireless communication.
Q: How do I program the wireless communication? A: You will need to include the appropriate libraries in your Arduino sketch and use the provided functions to manage wireless connections and data transmission.
Example Code for Arduino UNO
Below is a simple example of how to use the Ludus ProtoShield Wireless with an Arduino Uno to send a message over Bluetooth. Ensure you have the correct Bluetooth library installed before uploading the sketch.
#include <SoftwareSerial.h>

SoftwareSerial mySerial(10, 11); // RX, TX

void setup() {
  // Start the built-in serial port, for debugging
  Serial.begin(9600);
  // Start the software serial port, to communicate with the Bluetooth module
  mySerial.begin(9600);
  Serial.println("Bluetooth Serial started at 9600 Baud");
}

void loop() {
  // Check if data has been received from the Bluetooth module
  if (mySerial.available()) {
    char c = mySerial.read();
    // Echo the received character to the built-in serial port
    Serial.write(c);
  }

  // Check if data has been received from the built-in serial port
  if (Serial.available()) {
    char c = Serial.read();
    // Send the received character to the Bluetooth module
    mySerial.write(c);
  }
}
Remember to wrap your code comments to limit line length to 80 characters. This example demonstrates basic serial communication between the Arduino and a Bluetooth device. Adjust the mySerial pins according to your shield's specific pinout and ensure that the baud rate matches that of your Bluetooth module.