Cirkit Designer Logo
Cirkit Designer
Your all-in-one circuit design IDE
Home / 
Component Documentation

How to Use Sensorhumedad: Examples, Pinouts, and Specs

Image of Sensorhumedad
Cirkit Designer LogoDesign with Sensorhumedad in Cirkit Designer

Introduction

The Sensorhumedad, manufactured by Arduino (Part ID: UNO), is a reliable humidity sensor designed to measure the moisture level in the air. This sensor is widely used in applications such as environmental monitoring, HVAC (Heating, Ventilation, and Air Conditioning) systems, agricultural automation, and weather stations. Its compact design and compatibility with microcontrollers like the Arduino UNO make it an excellent choice for both hobbyists and professionals.

Explore Projects Built with Sensorhumedad

Use Cirkit Designer to design, explore, and prototype these projects online. Some projects support real-time simulation. Click "Open Project" to start designing instantly!
ESP32-Based Smart Humidity and Temperature Controller with Wi-Fi Connectivity
Image of FINAL PROJECT: A project utilizing Sensorhumedad in a practical application
This circuit is designed to monitor and control temperature and humidity using an ESP32 microcontroller, which interfaces with a DHT11 sensor, an OLED display, and a two-channel relay. The ESP32 uses Blynk for IoT connectivity, allowing remote monitoring and control of a connected humidifier and a bulb (as a heater). Pushbuttons are included for manual control, and the system operates in either automatic or manual mode to maintain desired environmental conditions.
Cirkit Designer LogoOpen Project in Cirkit Designer
ESP32-Based Smart Irrigation and Environmental Monitoring System
Image of Skripsi: A project utilizing Sensorhumedad in a practical application
This is an automated environmental control system for plant growth that uses an ESP32 to monitor soil moisture and pH levels, and to manage irrigation through solenoid valves. The system aims to maintain optimal growing conditions by adjusting watering schedules based on sensor inputs.
Cirkit Designer LogoOpen Project in Cirkit Designer
ESP32-Based Plant Monitoring System with Wi-Fi Control and Relay Switching
Image of Plant Monitoring System: A project utilizing Sensorhumedad in a practical application
This circuit is designed for a plant monitoring system that measures soil moisture, ambient light, and temperature/humidity conditions. It uses an ESP32 microcontroller to read data from a DHT11 temperature and humidity sensor, a YL-69 soil moisture sensor, and a photosensitive sensor module. The ESP32 controls a relay module to power a water pump based on sensor inputs, and it interfaces with a Blynk application for remote monitoring and manual override via a physical button.
Cirkit Designer LogoOpen Project in Cirkit Designer
ESP32-Based Automated Plant Watering System with Environmental Monitoring
Image of Smart Greenhouse: A project utilizing Sensorhumedad in a practical application
This is an environmental monitoring and control system designed to read soil moisture and air temperature/humidity, and to actuate a fan and water pump for maintaining desired conditions. The ESP32 microcontroller serves as the central processing unit, interfacing with sensors, an OLED display, and controlling actuators via a 2-channel relay. Power is supplied by a 12V battery, with the ESP32 managing power distribution to the components.
Cirkit Designer LogoOpen Project in Cirkit Designer

Explore Projects Built with Sensorhumedad

Use Cirkit Designer to design, explore, and prototype these projects online. Some projects support real-time simulation. Click "Open Project" to start designing instantly!
Image of FINAL PROJECT: A project utilizing Sensorhumedad in a practical application
ESP32-Based Smart Humidity and Temperature Controller with Wi-Fi Connectivity
This circuit is designed to monitor and control temperature and humidity using an ESP32 microcontroller, which interfaces with a DHT11 sensor, an OLED display, and a two-channel relay. The ESP32 uses Blynk for IoT connectivity, allowing remote monitoring and control of a connected humidifier and a bulb (as a heater). Pushbuttons are included for manual control, and the system operates in either automatic or manual mode to maintain desired environmental conditions.
Cirkit Designer LogoOpen Project in Cirkit Designer
Image of Skripsi: A project utilizing Sensorhumedad in a practical application
ESP32-Based Smart Irrigation and Environmental Monitoring System
This is an automated environmental control system for plant growth that uses an ESP32 to monitor soil moisture and pH levels, and to manage irrigation through solenoid valves. The system aims to maintain optimal growing conditions by adjusting watering schedules based on sensor inputs.
Cirkit Designer LogoOpen Project in Cirkit Designer
Image of Plant Monitoring System: A project utilizing Sensorhumedad in a practical application
ESP32-Based Plant Monitoring System with Wi-Fi Control and Relay Switching
This circuit is designed for a plant monitoring system that measures soil moisture, ambient light, and temperature/humidity conditions. It uses an ESP32 microcontroller to read data from a DHT11 temperature and humidity sensor, a YL-69 soil moisture sensor, and a photosensitive sensor module. The ESP32 controls a relay module to power a water pump based on sensor inputs, and it interfaces with a Blynk application for remote monitoring and manual override via a physical button.
Cirkit Designer LogoOpen Project in Cirkit Designer
Image of Smart Greenhouse: A project utilizing Sensorhumedad in a practical application
ESP32-Based Automated Plant Watering System with Environmental Monitoring
This is an environmental monitoring and control system designed to read soil moisture and air temperature/humidity, and to actuate a fan and water pump for maintaining desired conditions. The ESP32 microcontroller serves as the central processing unit, interfacing with sensors, an OLED display, and controlling actuators via a 2-channel relay. Power is supplied by a 12V battery, with the ESP32 managing power distribution to the components.
Cirkit Designer LogoOpen Project in Cirkit Designer

Technical Specifications

The Sensorhumedad is designed to provide accurate and stable humidity readings. Below are its key technical details:

Parameter Value
Operating Voltage 3.3V - 5V
Operating Current < 20 mA
Humidity Range 20% - 90% RH (Relative Humidity)
Accuracy ±5% RH
Response Time ≤ 5 seconds
Operating Temperature -20°C to 60°C
Output Signal Analog Voltage

Pin Configuration and Descriptions

The Sensorhumedad has three pins, as described in the table below:

Pin Name Description
1 VCC Power supply pin (3.3V - 5V)
2 GND Ground connection
3 OUT Analog output pin that provides the humidity reading

Usage Instructions

To use the Sensorhumedad in a circuit, follow these steps:
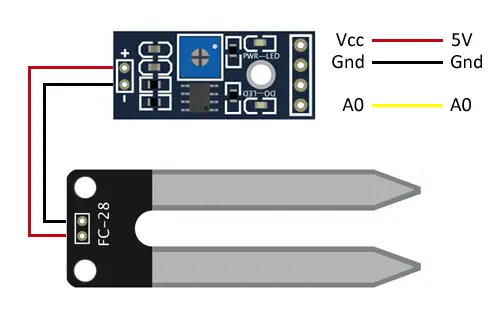
  1. Wiring the Sensor:

    • Connect the VCC pin of the sensor to the 5V pin on the Arduino UNO.
    • Connect the GND pin of the sensor to the GND pin on the Arduino UNO.
    • Connect the OUT pin of the sensor to an analog input pin on the Arduino UNO (e.g., A0).
  2. Arduino Code Example: Below is an example code snippet to read humidity data from the Sensorhumedad using an Arduino UNO:

    // Define the analog pin connected to the sensor's OUT pin
    const int sensorPin = A0;
    
    void setup() {
      Serial.begin(9600); // Initialize serial communication at 9600 baud
    }
    
    void loop() {
      int sensorValue = analogRead(sensorPin); // Read the analog value from the sensor
      
      // Convert the analog value to a percentage (assuming 0-1023 maps to 0-100%)
      float humidity = (sensorValue / 1023.0) * 100.0;
    
      // Print the humidity value to the Serial Monitor
      Serial.print("Humidity: ");
      Serial.print(humidity);
      Serial.println("%");
    
      delay(1000); // Wait for 1 second before taking the next reading
    }
    

    Note: The conversion formula in the code assumes a linear relationship between the sensor's output and humidity. Refer to the sensor's datasheet for more precise calibration if needed.

  3. Important Considerations:

    • Ensure the sensor is not exposed to water or condensation, as this may damage the component.
    • Avoid placing the sensor in environments with extreme temperatures or humidity levels beyond its specified range.
    • For long-term use, consider adding a protective enclosure to shield the sensor from dust and debris.

Troubleshooting and FAQs

Common Issues and Solutions

  1. No Output or Incorrect Readings:

    • Cause: Loose or incorrect wiring.
    • Solution: Double-check all connections and ensure the sensor is powered correctly.
  2. Fluctuating Humidity Readings:

    • Cause: Electrical noise or unstable power supply.
    • Solution: Use a decoupling capacitor (e.g., 0.1 µF) between the VCC and GND pins to stabilize the power supply.
  3. Sensor Not Responding:

    • Cause: Sensor may be damaged or operating outside its specified range.
    • Solution: Verify the operating conditions and replace the sensor if necessary.

FAQs

  • Q: Can the Sensorhumedad measure temperature as well?
    A: No, the Sensorhumedad is designed specifically for humidity measurement. For temperature and humidity sensing, consider using a combined sensor like the DHT11 or DHT22.

  • Q: How can I improve the accuracy of the sensor?
    A: Perform calibration using a reference humidity source and adjust the conversion formula in your code accordingly.

  • Q: Is the Sensorhumedad compatible with other microcontrollers?
    A: Yes, the Sensorhumedad can be used with other microcontrollers that support analog input, such as ESP32, Raspberry Pi (with an ADC), and STM32.

By following this documentation, you can effectively integrate the Sensorhumedad into your projects and ensure reliable humidity measurements.