Cirkit Designer
Your all-in-one circuit design IDE
Home /
Component Documentation
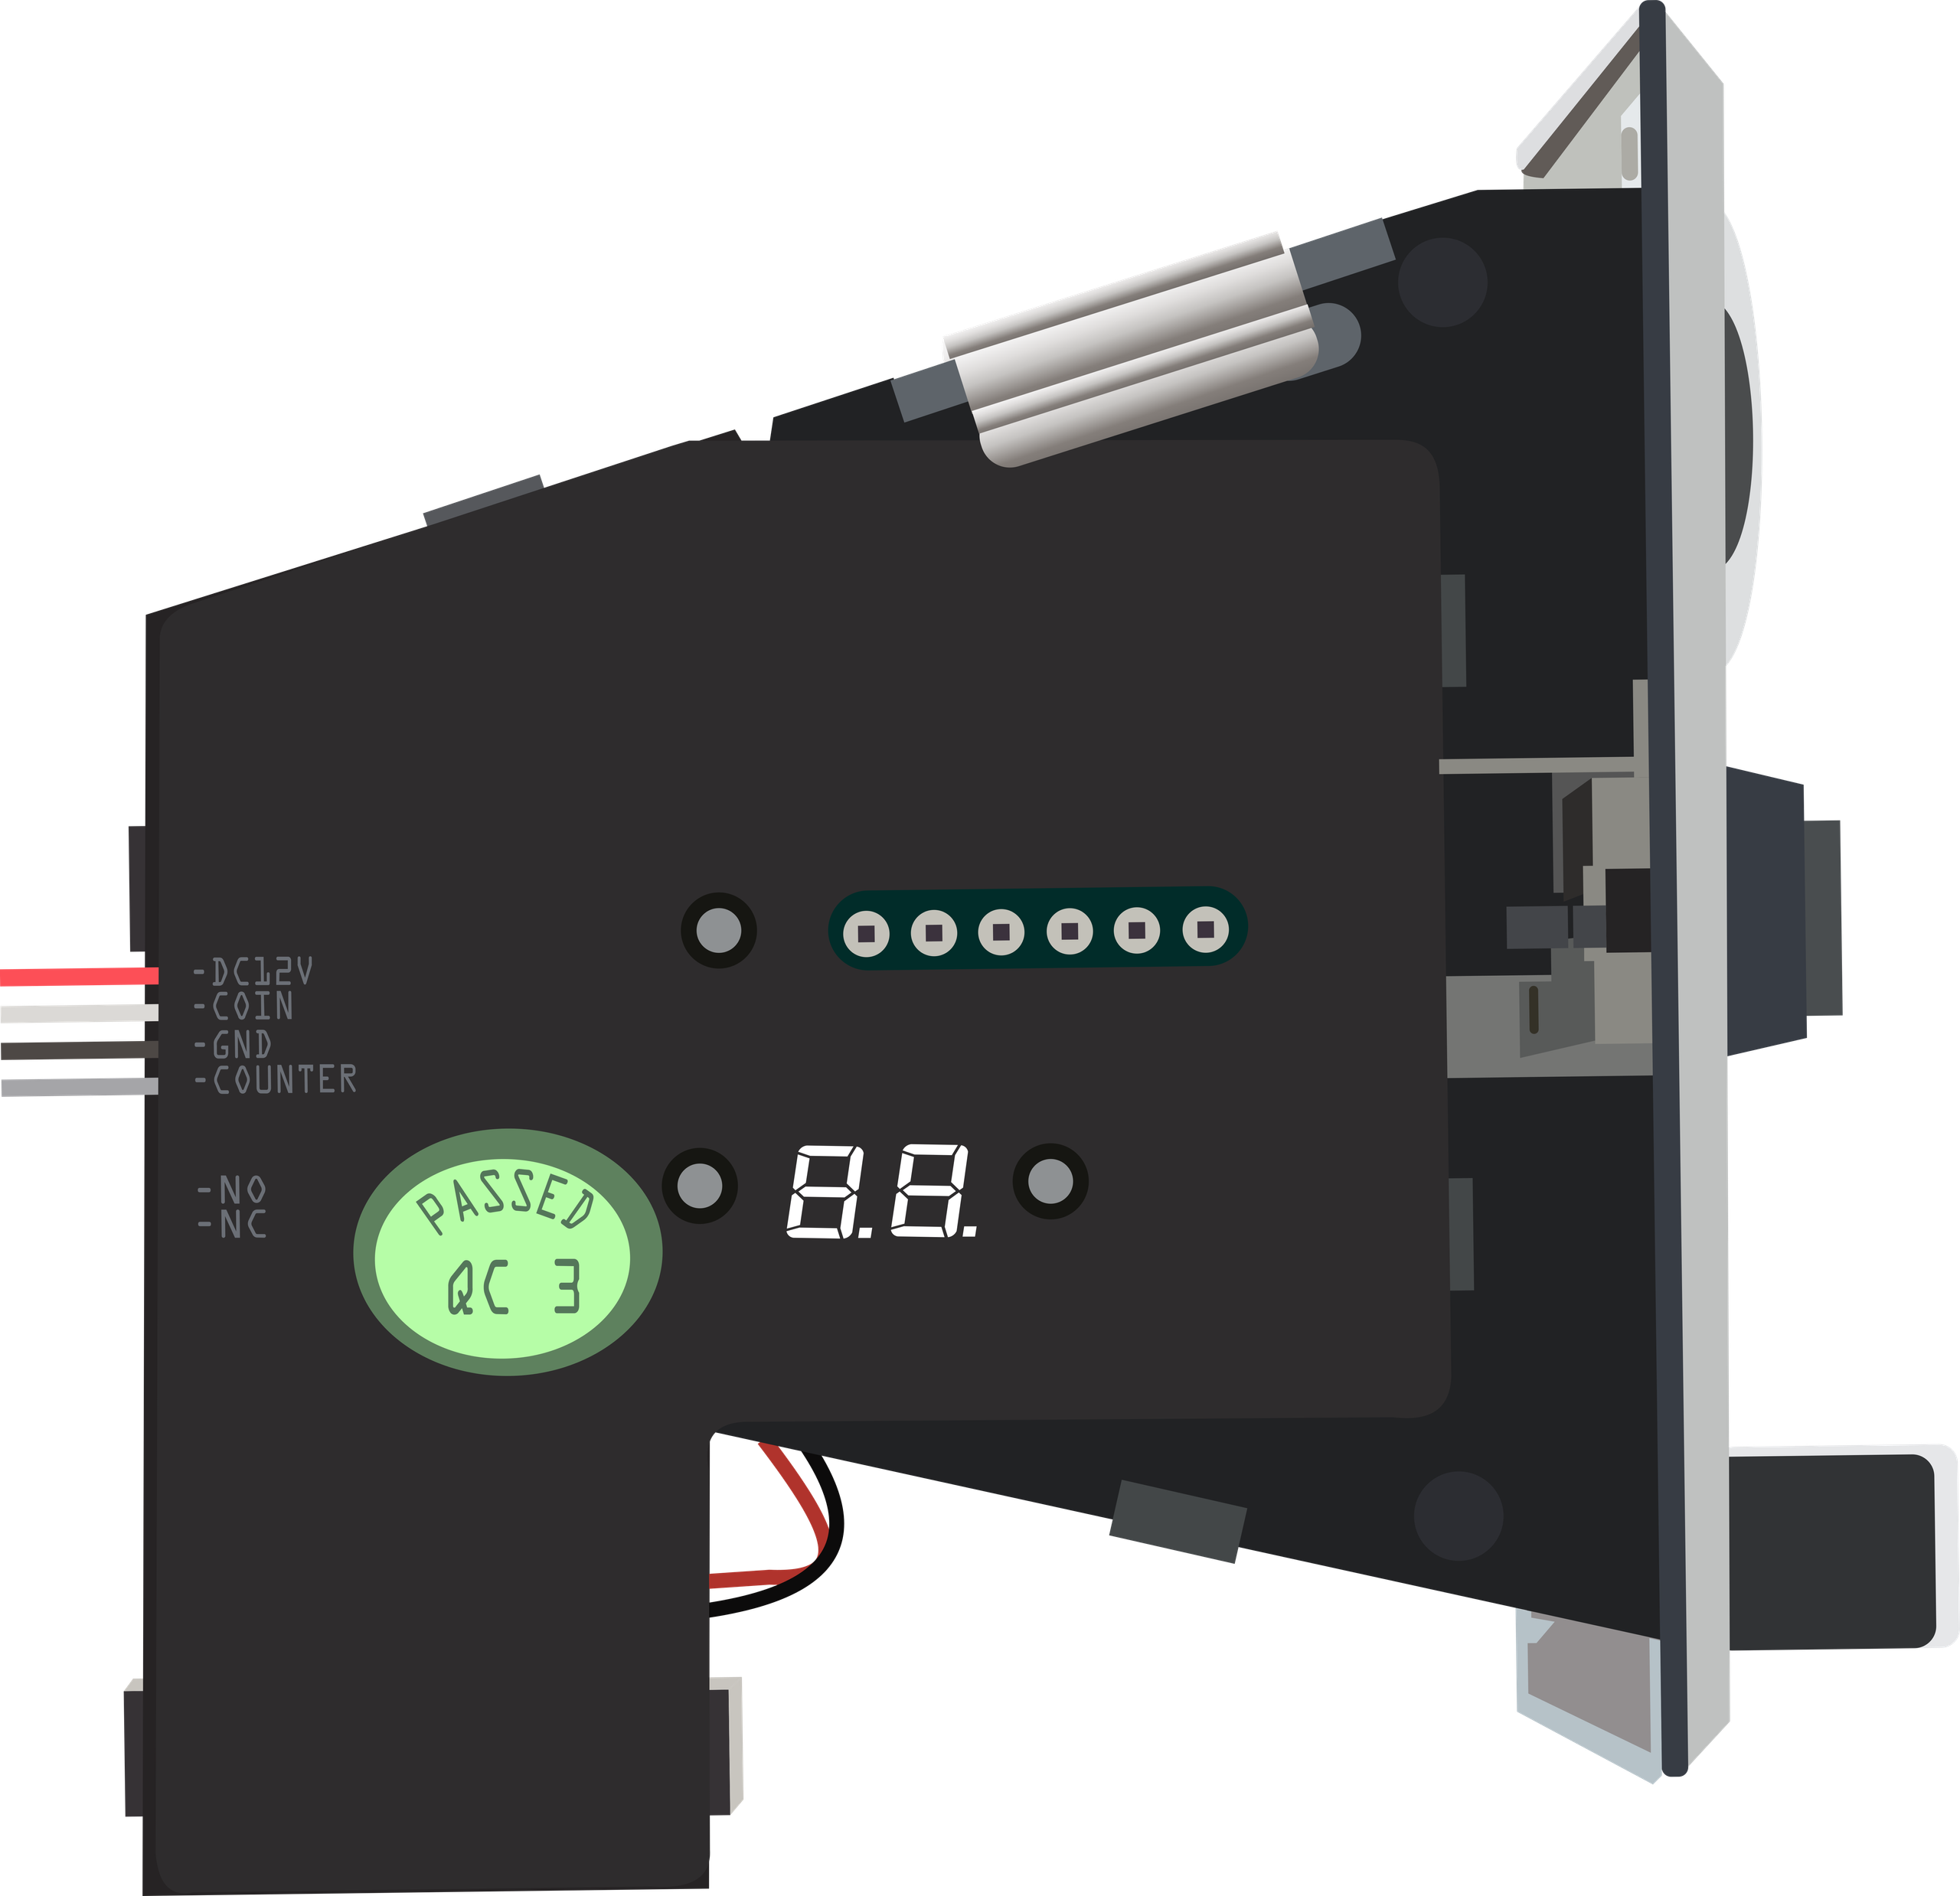
How to Use Multi Coin Acceptor: Examples, Pinouts, and Specs
Introduction
The Multi Coin Acceptor is a versatile device designed to accept and validate multiple types of coins. It is commonly used in vending machines, arcade games, and other automated payment systems. This component ensures accurate coin recognition and provides a reliable way to handle various denominations, making it an essential part of many automated systems.
Explore Projects Built with Multi Coin Acceptor
Raspberry Pi 4B-based Payment Kiosk with Coin and Bill Acceptors
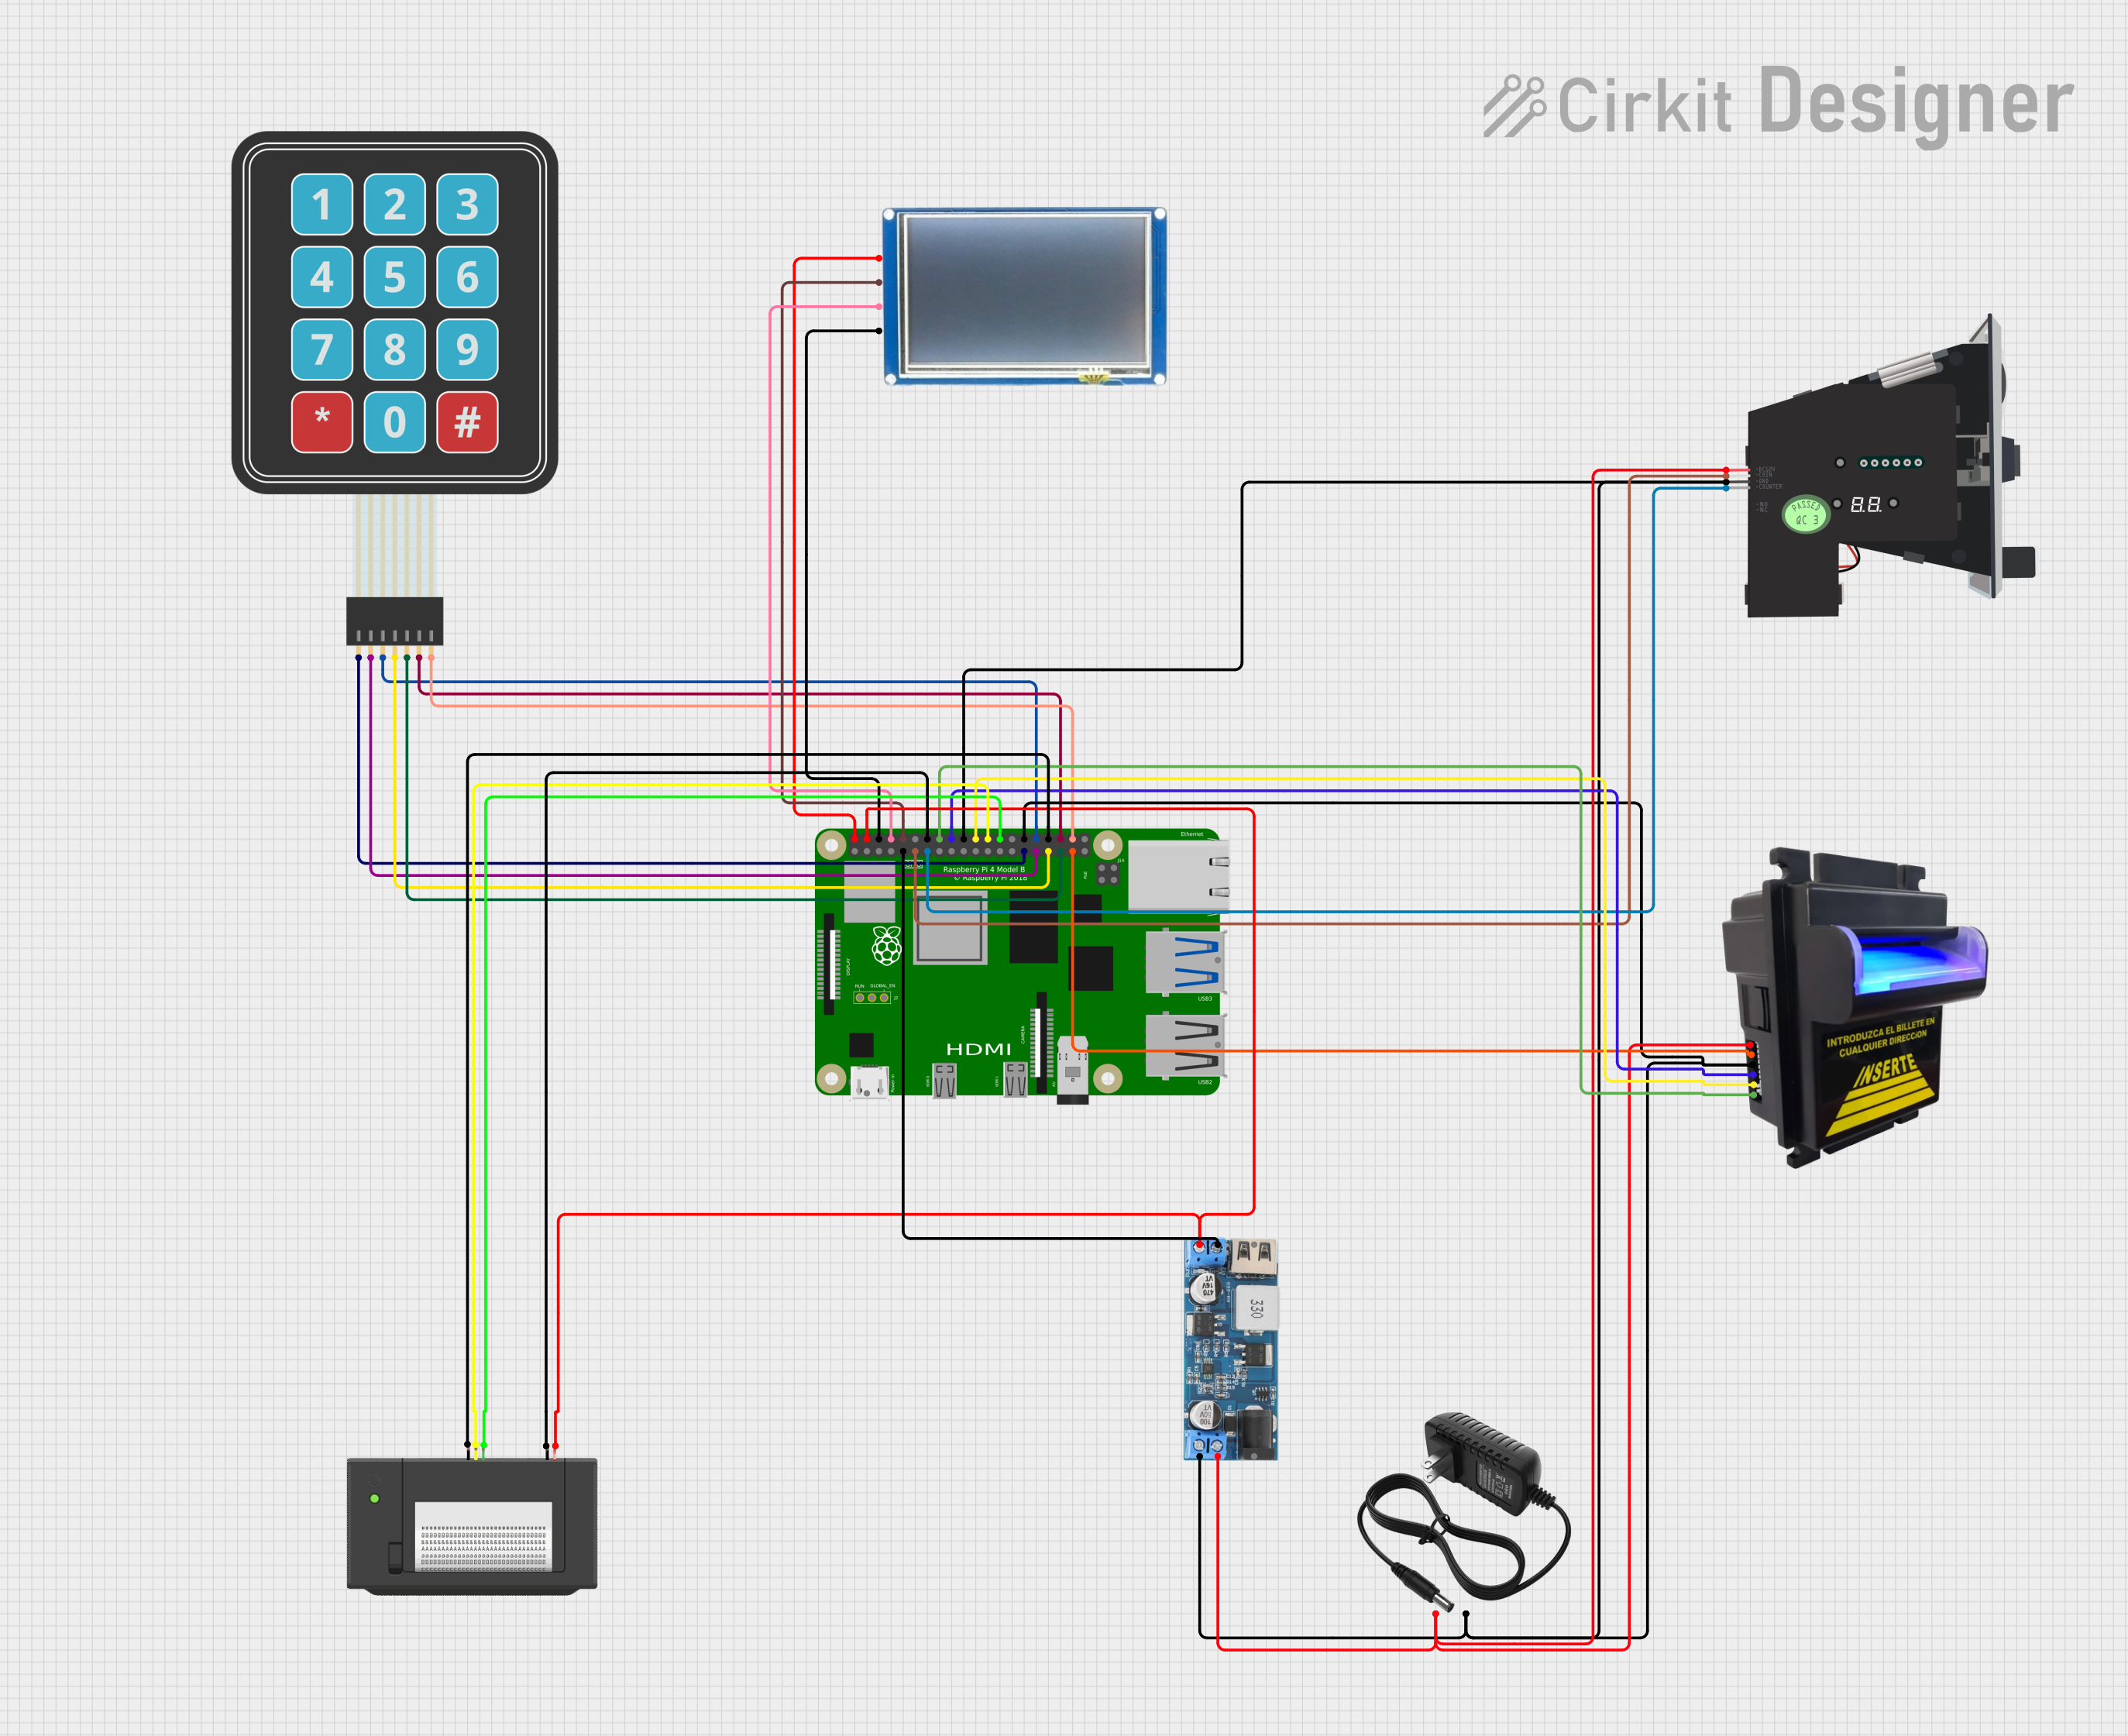
This circuit features a Raspberry Pi 4B as the central controller, interfaced with a variety of peripherals for a payment and display system. It includes a bill acceptor and multi coin acceptor for monetary input, a thermal printer for receipts, and a touch display for user interaction. The circuit also incorporates a 12V to 5V step-down converter to power the 5V components and a membrane matrix keypad for additional input options.
ESP32-Based Coin and Bill Acceptor with TFT Display and Thermal Printer
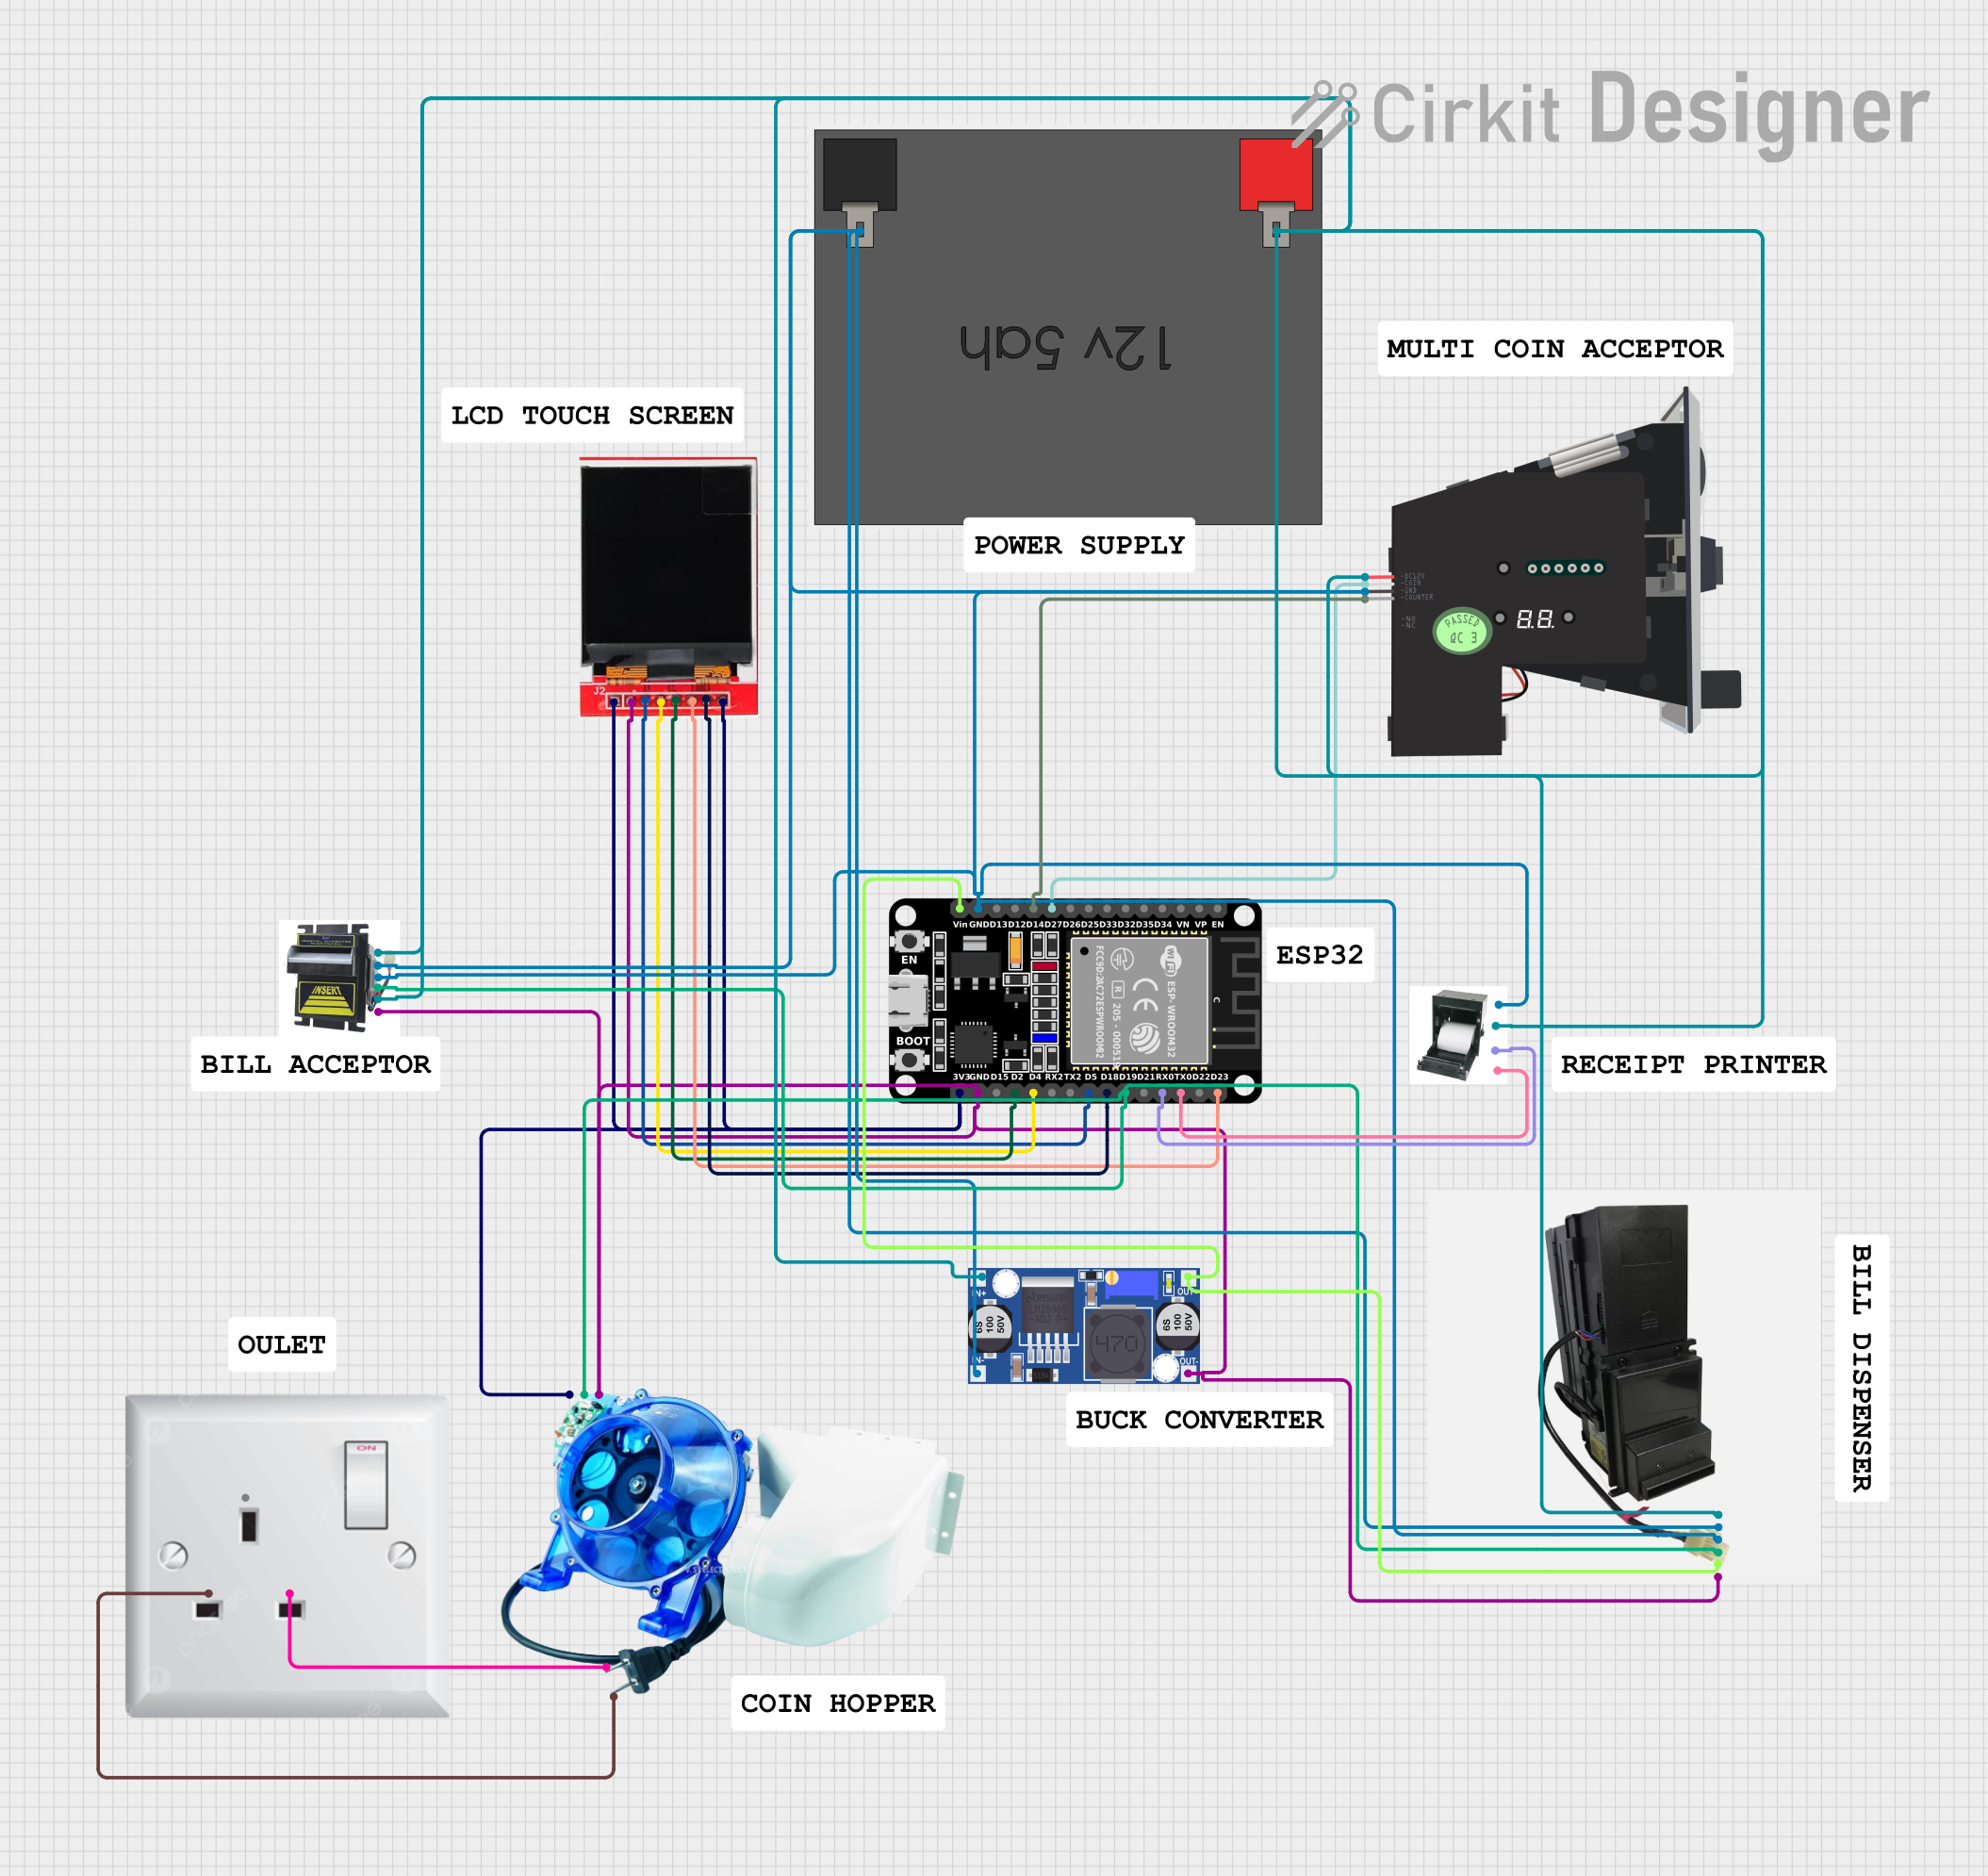
This circuit is a vending machine control system that integrates an ESP32 microcontroller to manage various peripherals including a multi-coin acceptor, coin hopper, bill dispenser, money acceptor, thermal printer, and a TFT LCD display. The system is powered by a 12V battery and a buck converter to step down the voltage for the ESP32 and other components, enabling the machine to accept and dispense coins and bills, print receipts, and display information on the screen.
ESP32-Based Coin and Bill Acceptor with TFT Display and Thermal Printer

This circuit is a vending machine controller that uses an ESP32 microcontroller to interface with various peripherals including a multi-coin acceptor, coin hopper, bill dispenser, and a thermal printer. The ESP32 also drives a TFT LCD display for user interaction, and the entire system is powered by a 12V battery with a buck converter to step down the voltage for the ESP32 and other components.
Arduino UNO Coin Counting Machine with IR Sensors and 16x2 I2C LCD Display
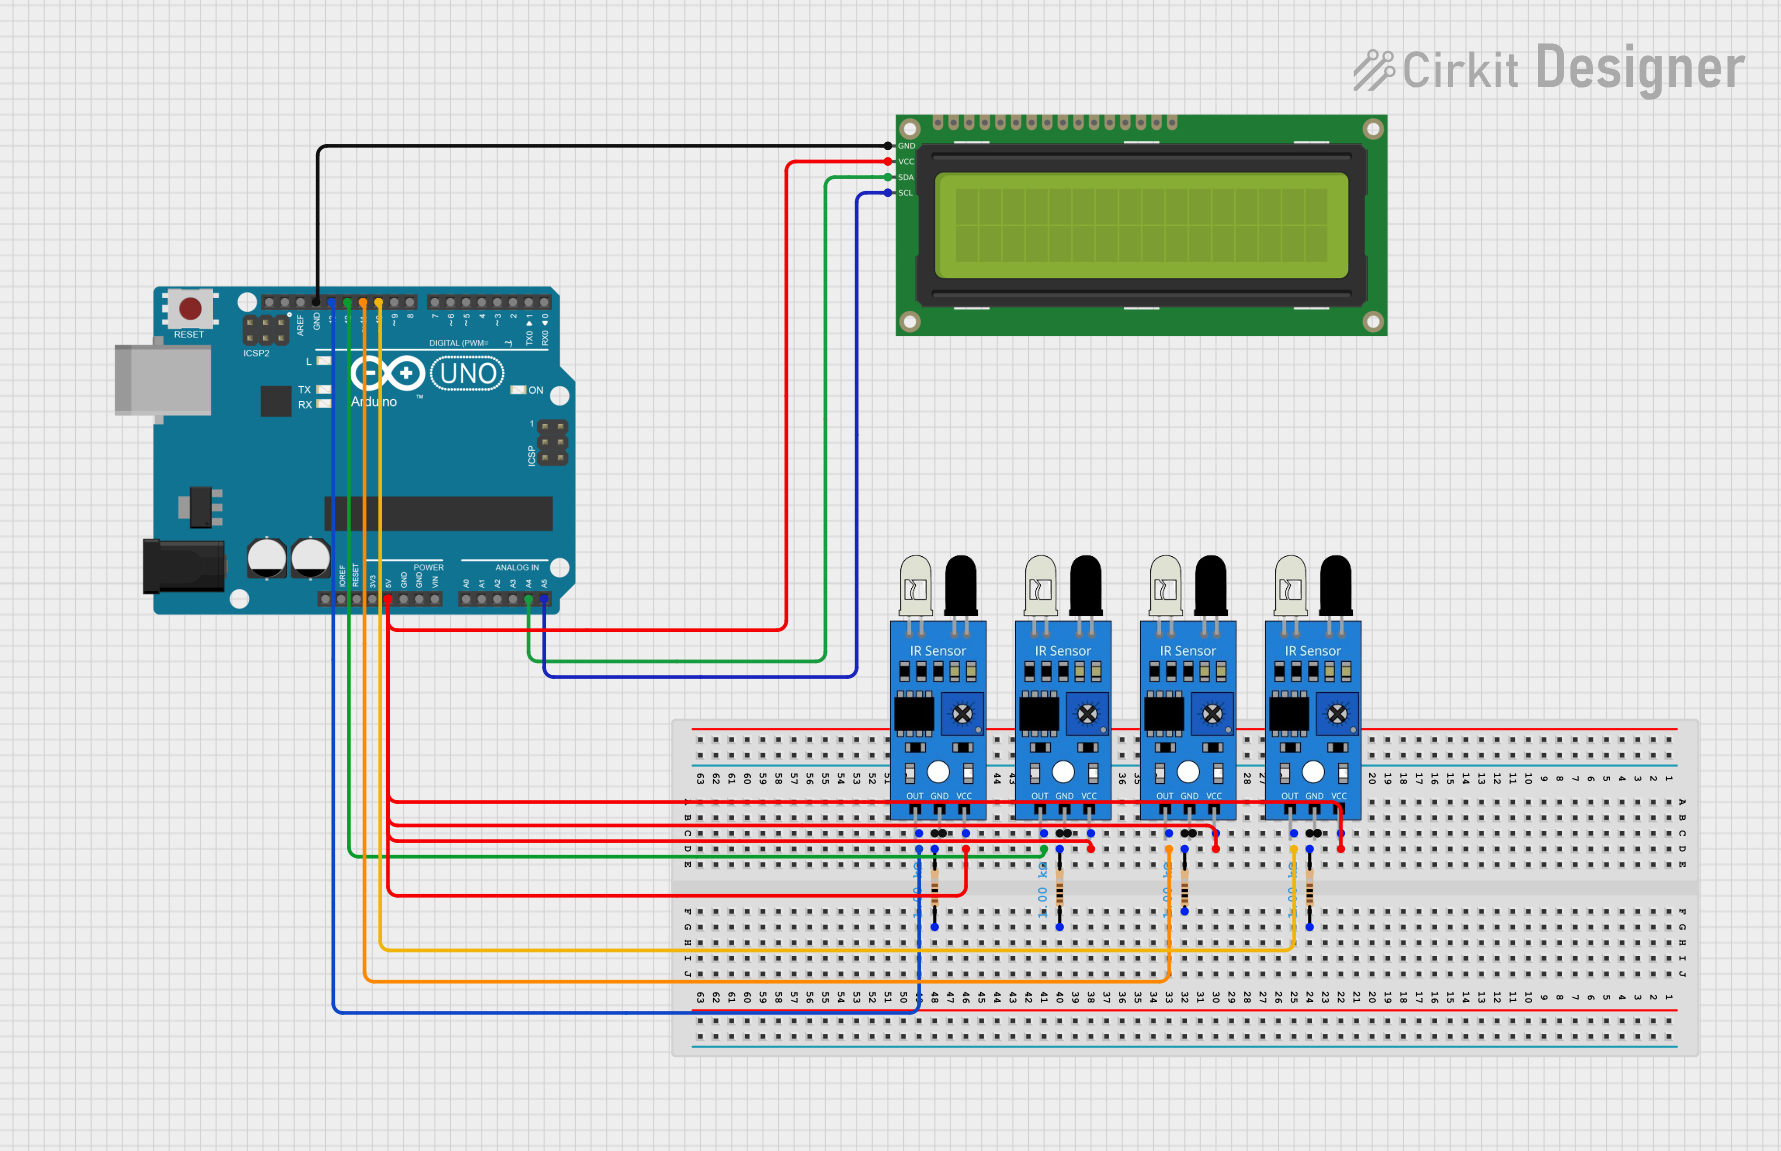
This circuit is a coin counting machine that uses four IR sensors to detect different coin denominations and displays the count on a 16x2 I2C LCD. The Arduino UNO microcontroller reads the sensor inputs and updates the LCD with the current count of 1 peso, 5 peso, 10 peso, and 20 peso coins.
Explore Projects Built with Multi Coin Acceptor
Raspberry Pi 4B-based Payment Kiosk with Coin and Bill Acceptors
This circuit features a Raspberry Pi 4B as the central controller, interfaced with a variety of peripherals for a payment and display system. It includes a bill acceptor and multi coin acceptor for monetary input, a thermal printer for receipts, and a touch display for user interaction. The circuit also incorporates a 12V to 5V step-down converter to power the 5V components and a membrane matrix keypad for additional input options.
ESP32-Based Coin and Bill Acceptor with TFT Display and Thermal Printer
This circuit is a vending machine control system that integrates an ESP32 microcontroller to manage various peripherals including a multi-coin acceptor, coin hopper, bill dispenser, money acceptor, thermal printer, and a TFT LCD display. The system is powered by a 12V battery and a buck converter to step down the voltage for the ESP32 and other components, enabling the machine to accept and dispense coins and bills, print receipts, and display information on the screen.
ESP32-Based Coin and Bill Acceptor with TFT Display and Thermal Printer
This circuit is a vending machine controller that uses an ESP32 microcontroller to interface with various peripherals including a multi-coin acceptor, coin hopper, bill dispenser, and a thermal printer. The ESP32 also drives a TFT LCD display for user interaction, and the entire system is powered by a 12V battery with a buck converter to step down the voltage for the ESP32 and other components.
Arduino UNO Coin Counting Machine with IR Sensors and 16x2 I2C LCD Display
This circuit is a coin counting machine that uses four IR sensors to detect different coin denominations and displays the count on a 16x2 I2C LCD. The Arduino UNO microcontroller reads the sensor inputs and updates the LCD with the current count of 1 peso, 5 peso, 10 peso, and 20 peso coins.
Technical Specifications
Key Technical Details
| Parameter | Value |
|---|---|
| Operating Voltage | 12V DC |
| Operating Current | 65mA (standby), 500mA (max) |
| Coin Types | Up to 6 different coins |
| Coin Diameter | 15mm to 32mm |
| Coin Thickness | 1.2mm to 3.8mm |
| Output Signal | Pulse (TTL level) |
| Interface | Serial, Pulse, Parallel |
| Response Time | < 0.3 seconds |
| Operating Temperature | -10°C to 50°C |
Pin Configuration and Descriptions
| Pin Number | Pin Name | Description |
|---|---|---|
| 1 | GND | Ground |
| 2 | +12V | Power Supply (12V DC) |
| 3 | COIN | Coin Signal Output (Pulse) |
| 4 | INHIBIT | Inhibit Signal (Active Low) |
| 5 | COUNT | Coin Count Signal (Optional) |
| 6 | SET | Coin Setting Mode (Active Low) |
Usage Instructions
How to Use the Component in a Circuit
- Power Supply: Connect the +12V pin to a 12V DC power supply and the GND pin to the ground.
- Coin Signal Output: Connect the COIN pin to a digital input pin on your microcontroller (e.g., Arduino).
- Inhibit Signal: Optionally, connect the INHIBIT pin to control the acceptor's enable/disable state.
- Coin Count Signal: Optionally, connect the COUNT pin to monitor the number of coins accepted.
- Coin Setting Mode: Use the SET pin to configure the types of coins the acceptor should recognize.
Important Considerations and Best Practices
- Power Supply: Ensure a stable 12V DC power supply to avoid malfunction.
- Debouncing: Implement debouncing in your code to handle the pulse signal correctly.
- Coin Calibration: Follow the manufacturer's instructions to calibrate the acceptor for different coin types.
- Environmental Conditions: Operate within the specified temperature range to ensure reliable performance.
Example Code for Arduino UNO
// Multi Coin Acceptor Example Code for Arduino UNO

const int coinPin = 2; // Pin connected to COIN signal
volatile int coinCount = 0;

void setup() {
  pinMode(coinPin, INPUT);
  attachInterrupt(digitalPinToInterrupt(coinPin), coinInserted, RISING);
  Serial.begin(9600);
}

void loop() {
  // Print the number of coins inserted
  Serial.print("Coins Inserted: ");
  Serial.println(coinCount);
  delay(1000); // Update every second
}

void coinInserted() {
  coinCount++; // Increment coin count on each pulse
}
Troubleshooting and FAQs
Common Issues Users Might Face
No Coin Detection:
- Solution: Check the power supply and ensure the acceptor is receiving 12V DC. Verify the connections to the microcontroller.
False Coin Detection:
- Solution: Ensure proper calibration of the acceptor for the specific coin types. Implement debouncing in the code to filter out noise.
Inconsistent Coin Counting:
- Solution: Verify the coin signal connection and ensure the microcontroller's interrupt pin is correctly configured.
Solutions and Tips for Troubleshooting
- Check Connections: Ensure all connections are secure and correctly wired.
- Power Supply: Use a regulated 12V DC power supply to avoid voltage fluctuations.
- Calibration: Regularly calibrate the acceptor to maintain accuracy.
- Code Debugging: Use serial print statements to debug and monitor the coin signal in real-time.
By following this documentation, users can effectively integrate and utilize the Multi Coin Acceptor in their projects, ensuring reliable and accurate coin validation.