Cirkit Designer
Your all-in-one circuit design IDE
Home /
Component Documentation
How to Use PWM fan: Examples, Pinouts, and Specs
Introduction
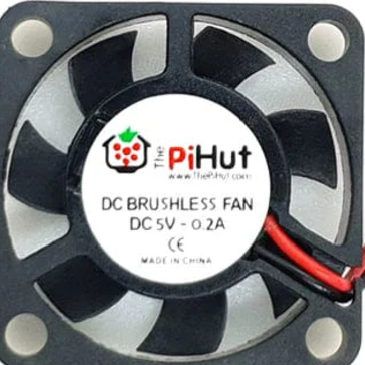
The HighPi Pro 5V Fan - Software-Controlled by PiHut is a PWM (Pulse Width Modulation) fan designed for precise speed control. By varying the duty cycle of the power signal, this fan provides efficient cooling with reduced noise, making it ideal for applications where thermal management and noise reduction are critical.
Explore Projects Built with PWM fan
ESP32-Based Wi-Fi Controlled PWM Fan with Temperature Regulation
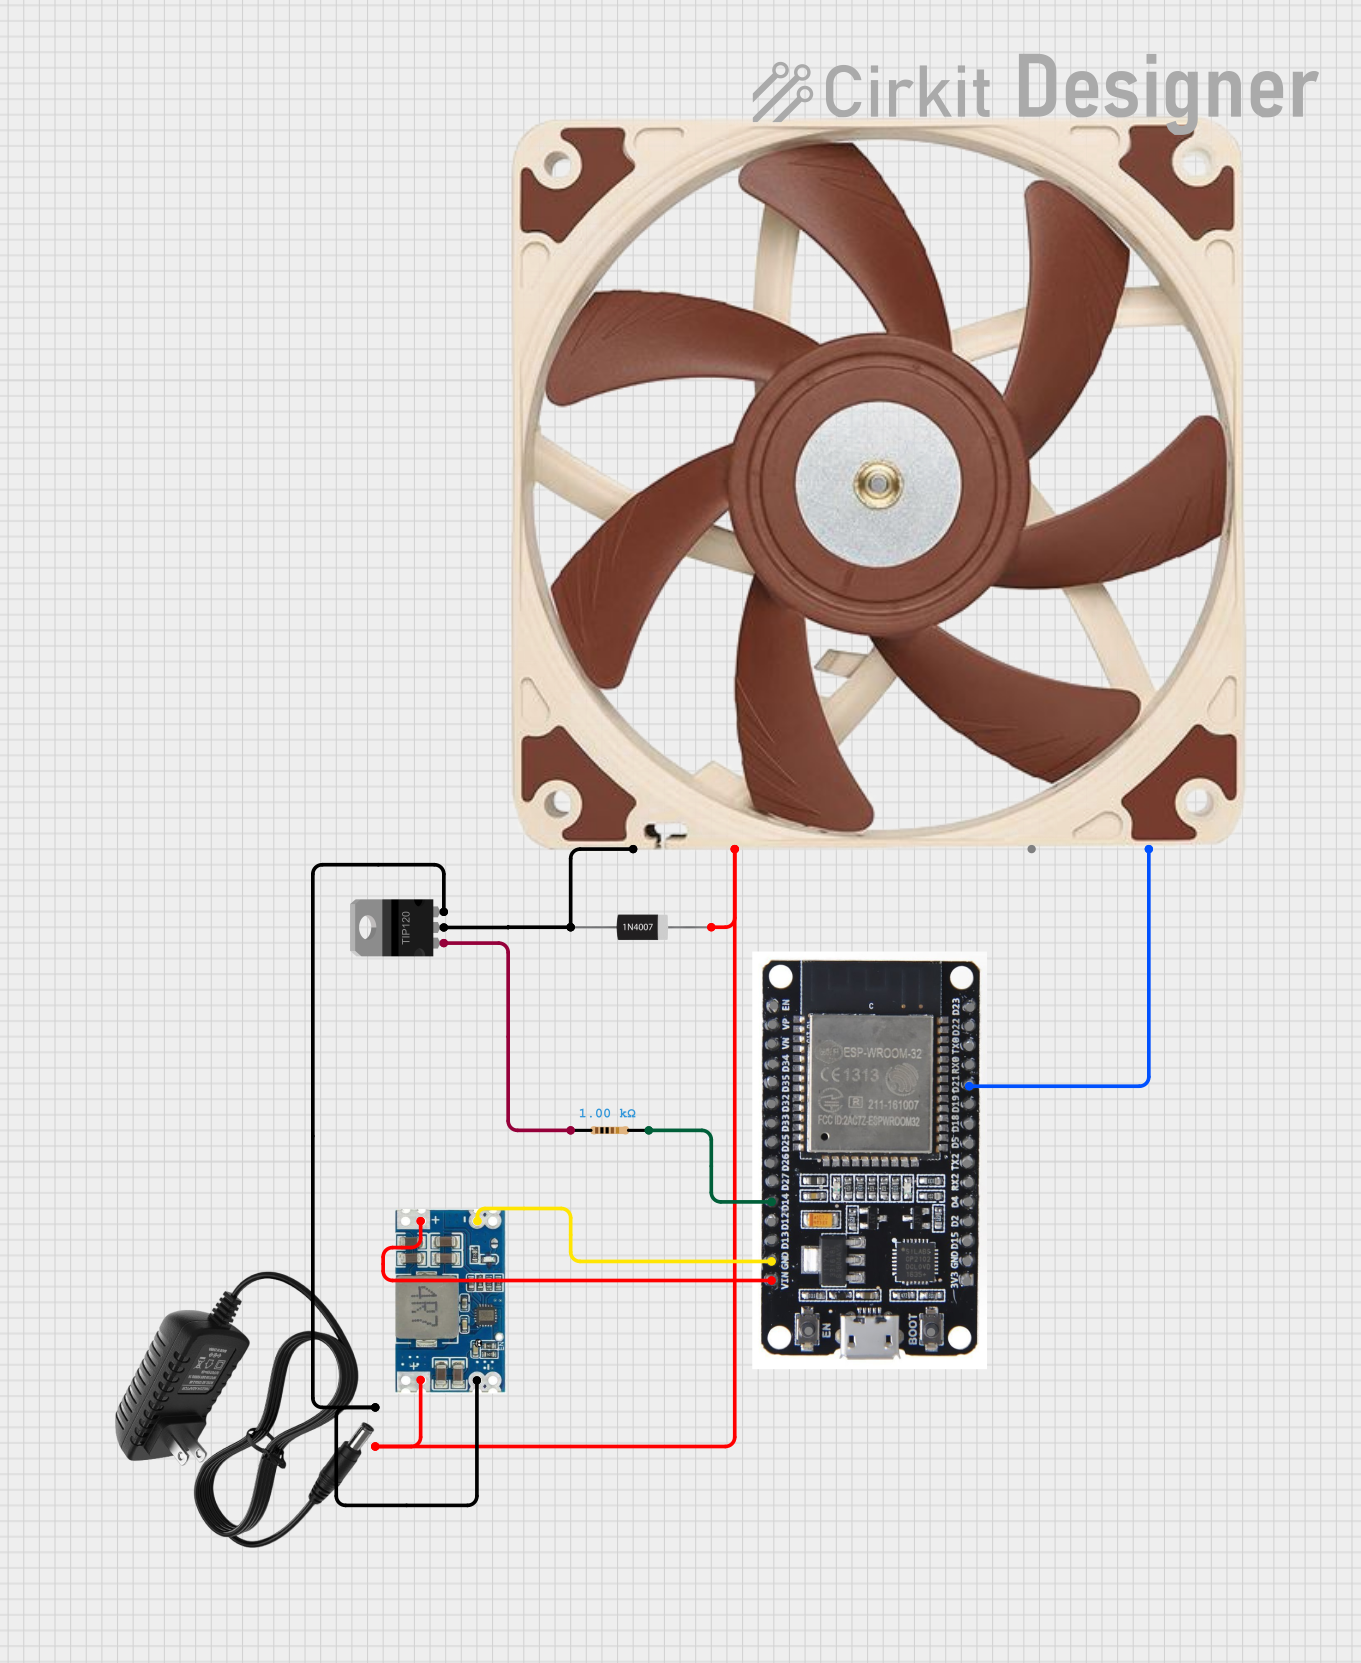
This circuit controls a 12V PWM fan using an ESP32 microcontroller. The ESP32 regulates the fan speed via a TIP120 transistor and a 1kΩ resistor, with power supplied by a 12V power source and stepped down to 5V for the ESP32 using a Mini 560 step-down converter.
Arduino UNO Controlled Dual 12V PWM Fan System with Speed Adjustment
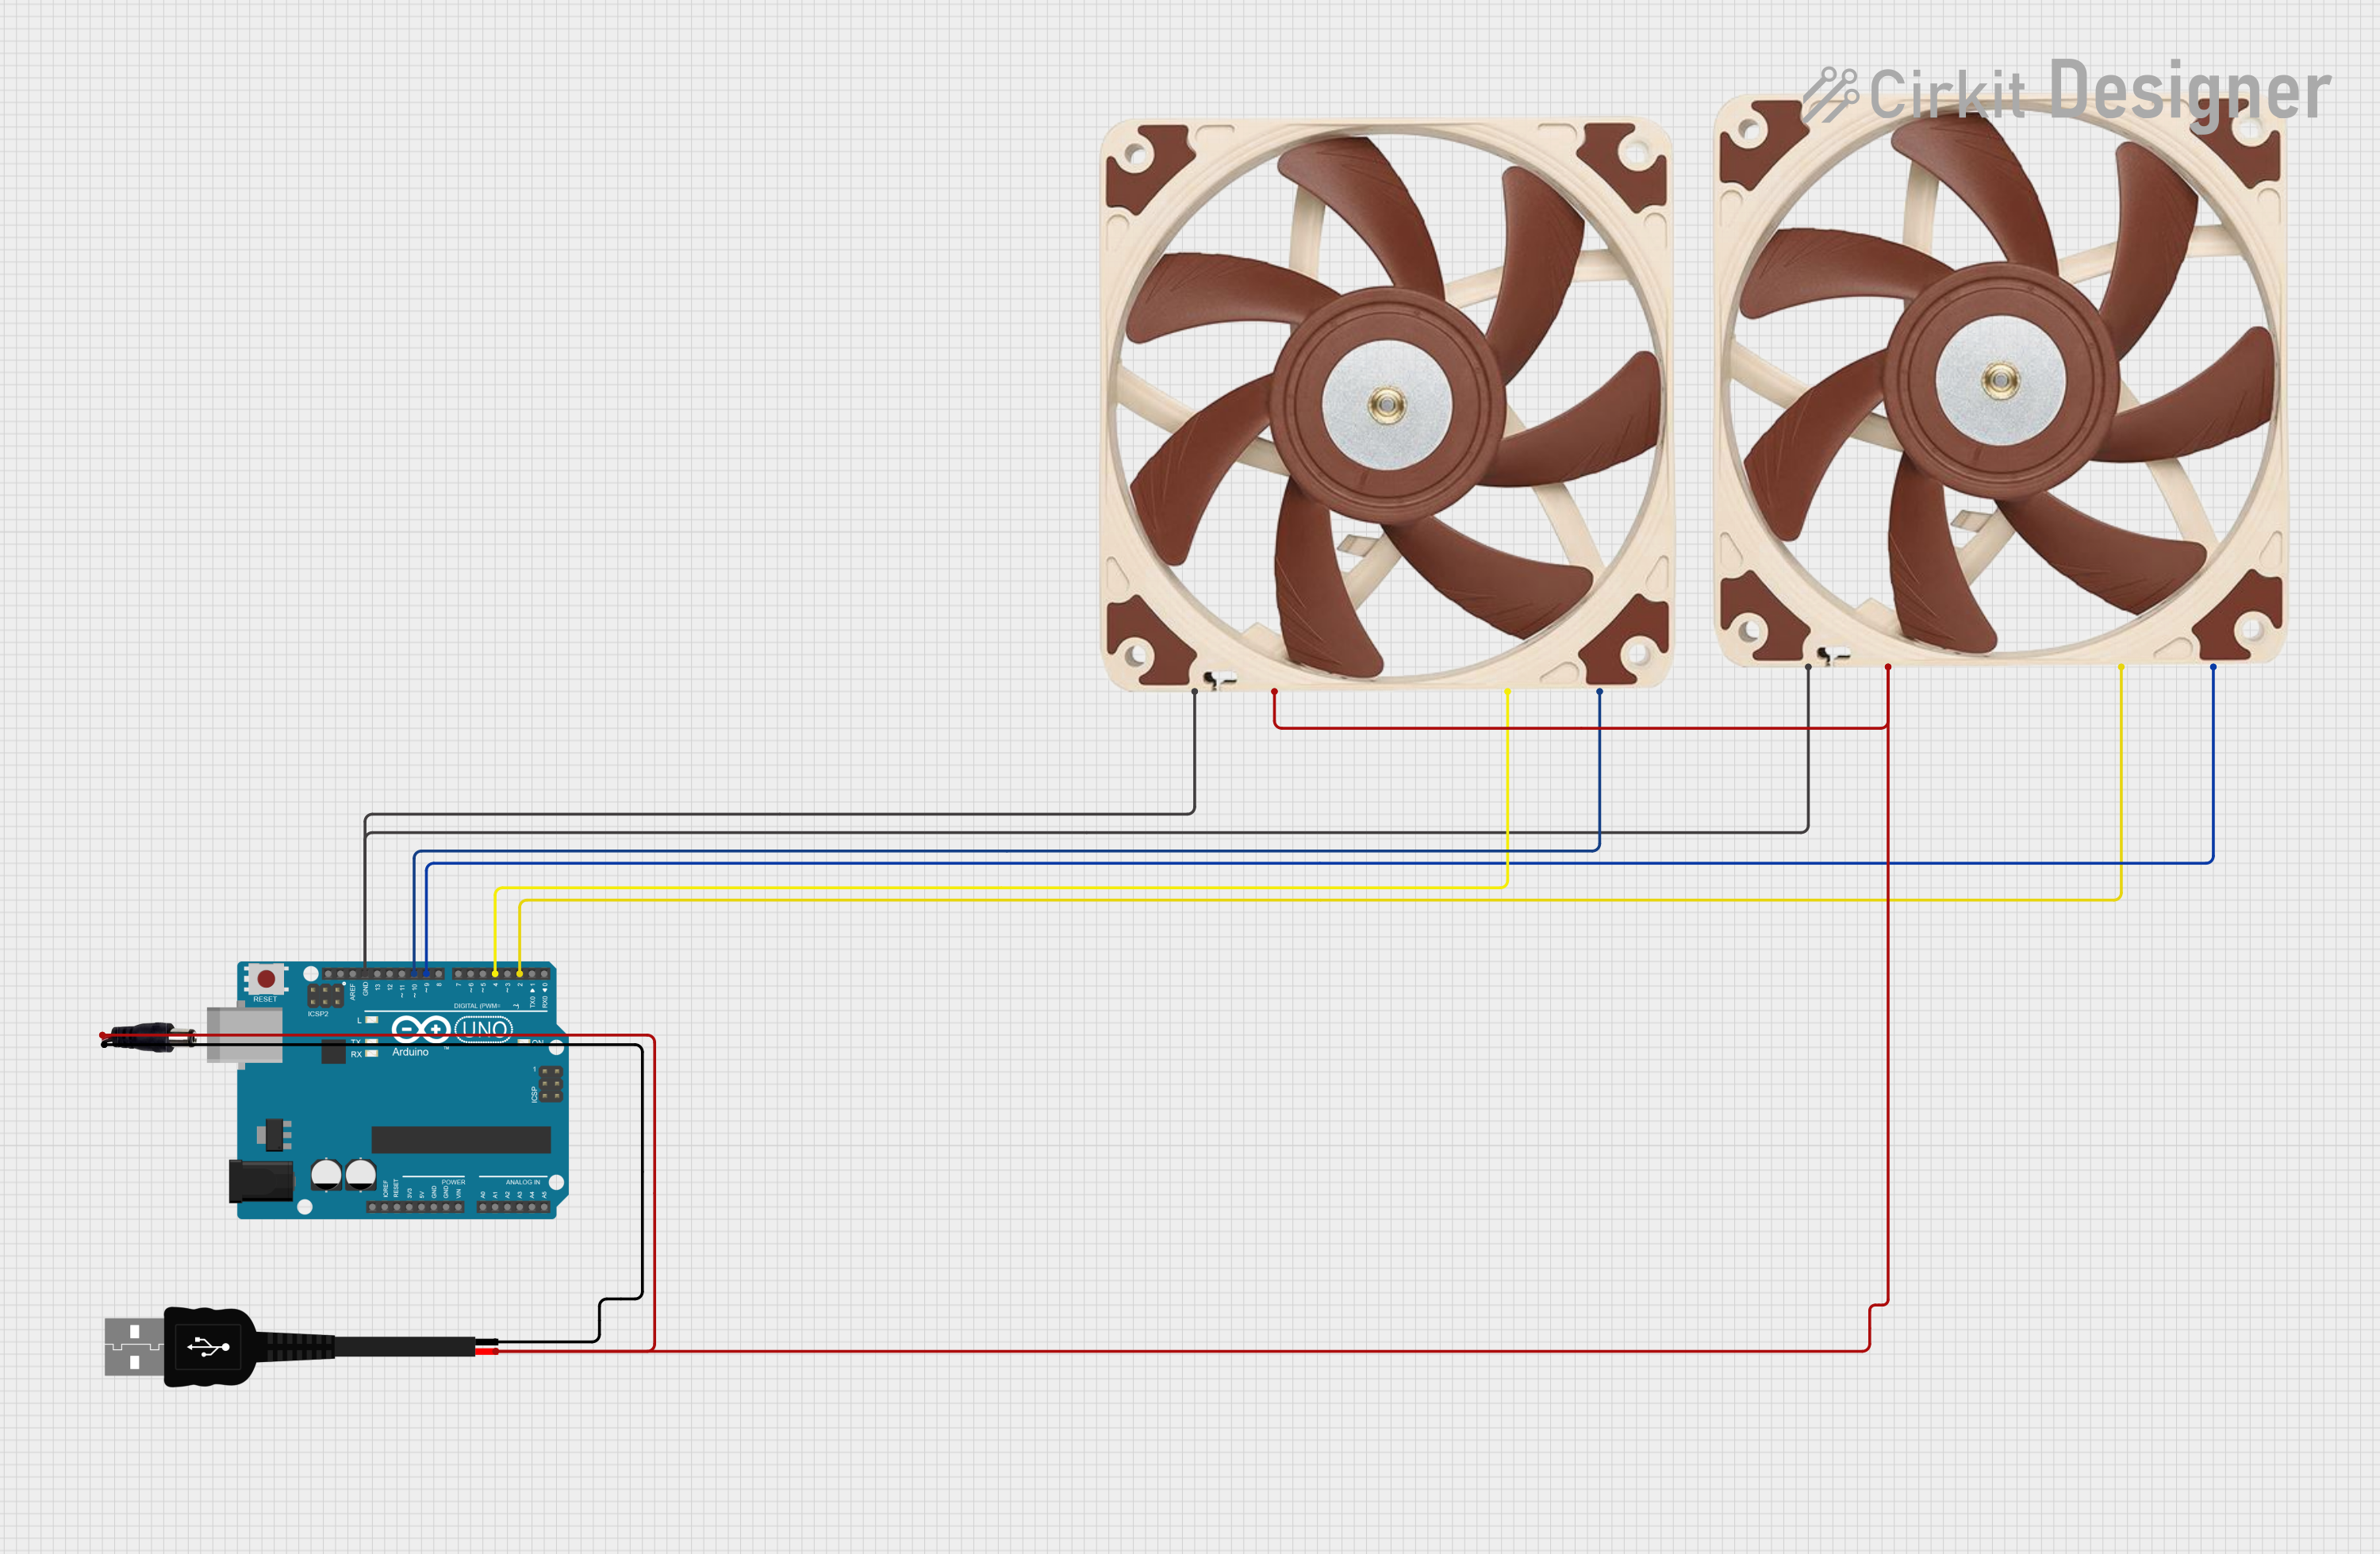
This circuit uses an Arduino UNO to control two 12V PWM fans. The Arduino reads the tachometer signals from the fans and adjusts their speed using PWM signals, incrementing the speed from 0% to 100% in 10% steps with a 10-second delay between each increment. Power is supplied through a power jack and a USB connection.
12V PWM-Controlled Water Pump System
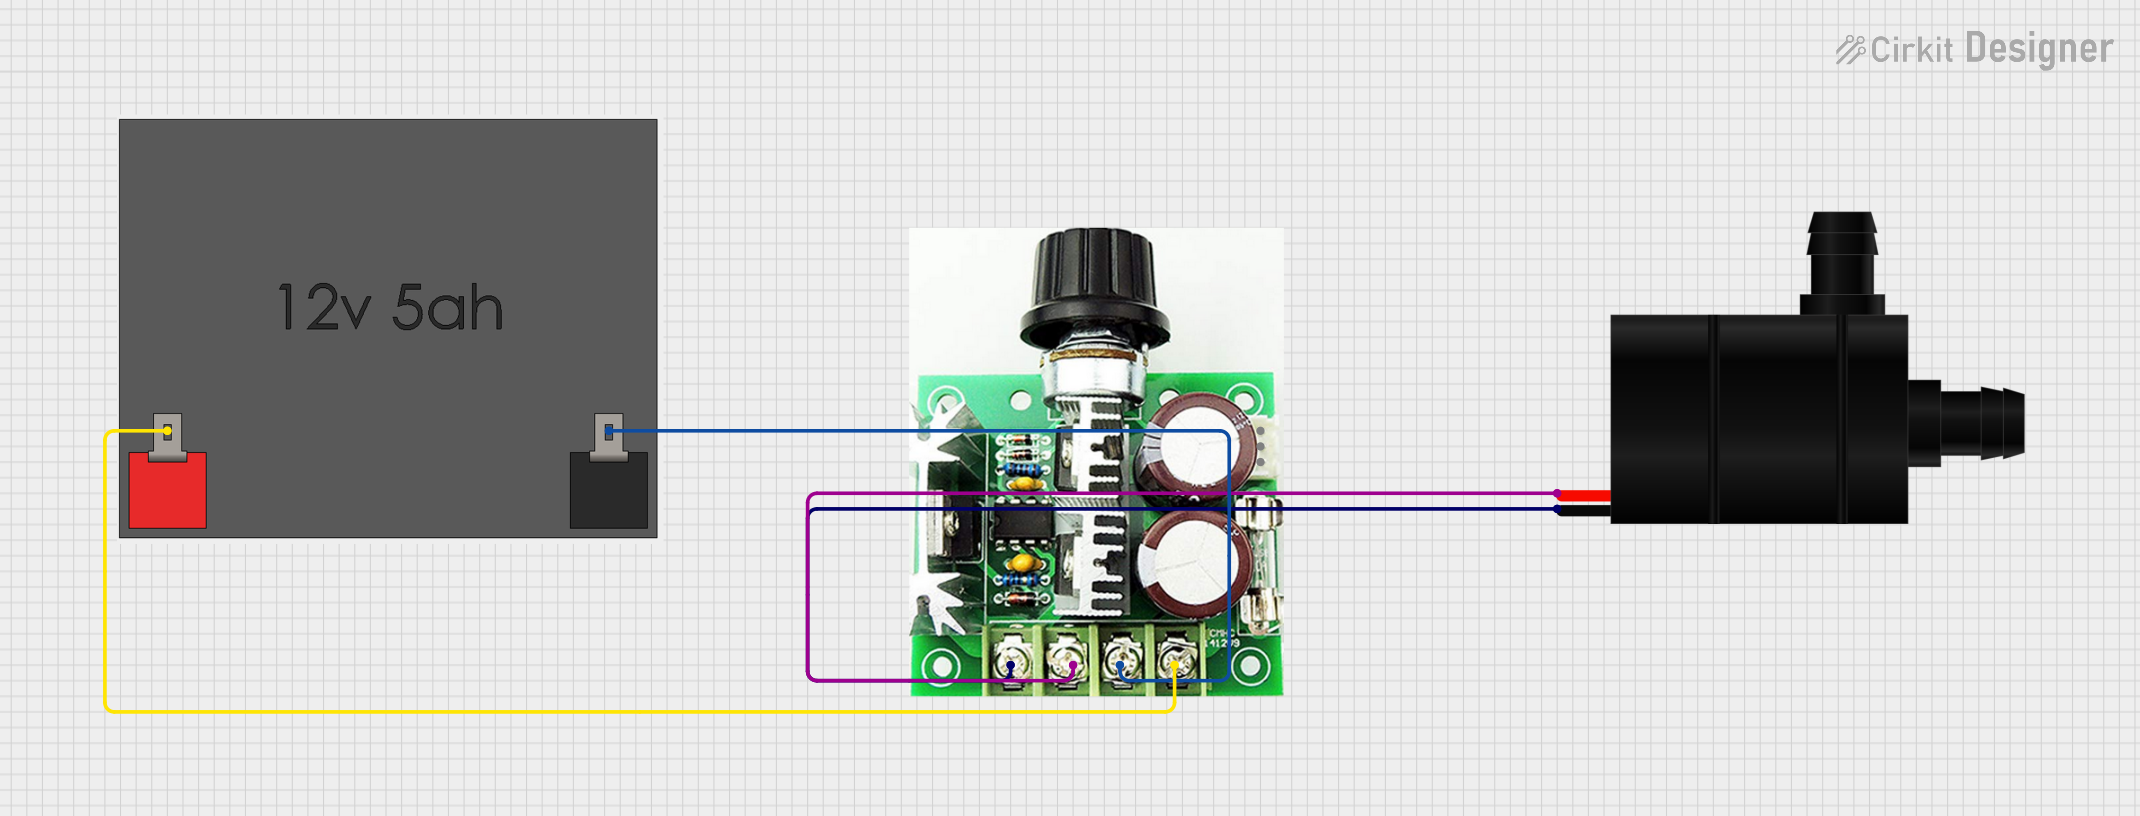
This circuit is designed to control the speed of a water pump using a PWM DC motor speed controller. The 12V5Ah battery provides power to the speed controller, which in turn regulates the power supplied to the water pump, allowing for adjustable flow rates. There is no microcontroller code provided, indicating that the speed control is likely adjusted manually via the PWM controller.
Arduino Nano Controlled PWM Fan with Variable Speed and Rocker Switch
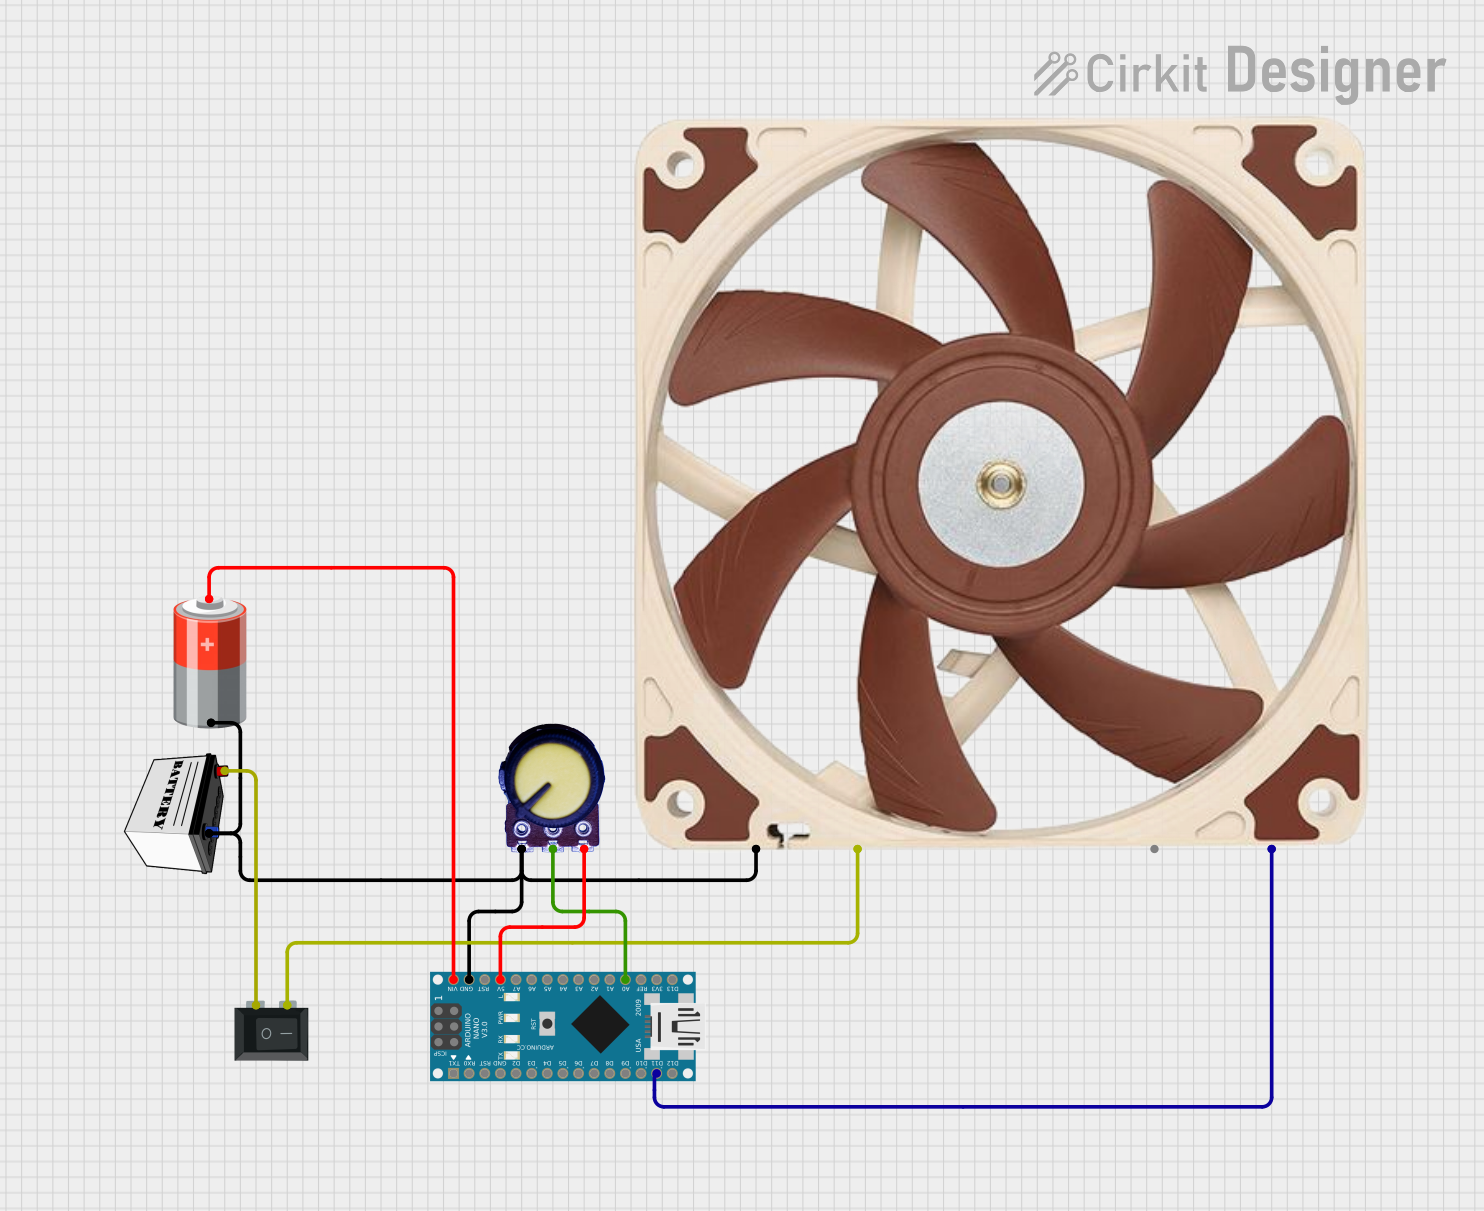
This circuit uses an Arduino Nano to control the speed of a 12V PWM fan with a potentiometer. The Arduino is powered by a 5V battery, while the fan is powered by a separate 12V battery with an SPST rocker switch for power control.
Explore Projects Built with PWM fan
ESP32-Based Wi-Fi Controlled PWM Fan with Temperature Regulation
This circuit controls a 12V PWM fan using an ESP32 microcontroller. The ESP32 regulates the fan speed via a TIP120 transistor and a 1kΩ resistor, with power supplied by a 12V power source and stepped down to 5V for the ESP32 using a Mini 560 step-down converter.
Arduino UNO Controlled Dual 12V PWM Fan System with Speed Adjustment
This circuit uses an Arduino UNO to control two 12V PWM fans. The Arduino reads the tachometer signals from the fans and adjusts their speed using PWM signals, incrementing the speed from 0% to 100% in 10% steps with a 10-second delay between each increment. Power is supplied through a power jack and a USB connection.
12V PWM-Controlled Water Pump System
This circuit is designed to control the speed of a water pump using a PWM DC motor speed controller. The 12V5Ah battery provides power to the speed controller, which in turn regulates the power supplied to the water pump, allowing for adjustable flow rates. There is no microcontroller code provided, indicating that the speed control is likely adjusted manually via the PWM controller.
Arduino Nano Controlled PWM Fan with Variable Speed and Rocker Switch
This circuit uses an Arduino Nano to control the speed of a 12V PWM fan with a potentiometer. The Arduino is powered by a 5V battery, while the fan is powered by a separate 12V battery with an SPST rocker switch for power control.
Common Applications and Use Cases
- Computer Cooling: Effective cooling for CPUs, GPUs, and other components.
- Embedded Systems: Thermal management for Raspberry Pi, Arduino, and other microcontrollers.
- Industrial Equipment: Cooling for power supplies, motor drivers, and other industrial electronics.
- Home Automation: Quiet and efficient cooling for smart home devices.
Technical Specifications
Key Technical Details
| Parameter | Value |
|---|---|
| Voltage | 5V DC |
| Current | 0.2A (max) |
| Power Rating | 1W |
| Speed Control | PWM (Pulse Width Modulation) |
| Connector Type | 4-pin (GND, VCC, PWM, Tach) |
| Dimensions | 40mm x 40mm x 10mm |
| Manufacturer | PiHut |
| Part ID | HighPi Pro 5V Fan - Software-Controlled |
Pin Configuration and Descriptions
| Pin Number | Pin Name | Description |
|---|---|---|
| 1 | GND | Ground |
| 2 | VCC | 5V Power Supply |
| 3 | PWM | PWM Signal Input for Speed Control |
| 4 | Tach | Tachometer Output for Speed Feedback |
Usage Instructions
How to Use the Component in a Circuit
Power Connection:
- Connect the GND pin of the fan to the ground (GND) of your power supply or microcontroller.
- Connect the VCC pin of the fan to the 5V power supply.
PWM Signal:
- Connect the PWM pin to a PWM-capable pin on your microcontroller (e.g., Arduino UNO pin 9).
Tachometer Feedback (Optional):
- Connect the Tach pin to a digital input pin on your microcontroller if you need speed feedback.
Important Considerations and Best Practices
- PWM Frequency: Ensure the PWM frequency is within the range specified by the fan's datasheet (typically 25kHz).
- Duty Cycle: Adjust the duty cycle (0-100%) to control the fan speed. A higher duty cycle results in a higher fan speed.
- Power Supply: Ensure your power supply can provide sufficient current (0.2A) for the fan.
- Ventilation: Ensure proper ventilation around the fan to maximize cooling efficiency.
Example Code for Arduino UNO
// Example code to control the HighPi Pro 5V Fan using Arduino UNO

const int pwmPin = 9; // PWM pin connected to the fan's PWM input

void setup() {
  pinMode(pwmPin, OUTPUT); // Set the PWM pin as an output
}

void loop() {
  // Set fan speed to 50% duty cycle
  analogWrite(pwmPin, 128); // 128/255 ~ 50% duty cycle
  delay(5000); // Run at 50% speed for 5 seconds

  // Set fan speed to 100% duty cycle
  analogWrite(pwmPin, 255); // 255/255 ~ 100% duty cycle
  delay(5000); // Run at 100% speed for 5 seconds

  // Set fan speed to 0% duty cycle (fan off)
  analogWrite(pwmPin, 0); // 0/255 ~ 0% duty cycle
  delay(5000); // Fan off for 5 seconds
}
Troubleshooting and FAQs
Common Issues Users Might Face
Fan Not Spinning:
- Solution: Check the power connections (GND and VCC). Ensure the PWM signal is being sent correctly.
Fan Speed Not Changing:
- Solution: Verify the PWM signal frequency and duty cycle. Ensure the PWM pin is correctly configured.
Excessive Noise:
- Solution: Ensure the fan is securely mounted and not obstructed. Check for any debris or obstructions.
Solutions and Tips for Troubleshooting
- Check Connections: Ensure all connections are secure and correctly oriented.
- Verify Power Supply: Ensure the power supply provides a stable 5V and sufficient current.
- PWM Signal: Use an oscilloscope to verify the PWM signal if possible.
- Consult Datasheet: Refer to the fan's datasheet for specific details on PWM frequency and duty cycle requirements.
By following this documentation, users can effectively integrate and utilize the HighPi Pro 5V Fan - Software-Controlled in their projects, ensuring efficient cooling and noise reduction.