How to Use Climastick: Examples, Pinouts, and Specs
Introduction
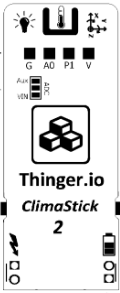
The Climastick, manufactured by Thinger.io (Part ID: uno), is a versatile temperature and humidity sensor designed for monitoring environmental conditions. It provides real-time data on temperature and relative humidity, making it an essential component for applications such as smart home systems, weather stations, industrial monitoring, and agricultural automation. Its compact design and ease of integration make it suitable for both hobbyist projects and professional deployments.
Explore Projects Built with Climastick
Explore Projects Built with Climastick
Common Applications
- Smart home climate control systems
- Weather monitoring stations
- Greenhouse and agricultural automation
- Industrial environmental monitoring
- IoT-based environmental sensing
Technical Specifications
The Climastick is designed to deliver accurate and reliable measurements of temperature and humidity. Below are its key technical details:
Key Specifications
| Parameter | Value |
|---|---|
| Operating Voltage | 3.3V - 5V |
| Operating Current | 2mA (typical) |
| Temperature Range | -40°C to +80°C |
| Temperature Accuracy | ±0.5°C |
| Humidity Range | 0% to 100% RH |
| Humidity Accuracy | ±2% RH |
| Communication Protocol | I2C |
| Dimensions | 25mm x 15mm x 5mm |
Pin Configuration
The Climastick has a 4-pin interface for easy integration into circuits. Below is the pinout description:
| Pin Number | Pin Name | Description |
|---|---|---|
| 1 | VCC | Power supply input (3.3V - 5V) |
| 2 | GND | Ground connection |
| 3 | SDA | I2C data line for communication |
| 4 | SCL | I2C clock line for communication |
Usage Instructions
The Climastick is simple to use and can be integrated into a variety of circuits. Below are the steps and best practices for using the Climastick:
Connecting the Climastick
- Power Supply: Connect the VCC pin to a 3.3V or 5V power source and the GND pin to the ground.
- I2C Communication: Connect the SDA and SCL pins to the corresponding I2C pins on your microcontroller (e.g., Arduino UNO).
- Pull-Up Resistors: Ensure that the SDA and SCL lines have pull-up resistors (typically 4.7kΩ) if not already present on your microcontroller.
Example: Using Climastick with Arduino UNO
Below is an example Arduino sketch to read temperature and humidity data from the Climastick:
#include <Wire.h> // Include the Wire library for I2C communication
#include <Adafruit_Sensor.h> // Include Adafruit sensor library
#include <Adafruit_AHTX0.h> // Include library for AHT10/AHT20 sensors

Adafruit_AHTX0 aht; // Create an instance of the AHTX0 sensor

void setup() {
  Serial.begin(9600); // Initialize serial communication at 9600 baud
  Serial.println("Climastick Sensor Test");

  if (!aht.begin()) {
    // Check if the sensor is detected
    Serial.println("Failed to find Climastick sensor! Check connections.");
    while (1); // Halt the program if the sensor is not found
  }
  Serial.println("Climastick sensor initialized successfully.");
}

void loop() {
  sensors_event_t humidity, temp;
  aht.getEvent(&humidity, &temp); // Get temperature and humidity data

  // Print temperature and humidity to the Serial Monitor
  Serial.print("Temperature: ");
  Serial.print(temp.temperature);
  Serial.println(" °C");

  Serial.print("Humidity: ");
  Serial.print(humidity.relative_humidity);
  Serial.println(" %");

  delay(2000); // Wait for 2 seconds before the next reading
}
Best Practices
- Power Supply: Ensure a stable power supply to avoid inaccurate readings.
- I2C Address: Verify the I2C address of the Climastick if using multiple I2C devices.
- Environmental Factors: Avoid placing the sensor in direct sunlight or near heat sources for accurate measurements.
Troubleshooting and FAQs
Common Issues and Solutions
Sensor Not Detected
- Cause: Incorrect wiring or loose connections.
- Solution: Double-check the wiring and ensure the SDA and SCL pins are correctly connected.
Inaccurate Readings
- Cause: Environmental interference or unstable power supply.
- Solution: Place the sensor in a stable environment and ensure a clean power source.
I2C Communication Failure
- Cause: Conflicting I2C addresses or missing pull-up resistors.
- Solution: Verify the I2C address and ensure pull-up resistors are in place.
FAQs
Q1: Can the Climastick be used outdoors?
A1: Yes, but it should be housed in a protective enclosure to shield it from direct exposure to rain or dust.
Q2: What is the default I2C address of the Climastick?
A2: The default I2C address is typically 0x38, but refer to the datasheet for confirmation.
Q3: Can the Climastick measure dew point?
A3: The Climastick does not directly measure dew point, but it can be calculated using temperature and humidity data.
Q4: Is the Climastick compatible with Raspberry Pi?
A4: Yes, the Climastick can be used with Raspberry Pi via the I2C interface.
By following this documentation, users can effectively integrate the Climastick into their projects and troubleshoot common issues with ease.