How to Use MPPT solar li-ion charger: Examples, Pinouts, and Specs

Introduction
A Maximum Power Point Tracking (MPPT) solar Li-ion charger is a highly efficient device designed to optimize the power output from solar panels. By dynamically adjusting the electrical operating point of the solar modules, the MPPT charger ensures that the solar panels operate at their maximum power point, thereby maximizing energy harvest. This energy is then used to charge lithium-ion batteries efficiently, ensuring both optimal energy utilization and battery longevity.
Explore Projects Built with MPPT solar li-ion charger


Explore Projects Built with MPPT solar li-ion charger
Common Applications and Use Cases
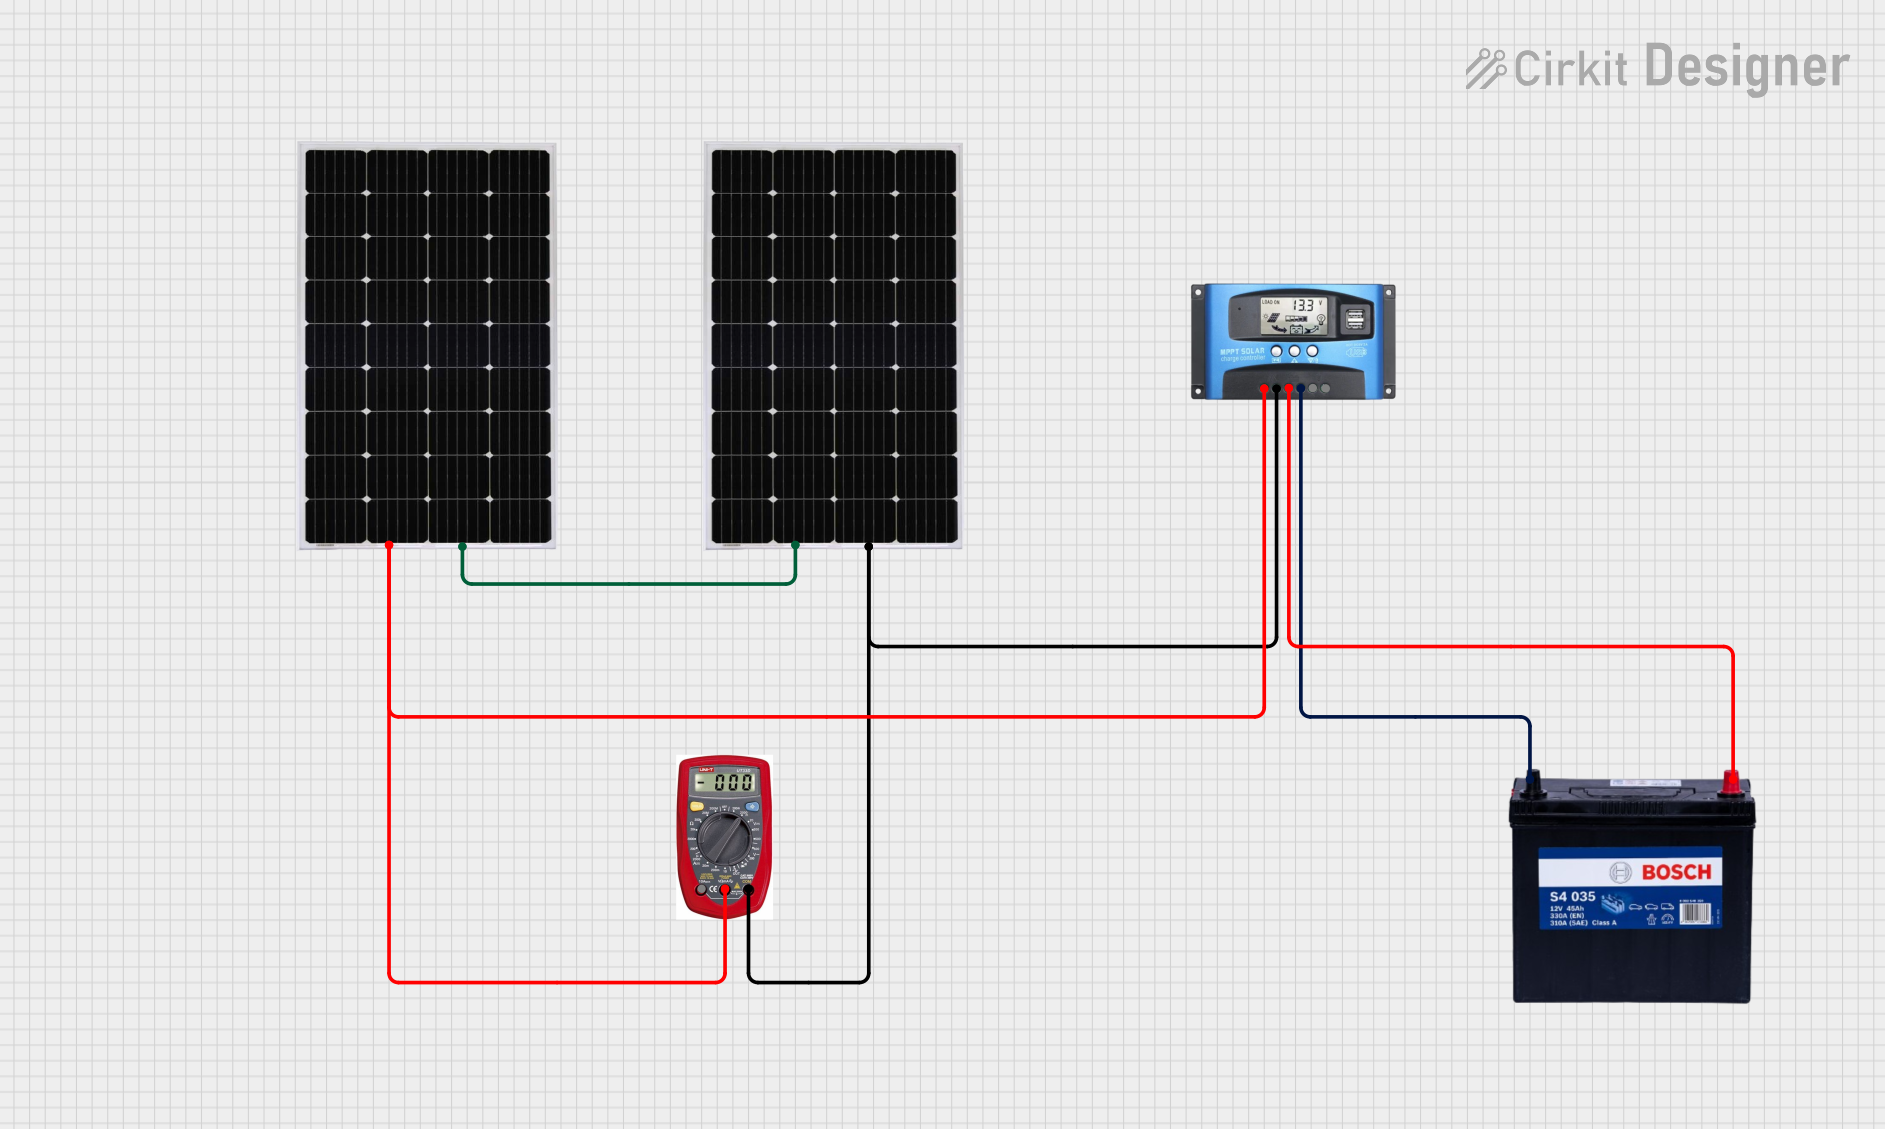
- Solar-powered battery charging systems for off-grid applications
- Portable solar power banks
- Renewable energy storage systems
- IoT devices powered by solar energy
- Solar-powered lighting systems
Technical Specifications
Key Technical Details
| Parameter | Value/Range |
|---|---|
| Input Voltage Range | 6V to 24V (typical, depending on model) |
| Output Voltage Range | 3.7V to 4.2V (for single-cell Li-ion batteries) |
| Maximum Charging Current | 1A to 3A (model-dependent) |
| Efficiency | Up to 95% |
| MPPT Tracking Efficiency | >99% |
| Operating Temperature Range | -40°C to 85°C |
| Battery Protection | Overcharge, over-discharge, and short-circuit protection |
Pin Configuration and Descriptions
| Pin Name | Description |
|---|---|
| VIN | Input voltage from the solar panel (6V to 24V). |
| GND | Ground connection for the circuit. |
| BAT+ | Positive terminal for the Li-ion battery connection. |
| BAT- | Negative terminal for the Li-ion battery connection. |
| LOAD+ | Positive terminal for connecting the load (optional, if supported). |
| LOAD- | Negative terminal for connecting the load (optional, if supported). |
| MPPT_EN | MPPT enable pin (optional, used to enable/disable MPPT functionality). |
| STAT | Status indicator pin (e.g., charging, fully charged, or fault). |
Usage Instructions
How to Use the Component in a Circuit
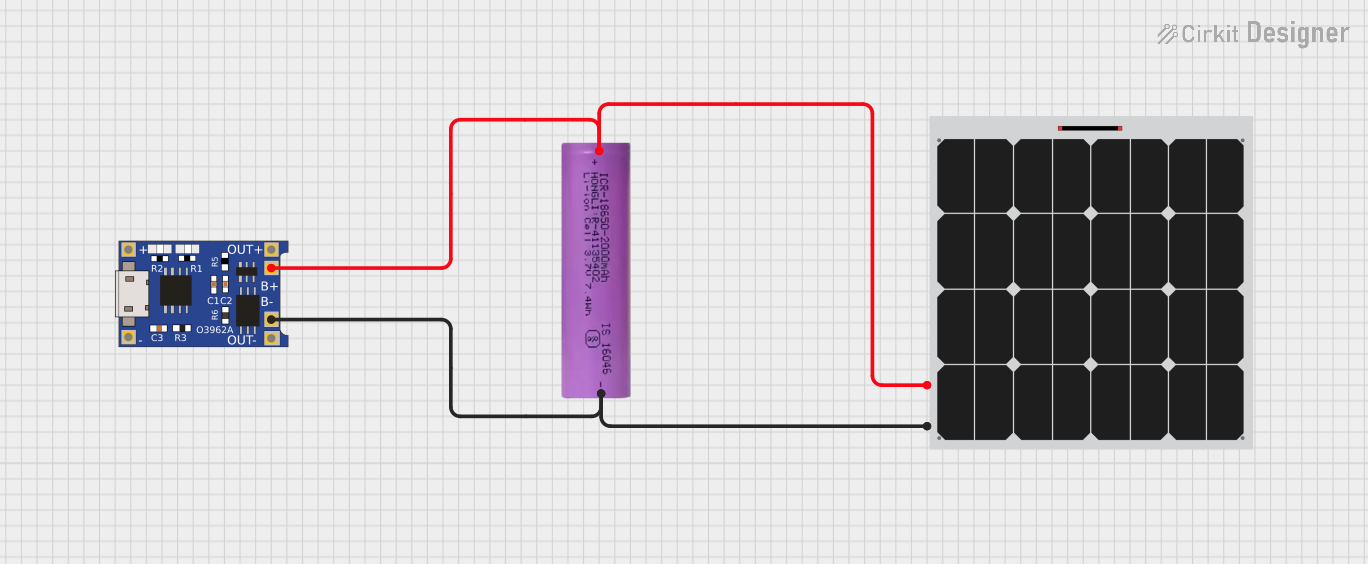
Connect the Solar Panel:
- Attach the positive terminal of the solar panel to the
VINpin and the negative terminal to theGNDpin. - Ensure the solar panel's voltage is within the input voltage range of the MPPT charger.
- Attach the positive terminal of the solar panel to the
Connect the Li-Ion Battery:
- Connect the positive terminal of the battery to the
BAT+pin and the negative terminal to theBAT-pin. - Ensure the battery is a single-cell Li-ion battery with a nominal voltage of 3.7V.
- Connect the positive terminal of the battery to the
Optional Load Connection:
- If the MPPT charger supports load output, connect the load to the
LOAD+andLOAD-pins.
- If the MPPT charger supports load output, connect the load to the
Enable MPPT (if applicable):
- If the MPPT charger has an
MPPT_ENpin, ensure it is set to the appropriate logic level (e.g., HIGH) to enable MPPT functionality.
- If the MPPT charger has an
Monitor Status:
- Use the
STATpin to monitor the charging status. Refer to the datasheet for specific status indicator behaviors (e.g., LED blinking patterns).
- Use the
Important Considerations and Best Practices
- Solar Panel Selection: Use a solar panel with a voltage and current rating that matches the input specifications of the MPPT charger.
- Battery Compatibility: Ensure the Li-ion battery is compatible with the charger's output voltage and current ratings.
- Heat Dissipation: MPPT chargers can generate heat during operation. Ensure proper ventilation or use a heatsink if necessary.
- Reverse Polarity Protection: Verify connections before powering the circuit to avoid damage due to reverse polarity.
- Avoid Overloading: Do not exceed the maximum charging current or input voltage rating of the MPPT charger.
Example Code for Arduino UNO
If you want to monitor the charging status using an Arduino UNO, you can connect the STAT pin to a digital input pin on the Arduino. Below is an example code snippet:
// Define the pin connected to the STAT pin of the MPPT charger
const int statPin = 2;

void setup() {
  // Initialize the serial communication for debugging
  Serial.begin(9600);

  // Set the STAT pin as an input
  pinMode(statPin, INPUT);
}

void loop() {
  // Read the status from the STAT pin
  int status = digitalRead(statPin);

  // Check the charging status and print to the serial monitor
  if (status == HIGH) {
    Serial.println("Battery is charging...");
  } else {
    Serial.println("Battery is fully charged or no charging.");
  }

  // Add a small delay to avoid flooding the serial monitor
  delay(1000);
}
Troubleshooting and FAQs
Common Issues and Solutions
No Charging Occurs:
- Cause: Solar panel voltage is too low.
- Solution: Ensure the solar panel is exposed to sufficient sunlight and its voltage is within the input range of the MPPT charger.
Battery Overheating:
- Cause: Excessive charging current or faulty battery.
- Solution: Verify the battery's specifications and ensure the charging current is within safe limits.
MPPT Not Functioning:
- Cause: MPPT functionality is disabled or faulty.
- Solution: Check the
MPPT_ENpin and ensure it is set to the correct logic level.
Status Indicator Not Working:
- Cause: Incorrect connection or damaged
STATpin. - Solution: Verify the connection to the
STATpin and check for any physical damage.
- Cause: Incorrect connection or damaged
FAQs
Can I use this charger with a multi-cell Li-ion battery pack?
- No, this charger is designed for single-cell Li-ion batteries. For multi-cell packs, use a charger designed for the specific configuration.
What happens if the solar panel voltage exceeds the input range?
- The MPPT charger may get damaged. Always ensure the solar panel's voltage is within the specified input range.
Can I connect a load directly to the battery terminals?
- It is not recommended unless the charger supports load sharing. Use the dedicated
LOAD+andLOAD-pins if available.
- It is not recommended unless the charger supports load sharing. Use the dedicated
Does the MPPT charger work in low-light conditions?
- The MPPT charger will attempt to operate, but its efficiency and output may be reduced in low-light conditions.