Cirkit Designer
Your all-in-one circuit design IDE
Home /
Component Documentation
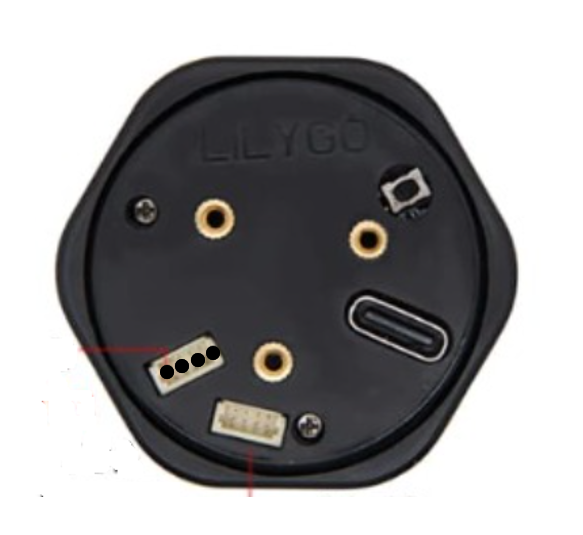
How to Use T encoder Pro: Examples, Pinouts, and Specs
Introduction
The T Encoder Pro by LillyGo is a high-precision rotary encoder designed to measure the position or speed of a rotating object. It converts the angular position of a shaft or axle into an analog or digital signal, making it an essential component in various applications such as robotics, industrial automation, and motor control systems.
Explore Projects Built with T encoder Pro
Teensy 4.1 Controlled Precision Stepper Motor System with OLED Display and Logic Level Conversion
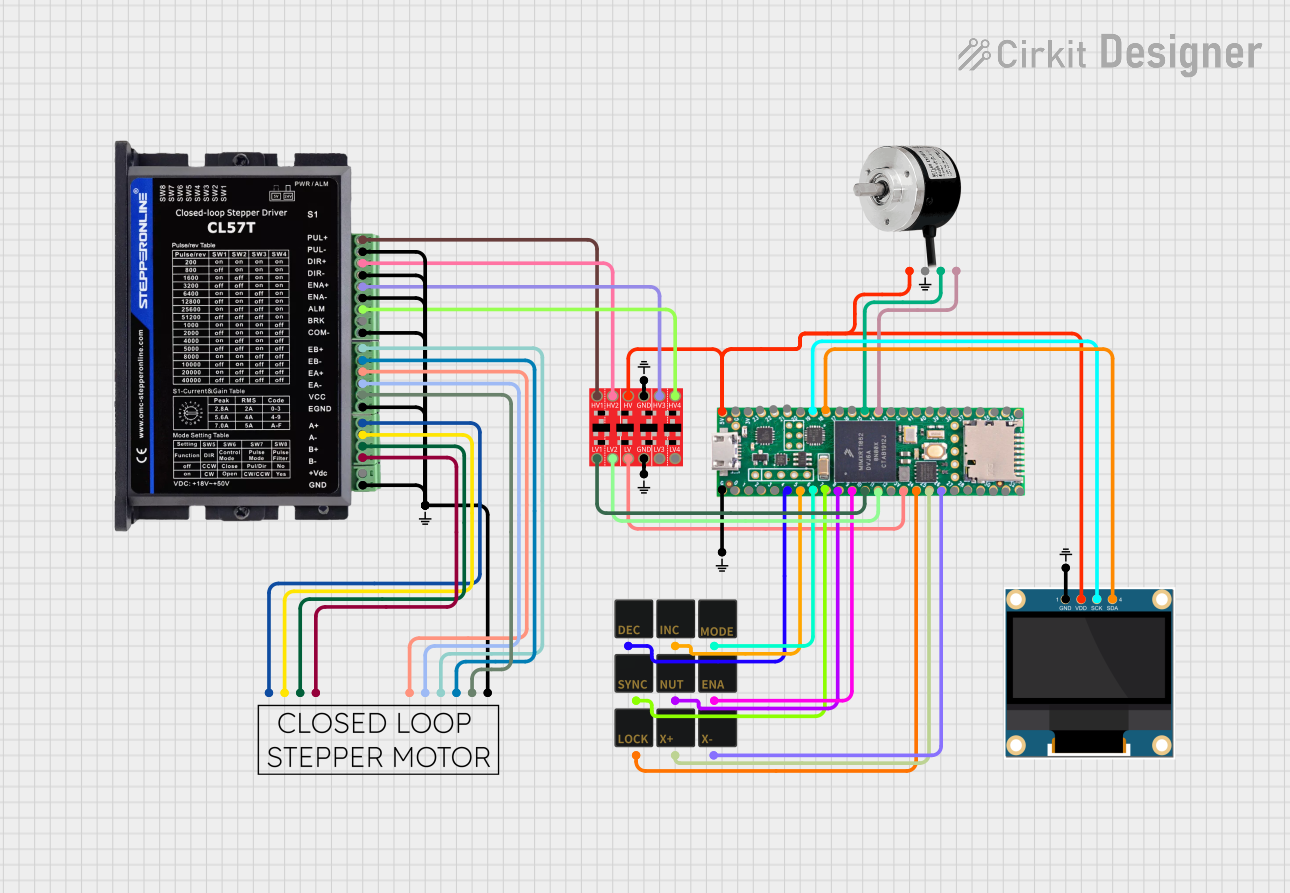
This circuit features a Teensy 4.1 microcontroller interfaced with a keypad for user input, an OLED display for visual feedback, and an optical rotary encoder for position sensing. It controls a closed-loop stepper motor via a Stepperonline CL57T driver, with a bi-directional logic level converter to ensure compatible voltage levels between the microcontroller and the stepper driver. The circuit is likely designed for precise motion control applications, such as CNC machines or robotic systems, where user input is used to adjust parameters like pitch or position.
Battery-Powered MIDI Controller with nRF52840, AS5600 Encoders, and OLED Display
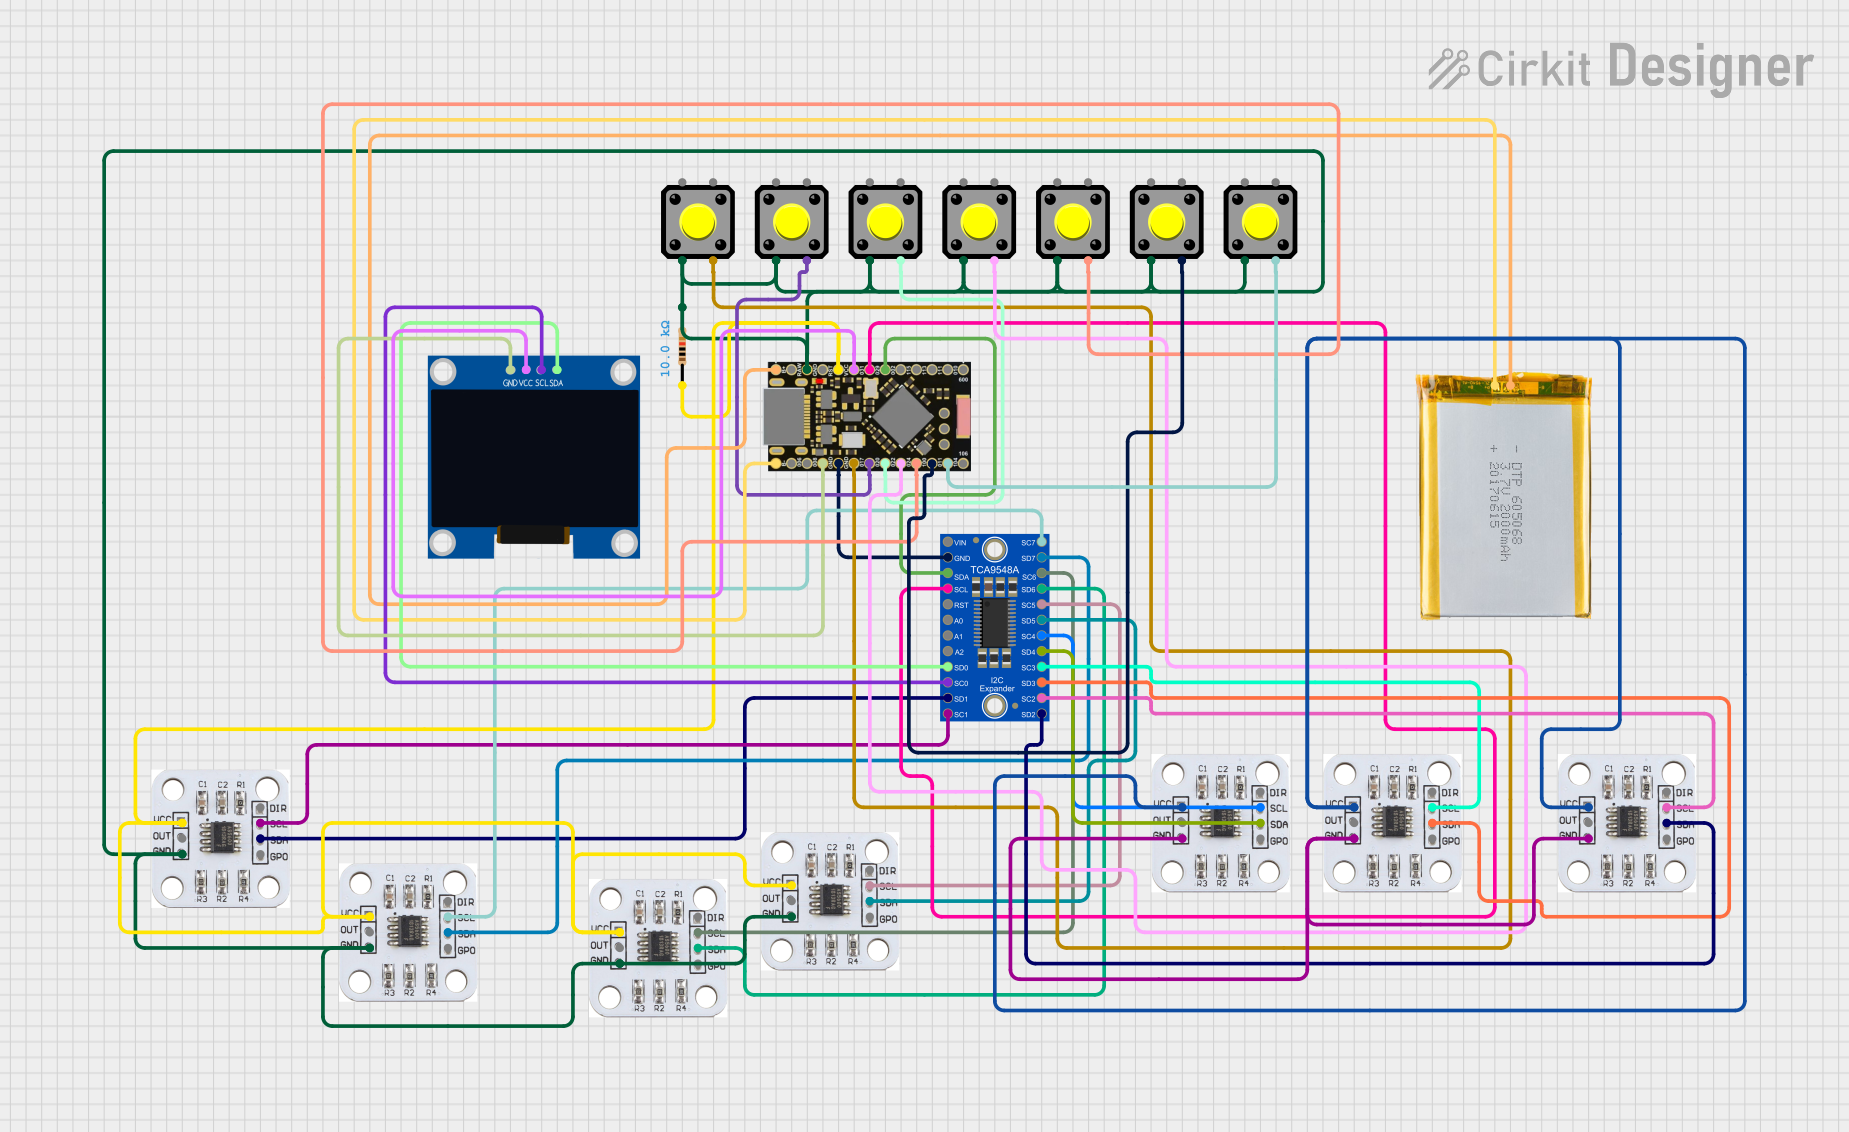
This circuit is a MIDI controller that uses an nRF52840 ProMicro microcontroller, multiple AS5600 magnetic encoders, an Adafruit TCA9548A I2C multiplexer, an OLED display, and several pushbuttons. The microcontroller reads the encoder positions and button states, displays information on the OLED screen, and sends MIDI signals based on user interactions.
Rotary Encoder Interface with STG Adapter for Signal Processing

The circuit consists of two rotary encoders (Kalamoyi P3022-V1-CW360) connected to two STG adapters. Each encoder's VCC, OUT, and GND pins are connected to the corresponding STG adapter, facilitating signal transmission and power supply management.
ESP32-CAM and T-Display-S3 Based Obstacle-Avoiding Robot
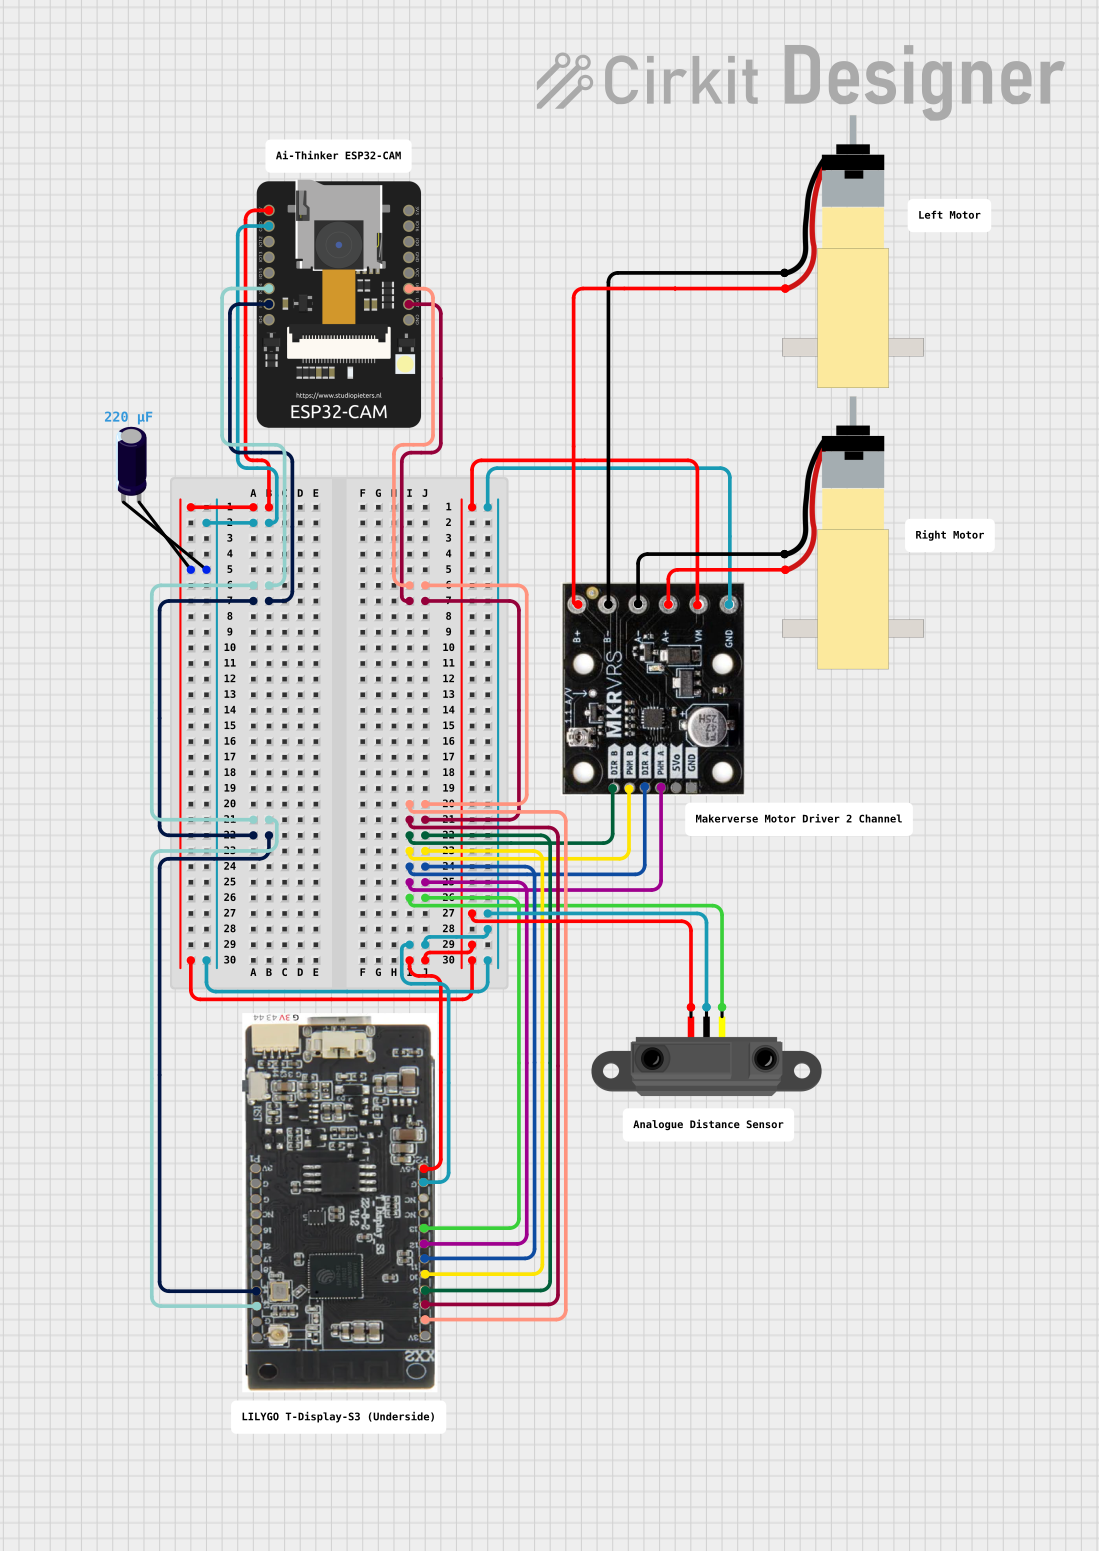
This circuit features an ESP32-CAM module and a T-Display-S3 for user interface, connected to a motor driver controlling two hobby gearmotors. An infrared proximity sensor provides input to the system, likely for obstacle detection or distance measurement. The electrolytic capacitor is used for power supply stabilization, ensuring smooth operation of the motor driver and connected motors.
Explore Projects Built with T encoder Pro
Teensy 4.1 Controlled Precision Stepper Motor System with OLED Display and Logic Level Conversion
This circuit features a Teensy 4.1 microcontroller interfaced with a keypad for user input, an OLED display for visual feedback, and an optical rotary encoder for position sensing. It controls a closed-loop stepper motor via a Stepperonline CL57T driver, with a bi-directional logic level converter to ensure compatible voltage levels between the microcontroller and the stepper driver. The circuit is likely designed for precise motion control applications, such as CNC machines or robotic systems, where user input is used to adjust parameters like pitch or position.
Battery-Powered MIDI Controller with nRF52840, AS5600 Encoders, and OLED Display
This circuit is a MIDI controller that uses an nRF52840 ProMicro microcontroller, multiple AS5600 magnetic encoders, an Adafruit TCA9548A I2C multiplexer, an OLED display, and several pushbuttons. The microcontroller reads the encoder positions and button states, displays information on the OLED screen, and sends MIDI signals based on user interactions.
Rotary Encoder Interface with STG Adapter for Signal Processing
The circuit consists of two rotary encoders (Kalamoyi P3022-V1-CW360) connected to two STG adapters. Each encoder's VCC, OUT, and GND pins are connected to the corresponding STG adapter, facilitating signal transmission and power supply management.
ESP32-CAM and T-Display-S3 Based Obstacle-Avoiding Robot
This circuit features an ESP32-CAM module and a T-Display-S3 for user interface, connected to a motor driver controlling two hobby gearmotors. An infrared proximity sensor provides input to the system, likely for obstacle detection or distance measurement. The electrolytic capacitor is used for power supply stabilization, ensuring smooth operation of the motor driver and connected motors.
Common Applications and Use Cases
- Robotics: For precise control of robotic arms and wheels.
- Industrial Automation: Monitoring and controlling the position of machinery.
- Motor Control Systems: Measuring the speed and position of motors.
- CNC Machines: Ensuring accurate positioning of cutting tools.
- Consumer Electronics: Volume control in audio equipment.
Technical Specifications
Key Technical Details
| Parameter | Value |
|---|---|
| Supply Voltage | 3.3V - 5V |
| Operating Current | 10mA |
| Output Type | Quadrature (A and B channels) |
| Resolution | 20 pulses per revolution |
| Operating Temperature | -20°C to 85°C |
| Shaft Diameter | 6mm |
| Mounting Hole Size | 3mm |
Pin Configuration and Descriptions
| Pin Number | Pin Name | Description |
|---|---|---|
| 1 | VCC | Power supply (3.3V - 5V) |
| 2 | GND | Ground |
| 3 | A | Channel A output |
| 4 | B | Channel B output |
| 5 | SW | Switch output (optional) |
Usage Instructions
How to Use the Component in a Circuit
- Power Supply: Connect the VCC pin to a 3.3V or 5V power supply and the GND pin to the ground.
- Output Channels: Connect the A and B output pins to the corresponding input pins on your microcontroller or other processing unit.
- Switch Output (Optional): If your application requires a switch, connect the SW pin to an input pin on your microcontroller.
Important Considerations and Best Practices
- Debouncing: Rotary encoders can produce noisy signals. Implement debouncing in your code to ensure accurate readings.
- Pull-up Resistors: Use pull-up resistors on the output pins to ensure stable signals.
- Mounting: Securely mount the encoder to avoid mechanical vibrations that can affect accuracy.
- Temperature Range: Ensure the operating environment is within the specified temperature range (-20°C to 85°C).
Example Code for Arduino UNO
// Include the Encoder library
#include <Encoder.h>

// Define the pins for the encoder
#define ENCODER_PIN_A 2
#define ENCODER_PIN_B 3

// Create an Encoder object
Encoder myEncoder(ENCODER_PIN_A, ENCODER_PIN_B);

long oldPosition  = -999;

void setup() {
  // Initialize serial communication
  Serial.begin(9600);
  Serial.println("Basic Encoder Test:");
}

void loop() {
  // Read the current position of the encoder
  long newPosition = myEncoder.read();

  // If the position has changed, print the new position
  if (newPosition != oldPosition) {
    oldPosition = newPosition;
    Serial.println(newPosition);
  }
}
Troubleshooting and FAQs
Common Issues Users Might Face
No Output Signal:
- Solution: Check the power supply connections and ensure the encoder is properly connected to the microcontroller.
Inaccurate Readings:
- Solution: Implement debouncing in your code and use pull-up resistors on the output pins.
Mechanical Noise:
- Solution: Securely mount the encoder to minimize vibrations and mechanical noise.
Solutions and Tips for Troubleshooting
- Check Connections: Ensure all connections are secure and correct.
- Use a Stable Power Supply: Fluctuations in the power supply can affect the encoder's performance.
- Implement Software Debouncing: Use software techniques to filter out noise and ensure accurate readings.
By following this documentation, users can effectively integrate the T Encoder Pro into their projects, ensuring accurate and reliable measurements of rotational position and speed.