Cirkit Designer Logo
Cirkit Designer
Your all-in-one circuit design IDE
Home / 
Component Documentation

How to Use Adafruit MPL3115A2 I2C Barometric Pressure, Altitude, Temperature Sensor: Examples, Pinouts, and Specs

Image of Adafruit MPL3115A2 I2C Barometric Pressure, Altitude, Temperature Sensor
Cirkit Designer LogoDesign with Adafruit MPL3115A2 I2C Barometric Pressure, Altitude, Temperature Sensor in Cirkit Designer

Introduction

The Adafruit MPL3115A2 is a compact, high-precision sensor module capable of measuring barometric pressure, altitude, and temperature. Utilizing the I2C communication protocol, it interfaces seamlessly with a wide range of microcontrollers, including the popular Arduino platform. This sensor is ideal for a variety of applications, such as personal weather stations, GPS navigation systems, drones, and altimeters.

Explore Projects Built with Adafruit MPL3115A2 I2C Barometric Pressure, Altitude, Temperature Sensor

Use Cirkit Designer to design, explore, and prototype these projects online. Some projects support real-time simulation. Click "Open Project" to start designing instantly!
Arduino UNO WiFi Weather Station with Adafruit MPL115A2 Sensor
Image of idk: A project utilizing Adafruit MPL3115A2 I2C Barometric Pressure, Altitude, Temperature Sensor in a practical application
This circuit uses an Arduino UNO R4 WiFi to interface with an Adafruit MPL115A2 I2C Barometric Pressure and Temperature Sensor. The Arduino reads pressure and temperature data from the sensor via I2C communication and outputs the readings to the serial monitor.
Cirkit Designer LogoOpen Project in Cirkit Designer
ESP8266-Based Environmental Monitoring System
Image of Stacja_Pogodowa1: A project utilizing Adafruit MPL3115A2 I2C Barometric Pressure, Altitude, Temperature Sensor in a practical application
This circuit is designed to collect environmental data using an ESP-8266 microcontroller connected to a BMP180 barometric pressure sensor, a GY-30 BH1750FVI digital light intensity sensor, and a DHT11 temperature and humidity sensor. The sensors are interfaced with the ESP-8266 via I2C (SCL and SDA lines) and digital IO pins, and they share a common power supply (3.3V) and ground. The circuit is likely intended for weather monitoring or home automation applications, with capabilities to measure temperature, humidity, barometric pressure, and light intensity.
Cirkit Designer LogoOpen Project in Cirkit Designer
Arduino UNO Weather Station with BME280 Sensor
Image of UNO_MBE280: A project utilizing Adafruit MPL3115A2 I2C Barometric Pressure, Altitude, Temperature Sensor in a practical application
This circuit uses an Arduino UNO to read temperature, pressure, and humidity data from a BME/BMP280 sensor via I2C communication. The sensor is powered by the Arduino's 5V and GND pins, and the data is printed to the Serial Monitor.
Cirkit Designer LogoOpen Project in Cirkit Designer
Arduino UNO with Adafruit BME680 Sensor Data Logger
Image of Adafruit BME680 + Arduino UNO: A project utilizing Adafruit MPL3115A2 I2C Barometric Pressure, Altitude, Temperature Sensor in a practical application
This circuit connects an Adafruit BME680 sensor to an Arduino UNO for the purpose of measuring environmental data such as temperature, pressure, humidity, gas resistance, and altitude. The BME680 is interfaced with the Arduino over I2C, with power supplied from the Arduino's 5V pin. The embedded code on the Arduino reads the sensor data and outputs it to the serial monitor, allowing for real-time environmental monitoring.
Cirkit Designer LogoOpen Project in Cirkit Designer

Explore Projects Built with Adafruit MPL3115A2 I2C Barometric Pressure, Altitude, Temperature Sensor

Use Cirkit Designer to design, explore, and prototype these projects online. Some projects support real-time simulation. Click "Open Project" to start designing instantly!
Image of idk: A project utilizing Adafruit MPL3115A2 I2C Barometric Pressure, Altitude, Temperature Sensor in a practical application
Arduino UNO WiFi Weather Station with Adafruit MPL115A2 Sensor
This circuit uses an Arduino UNO R4 WiFi to interface with an Adafruit MPL115A2 I2C Barometric Pressure and Temperature Sensor. The Arduino reads pressure and temperature data from the sensor via I2C communication and outputs the readings to the serial monitor.
Cirkit Designer LogoOpen Project in Cirkit Designer
Image of Stacja_Pogodowa1: A project utilizing Adafruit MPL3115A2 I2C Barometric Pressure, Altitude, Temperature Sensor in a practical application
ESP8266-Based Environmental Monitoring System
This circuit is designed to collect environmental data using an ESP-8266 microcontroller connected to a BMP180 barometric pressure sensor, a GY-30 BH1750FVI digital light intensity sensor, and a DHT11 temperature and humidity sensor. The sensors are interfaced with the ESP-8266 via I2C (SCL and SDA lines) and digital IO pins, and they share a common power supply (3.3V) and ground. The circuit is likely intended for weather monitoring or home automation applications, with capabilities to measure temperature, humidity, barometric pressure, and light intensity.
Cirkit Designer LogoOpen Project in Cirkit Designer
Image of UNO_MBE280: A project utilizing Adafruit MPL3115A2 I2C Barometric Pressure, Altitude, Temperature Sensor in a practical application
Arduino UNO Weather Station with BME280 Sensor
This circuit uses an Arduino UNO to read temperature, pressure, and humidity data from a BME/BMP280 sensor via I2C communication. The sensor is powered by the Arduino's 5V and GND pins, and the data is printed to the Serial Monitor.
Cirkit Designer LogoOpen Project in Cirkit Designer
Image of Adafruit BME680 + Arduino UNO: A project utilizing Adafruit MPL3115A2 I2C Barometric Pressure, Altitude, Temperature Sensor in a practical application
Arduino UNO with Adafruit BME680 Sensor Data Logger
This circuit connects an Adafruit BME680 sensor to an Arduino UNO for the purpose of measuring environmental data such as temperature, pressure, humidity, gas resistance, and altitude. The BME680 is interfaced with the Arduino over I2C, with power supplied from the Arduino's 5V pin. The embedded code on the Arduino reads the sensor data and outputs it to the serial monitor, allowing for real-time environmental monitoring.
Cirkit Designer LogoOpen Project in Cirkit Designer

Technical Specifications

Key Features

  • Pressure Range: 20 to 110 kPa
  • Altitude Range: -700 to 10,000 m
  • Temperature Range: -40 to 85°C
  • Resolution: 0.01 kPa (pressure), 0.1 m (altitude), 0.1°C (temperature)
  • Operating Voltage: 2.5V to 5.5V
  • Interface: I2C (up to 400 kHz)
  • 2.5 µA low power standby mode

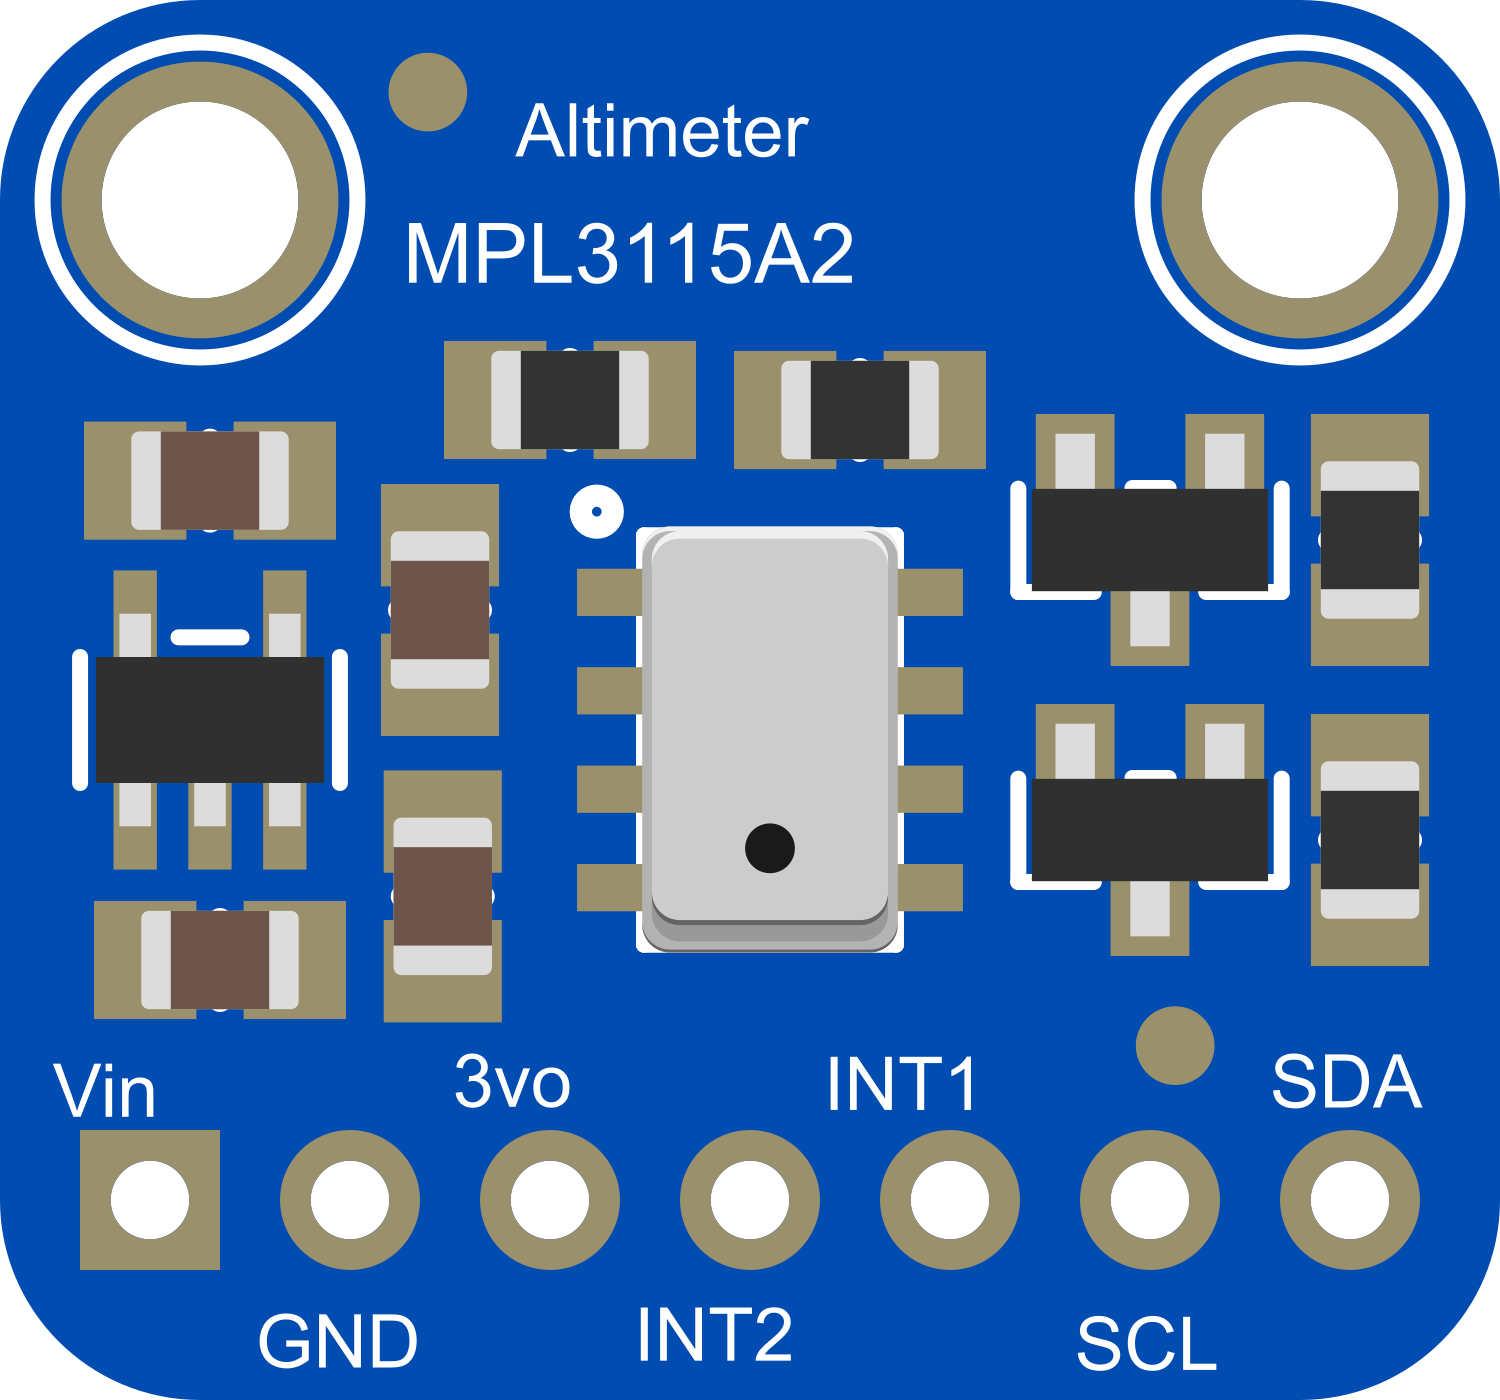
Pin Configuration and Descriptions

Pin Number Name Description
1 VDD Power supply (2.5V to 5.5V)
2 GND Ground connection
3 SCL I2C clock line
4 SDA I2C data line
5 INT Interrupt output (active low)

Usage Instructions

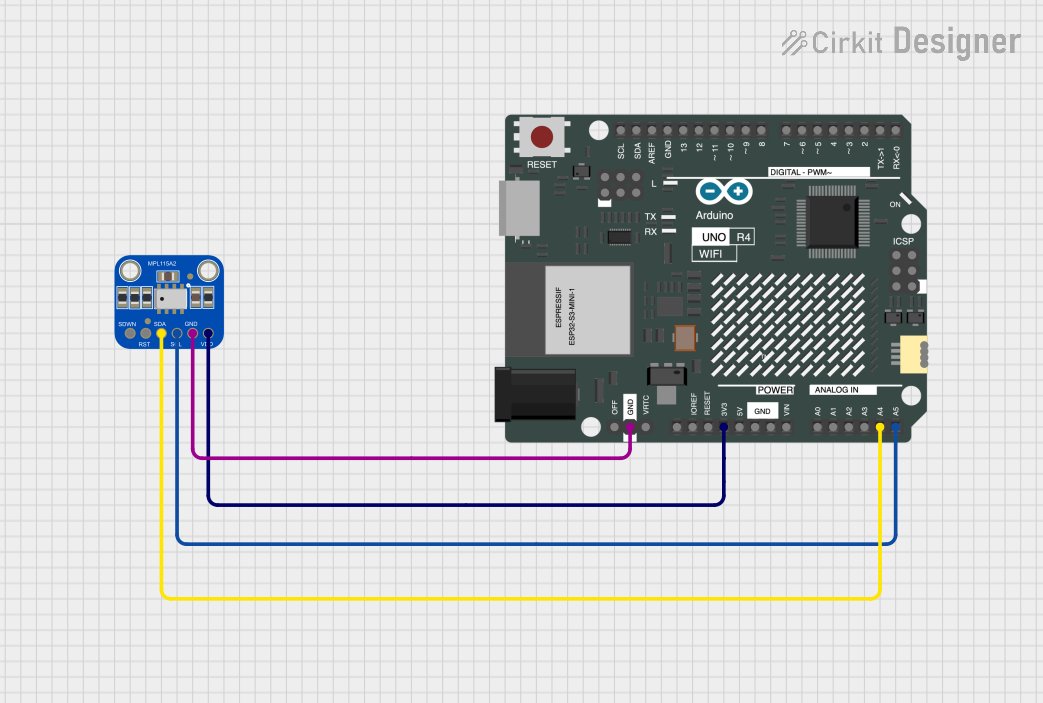
Interfacing with Arduino

  1. Connecting the Sensor:

    • Connect VDD to the 3.3V output on the Arduino.
    • Connect GND to a ground pin on the Arduino.
    • Connect SCL to the A5 pin (SCL) on the Arduino UNO.
    • Connect SDA to the A4 pin (SDA) on the Arduino UNO.
    • The INT pin can be left unconnected if the interrupt feature is not used.
  2. Library Installation:

    • Install the Adafruit MPL3115A2 library using the Arduino Library Manager or download it from the Adafruit GitHub repository.
  3. Initialization and Configuration:

    • Include the Adafruit MPL3115A2 library in your sketch.
    • Create an instance of the sensor and begin communication.
  4. Reading Sensor Data:

    • Use the provided functions in the library to read pressure, altitude, and temperature.

Example Arduino Sketch

#include <Wire.h>
#include <Adafruit_MPL3115A2.h>

// Create an MPL3115A2 instance
Adafruit_MPL3115A2 baro = Adafruit_MPL3115A2();

void setup() {
  Serial.begin(9600);
  if (!baro.begin()) {
    Serial.println("Could not find a valid MPL3115A2 sensor, check wiring!");
    while (1);
  }
}

void loop() {
  float pressure = baro.getPressure(); // Get pressure in Pascals
  float altitude = baro.getAltitude(); // Get altitude in meters
  float temperature = baro.getTemperature(); // Get temperature in Celsius

  // Print the sensor readings
  Serial.print("Pressure: ");
  Serial.print(pressure);
  Serial.println(" Pa");
  Serial.print("Altitude: ");
  Serial.print(altitude);
  Serial.println(" m");
  Serial.print("Temperature: ");
  Serial.print(temperature);
  Serial.println(" C");

  delay(500); // Wait half a second between readings
}

Important Considerations and Best Practices

  • Ensure that the sensor is not exposed to condensation or water as it is not waterproof.
  • Avoid physical stress and excessive heat to prevent damage to the sensor.
  • Use pull-up resistors on the I2C lines if multiple devices are connected to the bus.
  • For accurate altitude measurements, calibrate the sensor to a known pressure or altitude before use.

Troubleshooting and FAQs

Common Issues

  • Sensor Not Detected: Ensure that the wiring is correct and that the sensor is properly powered.
  • Inaccurate Readings: Calibrate the sensor, check for sources of heat near the sensor, and ensure that the sensor is not in a rapidly changing environment.
  • I2C Communication Errors: Check for loose connections and ensure that pull-up resistors are in place if necessary.

FAQs

Q: Can the MPL3115A2 be used with a 5V microcontroller? A: Yes, the sensor can be interfaced with a 5V microcontroller, but ensure that the I2C lines are level-shifted to be compatible with the sensor's voltage levels.

Q: How can I calibrate the sensor for altitude measurements? A: Use the setSeaPressure() function in the library to calibrate the sensor to the current sea level pressure.

Q: What is the purpose of the INT pin? A: The INT pin can be used to trigger an interrupt on the microcontroller when a measurement is ready or when certain pressure/altitude thresholds are reached.

For further assistance, consult the Adafruit MPL3115A2 datasheet and the Adafruit support forums.